
A few months back, we checked in with Mike Cox at The Glass House in San Dimas, California, as he installed a V-butt windshield in a '40 Ford sedan. We didn't know it at the time, but Mike and the owner of the sedan had a couple different glass ideas up their sleeves to make the old sedan a little more owner-friendly, and arguably more contemporary. The first order of business was the aforementioned V-butt windshield, which got rid of the post in the middle of the '40 windshield and created a nearly seamless one-piece windshield. Next up was a one-piece glass conversion for each of the front doors, along with electric regulators.
This treatment calls for the deletion of the vent windows and all the related mechanisms, which attach to the garnish molding. This all had to be removed very carefully since the garnish molding would be reinstalled after the window glass was mounted in place. There is also a channel in the door that the felt channel sits in, which ends where the vent window sat. This required mounting wooden blocks at the front quarter of the door to support the felt channel. And that's in addition to all the mounting requirements for the new electric motor, switch, and window regulator.
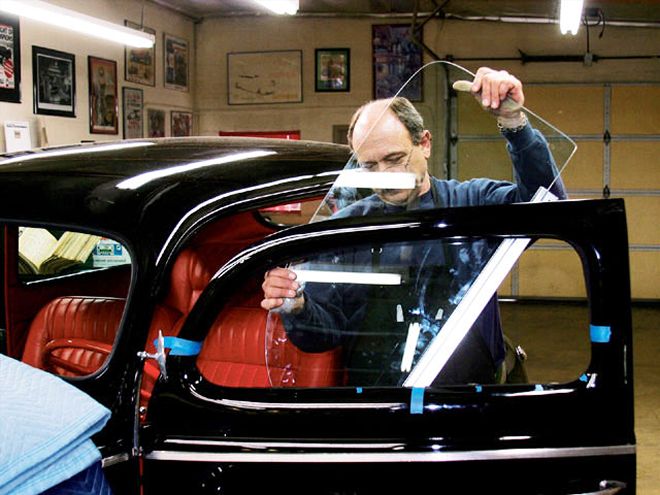
We thought this would be a neat companion piece to the first story, so we headed over to Mike's shop for a little converting. Mike started by removing the vent window, garnish molding, and side glass so we could get started installing all the new components.
Here's the stock window opening with the side glass removed and the vent window still in place. The owner of this particular two-door sedan wanted to get rid of the vent window and convert his doors to electric, one-piece glass. The first thing on the agenda was to remove the vent window, side glass, and any regulator mechanism inside the door.
With the side glass out of the way, the electric window controls could be mounted in the same location as the stock window cranks, maintaining the original look of the interior.
The one-piece conversion made it necessary to move the window regulator to the center of the window opening. The window opening was measured and a centerline marked.
Here's the electric kit that Mike uses. It consists of a screw cable drive regulator and motor, and uses glue-type glass sashes and dual sliding rollers on the mounting head. The rollers allow the regulator to move laterally as well as vertically. Also notice the pattern that had been fashioned. This makes laying out the mounting holes much easier than holding the heavy regulator assembly in place.
The top two bolts went directly into the door structure without a problem, but the lower mount required a little different approach.
With the pattern in place on the centerline, Mike could get an idea of where and how the regulator and motor assembly would mount to the inner doorframe.
For this mount, a bracket was fabricated out of sheetmetal to mount the bottom of the regulator to the door structure. A spacer was also necessary to offset the regulator with the window opening.
The bracket was then riveted to the door structure.
To run the needed electrical wires through the doorjambs, Mike used an EZ Wire Protector kit available from The Glass House. This prevents the wiring from being crimped or bent when opening and closing the doors.
In addition to the side glass, the one-piece conversion kit also comes with a pair of new front metal channels (these run vertically at the front of the door where the vent window was), a pair of unbent felt channels, four pre-bent flat channels for the door and garnish moldings, four spacer blocks, and all the necessary hardware.
The front metal channel was the first part of the kit to be installed. The window was measured with the felt channel firmly in place at each end. This gave the total length of the window with the channel installed; the length is 34 inches for a '40 Ford two-door sedan.
With the regulator in place, the motor could then be secured to the doorframe.
The doorframe was then measured as a comparison. The felt channel at the rear rests against the door, while the front metal channel must be installed at the length of the window with the felt attached.
To ensure the channels run parallel from top to bottom, the lower portion was also measured before being attached to the door structure.
While the felt channel can be bent by hand, it may have a tendency to crimp.A pair of duck-billed pliers can be usedto smooth out irregularities.
Once the length of the window was determined, the front channel was fastened at the top with a sheetmetal screw.
With the front channel in place, it was time to bend the felt channel to shape. The felt channel will follow the curvature of the window at the top, while the back will rest against the door and need to be left long enough to support the window at its lowest resting point.
The front corner was checked for fitment against the glass before the rest of the channel was bent to shape. Once the fitment was tight around the entire pane of glass, it was time to fit it to the door.
Careful work with a pneumatic Sawzall or cutting wheel made short work of removing the tab from the door.
Once the tab was removed, the felt channel was temporarily placed in the door channel while the flat channel was checked for fitment along the windowsill. Note how the flat channel is long at the front.
Before the felt channel and glass were installed in the door, a tab of metal that supported the vent window needed to be replaced.
The extra length of flat channel was carefully trimmed with a pair ofshears until it fit nicely between the front and rear feltchannels.
Here's the sash and roller mechanism that attaches to the bottom of the door glass.
The sash was centered on the glass before it was gently tapped into place using a rubber mallet.
The flat channel was then held in place with the five provided screws. Make sure the screws mount below the felt line so as to not scratch the glass as the window goes through its travel.
With the sash installed on the window and the felt channel in the door, the side glass was slid into place.
The roller mechanism was attached to the regulator once the window was put in place.
The one-piece conversion kit also comes with four spacer blocks for each side. Because Ford used a rubber gasket for the vent window, there is no channel built into the door to mount the felt channel. The wood blocks were attached to the door using Liquid Nails. The felt channel was then attached to the door channel and the wood block using black silicone the entire length of the channel.
The side glass was adjusted down to the lowest preferred position, where it was marked and a stop screw was installed to ensure that it would go no farther than it should once the elecric motor takes over.
Last were the removal of the vent window assembly from the garnish molding, the attachment of the new flat channel, and the reinstallation of the door. This involved removing the factoryFord rivets that hold the assembly together and cutting the vent window molding away from the garnish molding before the new flat channelcould be attached.
The Glass House
909-592-1078
www.theglasshouse1.com