They are like butt-ugly zits on your paint job. They might be evidence that your machine is driven and not just another garage queen, but regardless of how you view those chips, they are blemishes on what could otherwise be a great paint job. We have had a bunch of self-imposed paint scars on our El Camino courtesy of 18-wheeler pot shots we received on the Hot Rod Power Tour(tm) several years back. It finally got to the point where all we saw were those three big dings in the paint every time we looked at the car. Something had to be done.
Rather than make a bad situation worse with our custom flame-job skills (the movie Edward Scissorhands was really about us), we decided to go back to the source, our buddy Pete Santini, owner of Santini USA Paint & Body. This was actually not the first time we'd talked to him about the chips in the El Camino. "Man, that's tough," Santini said. "The chips are in the fogged section of the paint where it's tough to match because of the yellow fade."
"You can do it," we said, "You're the man!" Little did we know how right we were. After we assured Santini we wouldn't take his 440 'Cuda hostage if the paint fix didn't match, he agreed to help. Then we told him he only had four hours to do the whole job, but we waited until we got there to spring that one on him. Despite our urban guerrilla ambush, Santini showed us the tricks he's learned over the last 30 years of doing this stuff. That's why he keeps us coming back.
The Quick Fix
When those of us not comfortable with a professional paint gun in our hand think of paint-chip repair, we think of the classic "just jab some paint in there with a match stick" routine. As you might imagine, there's a little more to it than that. We'll take the easy route at this stage and assume you're dealing with a chip in a solid-color paint job that's a color base with a clearcoat. We asked Santini if those little paint-chip bottles really match to factory paint and he just snorted and said, "Maybe one out of ten will be close." This means if you don't have paint left over from the paint job, you're probably going to have to paint-match your color. Work with your local paint supplier, but assume it will be expensive. Santini says he paid $424 for a gallon of standard color that was not a custom mix.
To fix the small chip in the solid red quarter-panel on our El Camino we used the paint-dab approach. Start by smoothing the edge of the chip with 1,000- or 1,500-grit wet/dry sandpaper. To apply the paint, Santini says the best approach is to use a fine-tipped brush, but he's seen guys use a soft leaf off a tree in a pinch. Dab the paint and let it dry before adding more. The idea is to fill in the crater to just slightly above the original paint level. If you add too much, you will probably sand through the surrounding clearcoat. You want to avoid that. It may take an hour or so between fill attempts for the paint to dry, and if you have to take three or four shots at filling in the chip, this process could take most of one day. Another approach is to do one shot at filling in paint per day, which also allows the paint to fully cure before you add more.
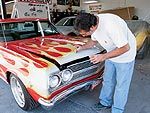
 Our flamed '65 El Camino suffered from several nasty chips scattered across the white fade portion of the flames Santini laid down more than seven years ago. We removed the hood letters to give us more working room.
Once the paint is properly filled in, Santini suggests 1,500-grit wet sandpaper wrapped around a short length of paint stick to sand the small bubble down smooth. Work slowly here to remove only the material necessary. Finish this off by buffing the area with a fine polish and you're done.
The Paint-Chip Challenge
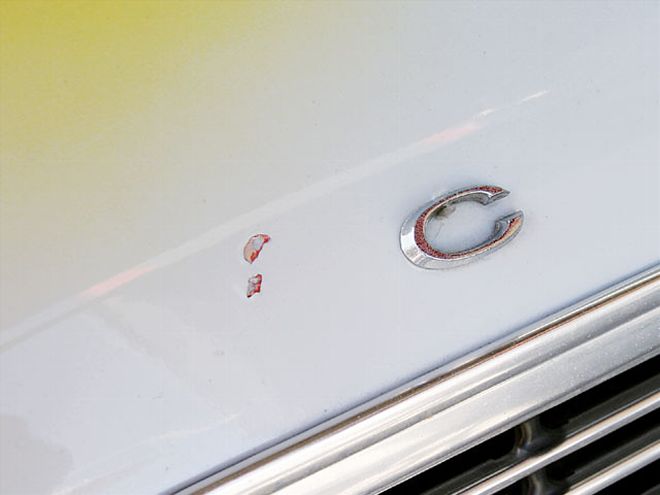
The paint chips in the leading edge of the hood of our Santini-flamed El Camino all occurred in the white portion of the flame job, but all three seemed to have different hues. Santini tried the paint dab trick, but even custom-mixing the paint didn't work. Several attempts at dabbing paint only made the repair look worse than the original chips. "I knew this was going to happen," Santini said. "We're gonna have to spray these out." We acted grateful.
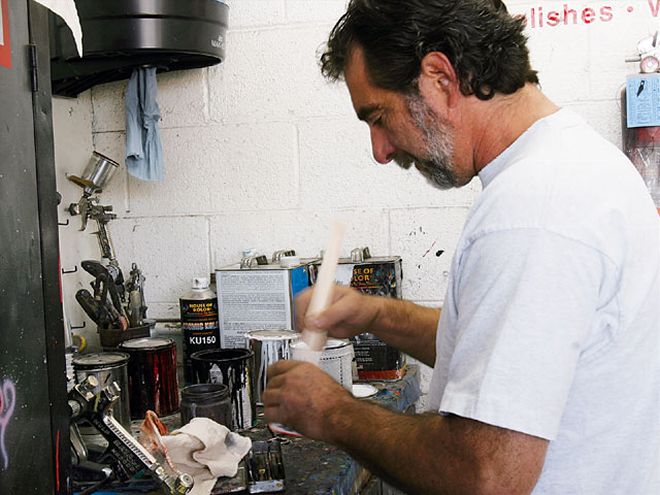 Santini experimented with mixing paint to come up with the best mix. He told us that it's not uncommon for the paint to get darker as it dries. The good news is that if paint is not catalyzed but well sealed in a cool, dry storage place, it can last for years.
The difference was worth the effort. Santini quickly filled in the offending chips with a filler, lightly scuffed a larger area around the chip, then masked the flames and the hood trim. With a small HVLP detail gun, he used the same paint mix that he had used to dab the chips, and instantly the flaws disappeared. He followed that up with a clear that had to sit for several days before it could be lightly rubbed out and buffed. It was literally that easy. Even before the repair was rubbed out, we could not tell that there had been an ugly chip there. So chips are not the end of the world, even for a flamed cruiser like ours. Oh, and just for the record, Santini is the man.
The Clear Advantage
After spending the better part of the day watching Santini fix those nasty chips in the leading edge of the hood on our El Camino, it occurred to us that maybe there's a way to prevent these problems from occurring again. Our El Camino is like driving a barn door through the wind, and it seems like every bouncing projectile and rock aims right for the leading edge of the hood. Then we remembered hearing something about a clear plastic mask you can apply over existing paint that protects it from rocks and other abusive projectiles.
3M offers a product called ClearMask that is just that-a very thin plastic mask that adheres like a large see-through decal. The ClearMask decal can be purchased as a kit for '00-up year cars, or you can buy a 10-foot-long by 2-inch-wide strip for $18.50. The plastic is a total of 0.008 inch thick and will protect your paint from all those nasty little heat-seeking Bouncing Betties that are always attacking your paint. We also priced a custom kit for an '02 Camaro that would cover the leading edge of the hood, both front fenders, and the mirrors for a mere $68.75, with upgrades that could total $97.02. It might be worth looking into if you're ready to try something new.