 | Engine Diagnostics Part Two
Cars are becoming increasingly reliant on electricity. Fifty years ago the extent of a car's electrical system was to crank the engine over, keep it charged, ignite the air/fuel mixture, and power some lights. That was about it. Vehicle electrical systems of today control everything from fuel delivery, to emissions control, to power steering and brakes. But it's still in charge of those same routine tasks it was 50 years ago. All of which is enough to make today's vehicle electrical systems rather daunting for the do-it-yourself mechanic. It's even enough to overwhelm more than a few pros. That's why there are auto repair shops that specialize in nothing but electrical diagnosing and repair. But that doesn't mean the next time you find yourself in an auto electric jam you need to source out one of those specialists. All that's required to diagnose the situation is a basic understanding of the system, a few tools and some patience.
You might recall part one of our engine diagnostics series in January. We covered most of the preliminary steps and testing procedures required when an engine-related problem is suspected. Maybe you read it. Maybe you didn't. Either way, we're moving on to part two, where we'll take a look at the engine-related electrical system and some of the more common problems associated with it. Read on. Empower yourself. Maybe the next time your buddy's car won't start you can be the hero who figures it out.
 | 1.
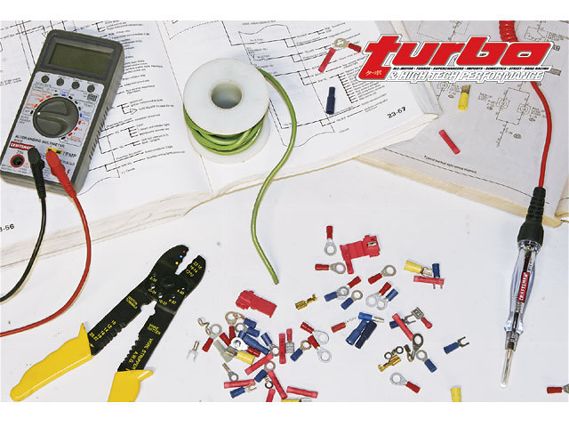
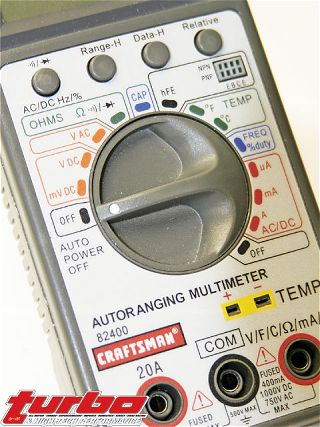
| 1.If you don't have a DVOM or multi-meter, get one. This Craftsman one is inexpensive and is usually all we ever need to figure out why a car won't start or hold a charge. Most multi-meters can read and measure DC and AC voltage, amperage and resistance, which are really all you need to diagnose almost any automotive electrical problem.
We mentioned last time the four elements an engine needs to operate: fuel, air, spark and compression. Obviously we'll be touching on that spark part this time around. A vehicle's electrical system can be broken down into subcategories, or systems, including: cranking; ignition; charging; computer and sensors; emissions; accessory circuits; lighting, signaling and dash instruments; and audio. Phew. When it comes to engine performance, it's the first four we care about. We could devote an entire chapter of a book to each of these systems, but we've got to make it bite-size. For now we'll focus on the first three and leave the rest for some other time. But before jumping into any diagnosing procedures, a brief overview of how electricity works-especially when it comes to automobiles-isn't such a bad idea. (Fig.1)
Electricity is used for thousands of things. It converts itself into stuff you need like light, information, sound or power. The process begins with lots of talk of complicated atoms, electrons and conductors and ends with really just a bunch of electrons moving through a circuit. The number of electrons moved is the current, and is measured in amps. The pressure exerted by the electrons is measured in volts and determines the amount of work that can potentially be accomplished. Any electrical source wants to move current out of its negative terminal at a specified voltage. Connect a wire from the negative to the positive terminal and you have a circuit. Splice something in between the circuit-any load source-and it'll be powered. This is so oversimplified it's not even funny, but it's the process in short. You'll always have a source (a battery); a load (the vehicle's components that require electricity); and positive and negative wires to make a circuit. Sounds simple enough.
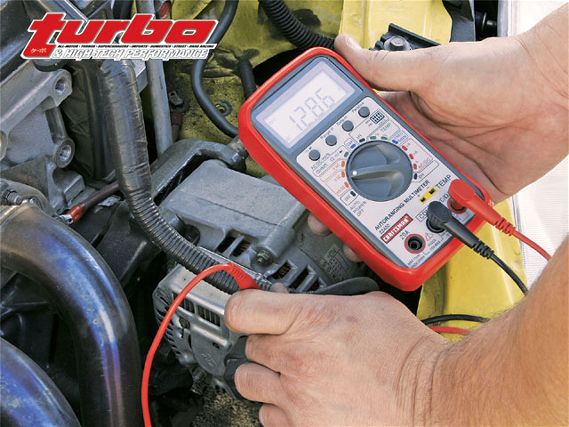
 | 2.
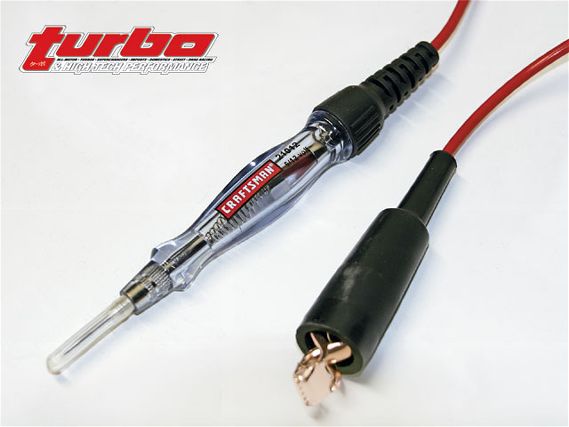
| 2.Having a test light in your toolbox is a small price to pay for what it can do. Yes, the same information can be found with the multi-meter, but the clamp-on terminal makes this so convenient for sourcing power, or a lack of power. The light is handy too.
The Cranking System
An engine can't start if it's not rotated. If you were alive 100 years ago, your arm would be your Model T's cranking circuit. Today we have starters. The cranking system is responsible for transferring power from the battery to the starter. The process is pretty straightforward and is made up of five parts: the battery, starter solenoid or relay, starter motor, starter drive and ignition switch. The ignition switch is fairly simple. It activates the starter solenoid or relay when the key's turned over. For any cranking system problems, your best bet is to check out the battery and starter first.
The battery stores the necessary electrical charge to provide current and voltage for the starter to work, as well as for powering anything else in the vehicle that exceeds what the alternator or generator is capable of. The battery also serves as a voltage stabilizer and can release and soak up large amounts of current during both starting and engine operation. There are a few cases where you might first suspect the battery as being the source of an electrical problem like: dim headlights, slow engine cranking, starter solenoid clicking, or when the battery itself won't charge. In each case, the easiest thing to do is first check the battery terminal connections, make sure they are tightened properly and free of corrosion, and then look for any applicable blown fuses.
 | 3.
| 3.The first thing to look for anytime you suspect a charging problem is a loose, worn or thrown alternator belt. The alternator has to spin at a certain rpm in order to work properly. It can't do that if ribs are missing or if the belt's not tensioned properly.
Next up would be the voltage test, then a load test and drain test. A voltage test will tell you the battery's state of charge-anything over 12.4 volts is good, while anything less will require a charge or possibly replacement. You need to remove the surface charge. Do this by turning the high beams on for 30 seconds or so if the car has just been driven, then test. While all you need to do a voltage test is hook up a common DVOM (digital volt and ohm meter), also called a multi-meter, to the battery terminals and read, load tests require more expensive equipment but will give you a bit more info, like cold cranking amps. Why should you care about cold cranking amps? Because the more cold cranking amps you have, the more available voltage you have for starting, even after the engine has been trying to crank over, even in cold weather. As you might expect, a load tester creates an electrical load on the battery. It measures how many amps it can provide at 0 degrees Fahrenheit for 30 seconds. Like the voltage test, remove the surface charge but look for a reading over 9.6 volts here-any less after a couple of tests and you can plan on replacing that battery. A multi-meter can also be used to perform a drain test. Do a drain test if you suspect something in the vehicle is drawing current when the vehicle is off. It's simple: Just disconnect the battery ground cable and use the multi-meter to measure resistance between the cable and the ground terminal. A drain larger than .050 amps should be fixed. This isn't a bad test to do anytime a battery is about to be replaced. If there is a drain, replacing the battery with a new one might end up being just a temporary fix. Finding the source of a drain isn't too difficult either. With the multi-meter connected, pull one fuse at a time until the amps reach the acceptable level. When that happens, you've located the drain source and it can be repaired.
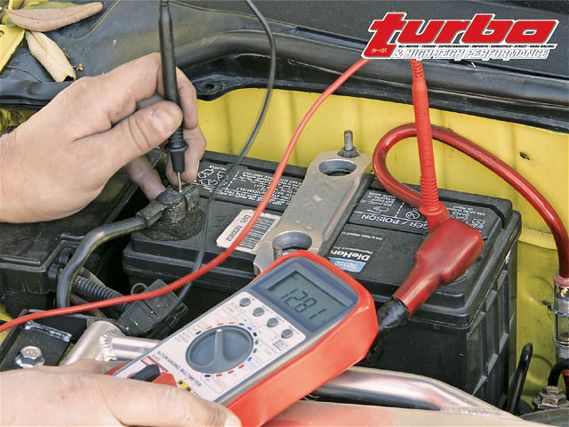 | 4.
| 4.A quick voltage test is the easiest way to check a battery: Set the multi-meter to read DC voltage, connect its leads to the battery's terminals and see what you get. A healthy 12-volt battery should read at least 12.4 volts after the surface charge is removed.
Battery checks out? Time to look at the starter. A starter is just a small electric motor that's able to produce a few horsepower for a few seconds at a time. It's what gives the engine its kick-start. It consists of the motor itself, and a solenoid or relay that acts as a switch, as well as a drive gear that transfers power from the starter motor to the engine. A lot of times, just because a car won't start doesn't mean it has anything to do with the starter-no matter how convenient that might be. But you should check the starter when you can hear its motor whine or grind, or when it rotates slowly or not at all. Also, be sure engine speeds are above 100 rpm when cranking. Starter whining and grinding noises can usually be traced back to a worn starter drive gear or damaged flywheel, while a cracked starter housing or improper starter pinion clearance are signaled by grinding sounds. A vehicle's interior dome light can also tell you a starter's status. The dome light should slightly dim when a starter's operating properly. If it remains bright or goes out, it's time to either check the starter circuitry, or the starter armature or field coils.
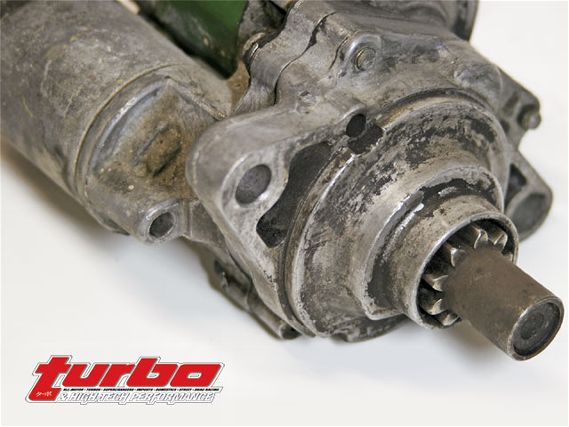 | 5.
| 5.There are several parts of a starter that can fail. Common ones include: the motor, the solenoid or relay, and the drive gear. A good working drive gear will have all of its teeth present and be evenly worn.
There are several tests that can be performed to check the starter system. The two easiest ones are the voltage drop test and amperage draw test. Voltage drops when current flows through a resistance-the higher the drop, the greater the resistance. High resistance leads to slow engine cranking or a starter that just clicks. The voltage drop test will tell us the difference between the voltage at the source (the battery) and the voltage at the device being tested (the starter). For a voltage drop test, disconnect the ignition and connect the multi-meter's leads to the battery's negative terminal and to a good chassis ground. Crank the engine and observe the results. The engine must be cranked over in order for current to flow. Perform the same test on the starter and compare the results. Just connect each of the multi-meter's leads to each end of the cable being tested. If the difference is more than .5 volts, check all connections and terminals and the cables themselves. A cable that's hot to the touch under cranking is a sign of high resistance and should be checked or replaced. An amperage test, which requires more specialized equipment, should be done if the starter still cranks slowly and the battery and all cables check out. The test can be done either on a bench with no load applied, or in the vehicle. Check your service manual for acceptable current draw. If it's reading too high, check the battery for appropriate supplied voltage, otherwise there's a problem with the starter's armature, cables or internal windings. Time for a new one.
Sometimes the problem might be the ignition switch itself. This can be checked by performing a continuity test between the switch's two terminals and comparing the results with your service manual. You can also bypass the switch with a remote starter or jumper wire to see whether or not the starter works. If the problem persists, be sure and check any relays, clutch switches (manual transmissions) and neutral position switches (automatic vehicles) in accordance with your service manual.
 | Engine Diagnostics Part Two
The Ignition System
The ignition system is really responsible for the whole spark part of the fuel/air/spark/compression formula. Its job is to produce and distribute 12 volts to the ignition coil and at least 40,000 volts to the spark plugs. If there's a problem here, the car won't start, and if it does it will misfire, hesitate, stall or fail an emissions test. An ignition system consists of a primary and secondary system. The primary system is made up of the battery, ignition switch, primary windings of the coil(s), pickup coil or crankshaft sensor and ignition module (igniter). The secondary system is made up of the secondary windings of the coil(s), distributor cap and rotor (if applicable), and spark plugs and wires (if applicable). That's a lot to chew on. It's also a lot to contemplate when an ignition problem is suspected. The trick is checking things in the right order, with the right tools, and knowing how to interpret the results so you're not throwing money at the wrong parts.
 | 6.
| 6.If the charging system checks out, a common place to look for a no-start condition is with the coil. Whether it's a distributor- or distributorless-type ignition system, the coil is basically just a big transformer that creates its own magnetic field to create the high voltage needed for spark. Measure the resistance between the coil's two primary winding terminals to check its condition. You can also check the secondary tower terminal's condition with a multi-meter.
One of the first things you should do is check for spark if you suspect an ignition system problem. Remove a plug from the cylinder, reconnect it to its respective wire, position the electrode a few millimeters away from any metal part on the engine, crank and look for spark. It's not as accurate as using a spark tester, which forces the spark to jump a wider gap, but it works. But you'll be able to tell if there's no spark or an intermittent one in either case. This could be due to a faulty coil, plug wire or ignition module. Check for voltage at the coil's positive terminal with a multi-meter (by the way, if you have a coil-on-plug ignition, this is where you'll want to begin testing).
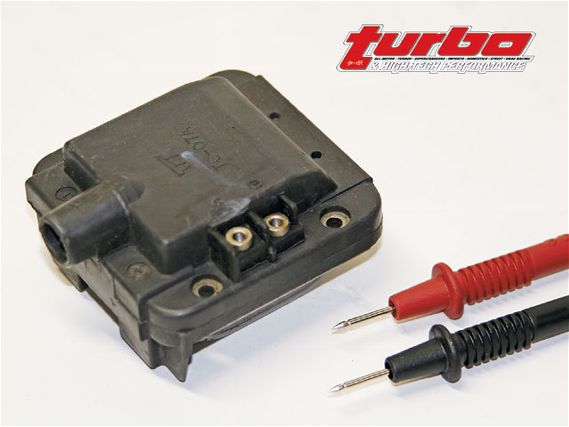
| 7.
The ignition control module opens and closes the primary ignition circuit through a ground path. Its job is to supply battery voltage to the positive side of the coil. Make sure it's grounded properly and is receiving power, otherwise the coil won't be receiving any juice.
But before diagnosing any ignition problem and breaking out the tools, check and make sure all of your spark plug wires are routed in the right firing order and connected properly (if applicable), that your plugs are clean, and that the distributor cap and rotor (if applicable) are in good condition. A damaged or corroded plug wire or cracked cap will reveal a spark if you check things out at night. Be sure and measure the resistance of the plug wires to make sure they're within specifications too. You can also check to see if intermittent engine missing is due to a spark-related issue with nothing more than a spray bottle full of water. Just lightly mist water over the spark plug wire and distributor area and look for any signs of arcing while the engine is running. Hooking up a test light to the coil's negative and positive sides will also reveal whether or not the ignition is the cause of a rough-running engine. The light should be dim and steady. If it pulses or varies, there's excessive resistance somewhere in the circuit.
Even ignition timing can affect engine starting and operation. Excessive timing, either advanced or retarded, will make for difficult, slow starts and possible overheating, not to mention a loss in power. Be sure and use a quality timing light, preferably one that hasn't been dropped on the shop floor, and adjust the timing to the factory specifications.
 | 8.
| 8.When troubleshooting a distributor ignition system, be sure to inspect the distributor's rotor for wear, carbon buildup and free-play. Rotors can come loose from the distributor shaft and cause either a no-start or poor running situation.
The Charging System
We know the battery supplies the current and that it's part of the primary ignition system, but without a charging system, it wouldn't last very long. Alternators, also called generators, use electromagnetic induction to generate electricity in order to keep the battery fully charged. Alternators generate alternating current (AC), which must be transferred to the battery. But car batteries can only use direct current (DC), so diodes within the alternator convert AC to DC to make everything happy. There are a couple of tests that should be performed if you suspect a problem with your vehicle's charging system, or if you just saw your charging light pop up on the dash. But before doing anything, make sure the alternator belt is tensioned properly and that the ribs aren't worn out. Now would be the time to look for any blown fuses. Then check to make sure the alternator's not producing AC voltage. With the multi-meter set to read AC, connect the leads to the battery terminals and run the engine at 2000 rpm with the headlights on. If you see more than .5 volts of AC, the diodes are bad.
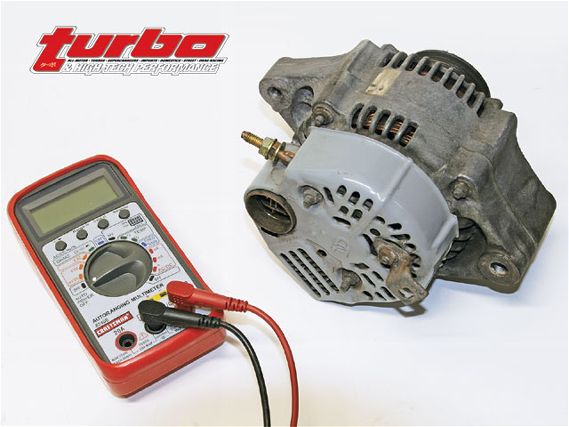
 | 9.
| 9.A voltage drop test on your alternator will tell you whether or not there's too much resistance present or if there's an open circuit somewhere in the system. Either condition is bad and needs to be taken care of.
You'll also know there's a problem with an alternator if you keep going through batteries. To check charging system voltage, connect both multi-meter leads to the battery terminals and measure voltage at your service manual's recommended rpm point. If voltage reads too high, check the alternator's and voltage regulator's electrical connections. If it's too low, it could still be a wiring problem or the alternator itself, but more tests should be done. Checking the alternator's rear bearing for magnetism will tell you whether or not the voltage regulator and generator brushes are working, and if the rotor's producing a magnetic field. With the engine running, use a metallic object to check for magnetism at the rear of the housing. Charging current can't be produced without this magnetic field present, so make sure it's there.
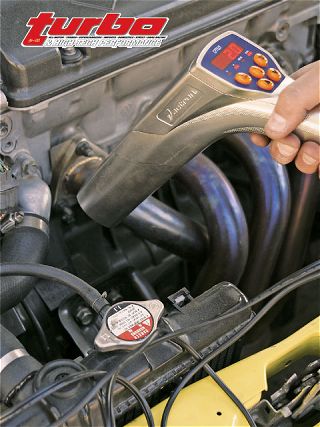 | 10.
| 10.Timing has to be pretty far off to make for a no-start condition. But if it's off by only a few degrees, then drivability, gas mileage, emissions and performance can suffer. Be sure to use a good quality timing light that hasn't been dropped. Timing lights like this Actron one have advance and retard controls, which makes it much easier and more accurate to set timing anywhere other than stock.
Like we did for the starter, you can also check voltage drop for the alternator. Operate the engine at a fast idle again with the headlights on, and connect the multi-meter's leads to the output terminal of the alternator and the positive terminal of the battery. Readings over .4 volts mean there's too much resistance, while readings equal to the battery's mean there's an open circuit somewhere. Check that the alternator is properly grounded by connecting the multi-meter's leads to the negative battery terminal and the alternator's housing. The reading should be less than .2 volts under a fast idle with the headlights on.
Keep in mind, we've barely touched on all of the tests that can be performed on a vehicle's cranking, ignition and charging systems, but these will get you started and, most importantly, can be done with less than $50 worth of tools. There are several internal components of both starters and alternators that can each be tested and replaced. Tests like these require specialized, not to mention expensive, equipment that even we don't have. But that's OK. With the tests mentioned above, we can at least pinpoint the problem to, say, the starter, with an educated guess that it just might be its pinion clearance, for example. This narrows down the possibility of buying a bunch of parts that we don't need.
Voltage Unit for measuring electrical pressure.Ohms Unit for measuring electrical resistance.Amps Unit for measuring electrical current flow.AC Alternating current varies both magnitude and direction (your house).DC Direct current has a constant magnitude and direction (your car).Resistance The degree to which an object stops the passage of electrical current.Circuit A conductor through which electrical current flows.