
Late last year, with the help of my good friend Shaun "Old School" Joseph, I installed an OEM FD2 frontend on the Project Si. Just 12 hours after finishing the process, I drove my grey sedan with an ugly white frontend to DTM Autobody to have it color matched. Shortly after, I purchased and installed an FD1 trunk lid and Back Yard Special wing and also had them painted to match. It's been a number of months now and though DTM did an absolutely outstanding job on the color match and blend, the sun and Mother Nature have taken a toll on the updated paint. Slight shrinkage and some dulling began to pop up, especially on the hood and trunk. It's no show car, but I've been known to be a bit of a clean freak with my builds and every time I pulled into the garage and saw the dull appearance increased by the overhead fluorescents, a bit of OCD tugged at me. The problem is something many can relate to as JDM frontend conversions have become common amongst Honda enthusiasts, and having a complete frontend color-matched is common practice.
I contacted RJ de Vera of Meguiar's to see if he and the other experts at his office could offer some insight. RJ advised me to bring the car by their garage, just a few blocks away from HT headquarters, so they could take a look at it. Michael Stoops and Mike Pennington took the time to look the sedan over. Stoops serves as the Internet technical specialist, but has many years of top-level professional detailing experience. Pennington not only knows about what works well from the past, but he's at the forefront of what's new, as he's a global director, and handles training and customer care. After discussing what they saw, they offered up a few ideas. The first, and the one that most would look toward (I know I did), was color sanding. The process is serious business as it involves taking specialized sandpapers to your car's finish and removing all orange peel and any signs of paint defects. The results, a glass-like, show-quality finish carry some inherent problems, most notably a reduced clear coat. With only about 1.5-2.0mm of factory clear coat, thinning that protective layer means leaving the car more susceptible to damage from the environment and various elements. Everyone wants the ultimate finish, but at what cost? As many of HT's readers drive their cars daily, paint protection is something that should be at the top of their list.
The other option was to avoid color sanding completely, maintain the protective clear coat, and instead work toward smoothing and refining the frontend but actually matching its texture to the factory orange peel. I was all for option B, and thought it would be a great article to capture, instead of the rather dry, "How to wash your car properly" articles that I've always skipped right over. This is next level stuff, done by true professionals. And please trust me when I say that these guys eat, sleep, and breathe all things detail-related. The way you and I feel about Hondas and performance, is exactly how they feel about car care.
The night before my day at Meguiar's, I gave the car a complete wash from top to bottom. I'm not going to bore you with photos of dipping a sponge into a bucket of water, as I'm confident you're a big boy or girl and you've done this over 1,000 times. I will, however, note that using a dual bucket system; one for clean soapy water, the other water only, to free dirt and debris from your sponge is essential, as is using the right cleaning device like a micro fiber wash mitt. Drying duties should be left to ultra soft waffle weave microfiber towels in order to avoid swirls.
After the steps explained in the captions were complete, the final bit of wax wiped off with ease due to the non-existent contaminants and the ridiculously smooth surface from the heavy cleaning process. The car takes on a whole new appearance, and running my knuckles across the entire car, it felt slick and ultrasmooth to the touch. Severe problem areas like the section of hood closest to the windshield that were once murky and clouded, are now crystal clear and reflective.
Maintaining the look and feel of the paint is really no different than before the Meguiar's makeover. Proper washing technique, followed by proper drying and a coat of Meguiar's Quik Detailer is what I'll be sticking to. Waxing a few times a year along with claying the car when needed is still in the cards, and because Meguiar's was able to keep my clear coat intact, I'll have plenty of protection. Mission accomplished.
Even though I thoroughly washed the car prior, there were plenty of contaminants on the paint's surface. They couldn't be seen, but they could certainly be felt and the guys at Meguiar's recommend detailing clay to start with. Here you can see Meguiar's off-the-shelf Smooth Surface Clay and Quik Detailer used to pull up quite a bit of debris and bonded contaminants that were stuck to the paint surface.
 | Project Honda Civic Si Detailing - All In The Details
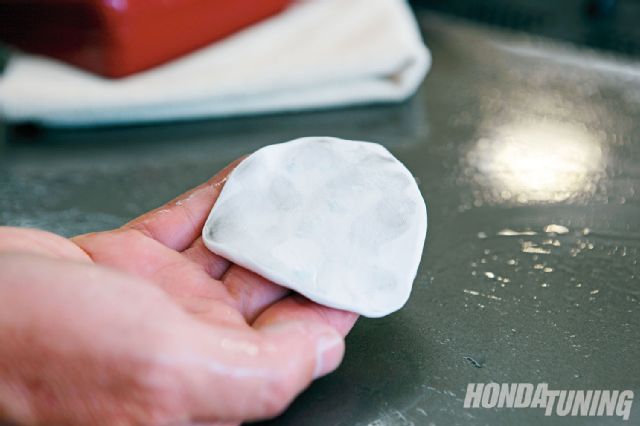 | Meguiar Smooth Surface Clay And Quik Detailer 03
 | Project Honda Civic Si Detailing - All In The Details
Tape is applied to the moldings, plastics, and intricate bits like the sidemarkers. This keeps from damaging anything with machines, and also avoids cleanup headaches.
 | Project Honda Civic Si Detailing - All In The Details
 | Project Honda Civic Si Detailing - All In The Details
Mr. Stoops cleans the application pad prior to getting started with Meguiar's M105 Ultra Cut Compound.
 | Project Honda Civic Si Detailing - All In The Details
 | Project Honda Civic Si Detailing - All In The Details
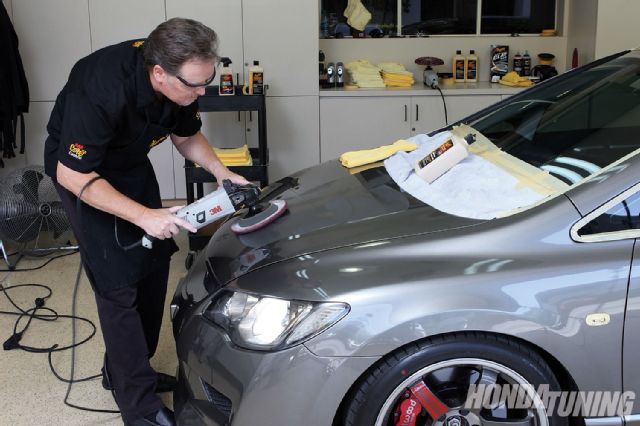 | Meguiar M105 Ultra Cut Compound 09
With the heavy clean up process complete, the cars finish looks brand new, but it's not over yet. Pennington and Stoops begin the "shine and protect" steps with a Meguiar's DA (dual-action) polisher over the entire surface of the car.
 | Project Honda Civic Si Detailing - All In The Details
 | Project Honda Civic Si Detailing - All In The Details
 | Project Honda Civic Si Detailing - All In The Details
 |
|  |
| Shine-ology-Tools of the trade
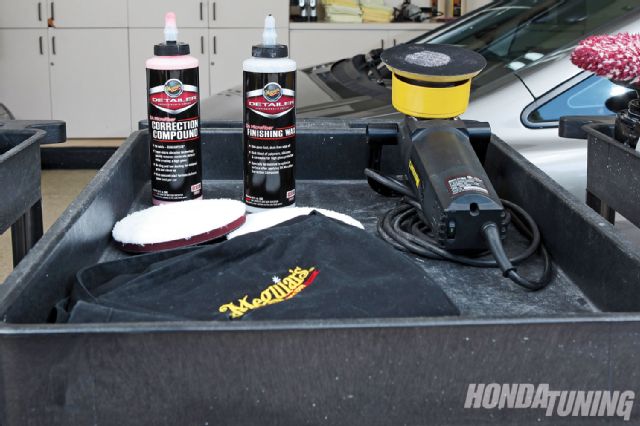
Hardcore
This cart is armed with the tools used for heavy clean up and, in my car's case, to help with some of the shrinkage. These are serious compounds intended for use by people that really know what they're doing (that pretty much excludes me, but I'm learning!).
 | Project Honda Civic Si Detailing - All In The Details
- Type of polisher (Rotary Buffer)
- Meguiar's M105 Ultra-Cut Compound (with wool pad)
- Meguiar's M205 Ultra Finishing Polish (with soft foam pad)
- Meguiar's M34 Final Inspection
Note: These items are for experienced detailers only. Swirl marks, burning through paint, ruining your finish-all are things that can happen if you don't know what you're doing.
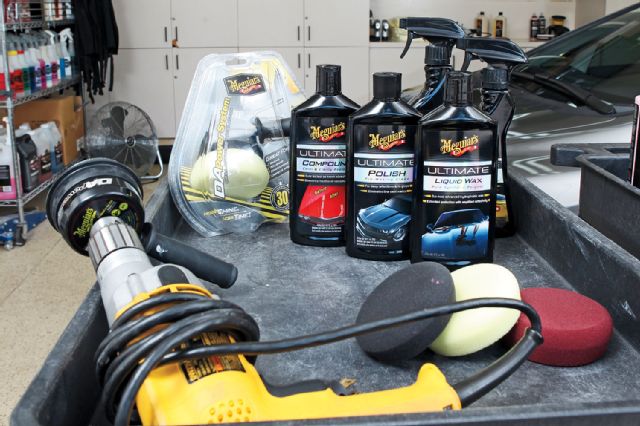
Experienced /"Prosumer"
This cart carries Meguiar's products used after the initial clean up, to give us the shine and protection along with a good-looking finish.
 | Meguiars Experienced Prosumer Package 16
- Meguiar's dual-action polisher with finishing products
- Meguiar's DA Microfiber Correction Compound
- Meguiar's DA Microfiber Finishing Wax
DIY/Maintenance
These compounds are extremely affordable and safe to use by anyone as they're very user friendly. The DA Power System connects to a standard drill and doesn't require years of experience to get excellent results.
 | Meguiars DIY Maintenance Package 17
Mike and Mike's notes
Machine speeds should be kept to a minimum in order to avoid generating too much heat. A slow, uniform, overlapping motion is used so that no areas are missed. The pad itself is kept flat, almost like painting to avoid any damage. The work area on each panel consists of no more than 2 square feet using an up and down motion, then side-to-side to cover each panel evenly and thoroughly. The machine should be left to do its job. That is, the operator should really only be guiding the machine while it does the work.
The steps
1. Rotary with wool cutting pad and M105 to remove all of the defects
2. DA (dual-action) polisher with D300 DA Microfiber Correction Compound and microfiber cutting disc to remove any and all swirls created by step 1 (speed setting 4)
3. Switched to micro-fiber finishing disc and D301 DA Microfiber Finishing Wax which was used to add gloss and protection with the DA (speed setting 3)