With the frame cleaned up and looking good, the days to follow contained more of the same. All the chassis components were broken down, and given the same treatment as the frame—degrease, clean and wire brush, then prep and paint. Our welder buddy Corey Miller of Miller Fab stopped by to drop off our valve cover that we had him TIG weld. While in the presence of such mastery of welding, we did what any normal person would do; we put him to work finishing up the welds on our upper control arms that we tweaked As the pieces were readied for assembly, we once again went to our large pile of parts that we ordered up from rockauto.com. We just can’t say enough great things about our experience with them.
The parts we ordered were the pieces we needed to get the Ol’ LUV safely back on the road: ball joints and tie rod ends. Anyone whose had a ball joint fail on their ’bagged truck can attest to that being money well spent. Oh, and we got all new brake components, too. Now when we say all new brake components, there’s all the hard parts like rotors, pads, drums and shoes, and of course the springs, all of which were subject to being exposed to the elements for all those years. In fact, when we drug the thing out of the field one of the front wheels was frozen up with rust. But that’s not all the bits you need to be concerned about, there’s also the hydraulic portion of the system, the master cylinder, hoses, calipers, and wheel cylinders. Now the thing you need to know about this part of the system is more about the fluid itself. Brake fluid is what’s called “hygroscopic” meaning it readily absorbs moisture, and even though the system was kept closed all those years as it sat out in that field, moisture was slowly absorbed into the brake fluid. With moisture now in the system, the internal bores of things like the master cylinder, calipers, and the wheel cylinders start to corrode and instead of having a nice smooth surface for the seals of said components to ride on and seal against, they now move on a rough and jagged surface tearing the seals. The worst-case scenario is total brake system failure—slam on the brakes and nothing … your foot goes straight to the floor!
Another thing we got from rockauto.com was a gasket kit to reseal the engine. There’s not going to be an easier time to reseal and detail it than when it’s sitting on the shop floor in front of you. Just like the frame and the rest of the components, we attacked the engine and transmission with wire wheels, brushes, and even a die grinder and sanding disc to tidy up some of the casting marks. Once cleaned and degreased to satisfaction, we laid down a couple coats of high-temp engine paint—nothing fancy, just an off-the-shelf spray can. We chose to do a two-tone with Chevy orange on the bottom, and “New Ford” grey on the top. Follow the instructions on the label to prevent any unwanted paint reaction from occurring.
With the chassis on point, we started to look at our options for how to control the uppie-downie function of our suspension. We opted for a manual valve block named after a red S-10 from an old Kid-n-Play movie. The Fourplay block, made by the fine folks at Little Larry’s, was boasting some pretty impressive stats that we just had to test out for ourselves. A CNC-machined billet manifold type system with a single inlet and one outlet to each of the ’bags—it’s even already equipped with outputs for gauges too. Nothing screams old school like a nice set of manual valves, so with that we placed an order. Upon arrival, we can say this thing is nice. The machine work is top-notch, and upon closer inspection, we found internal rollers on the ends of the valve levers that give ultra-smooth movement. Stay tuned and see when we hit the switches for the first time. If this valve block works half as good as it looks, it’ll be awesome!
Corey Miller did a great job with the valve cover that he TIG welded, so we lined up more work for him.
-

-

Damn, this kid can weld! De-burred and painted—our arms are looking good!
We started to pick away at our pile of parts we ordered up from rockauto.com. As components were painted, new pieces went on—ball joints and tie rods and brakes oh my!
New wheel cylinders were installed along with new shoes and hardware. If the paint is burnt off your brake springs, they have been affected by heat, and should be replaced.
Our pal, Unca Sean cleaned up the tape residue off our chrome bars, and the four-link, Slam RE-6 ’bags, and KYB shocks all went together for the last time.
Our donor engine was looking a bit ratty. Our tools of choice for cleanup included a selection of wire wheels and brushes, an air puffer, and brake cleaner. The more time you spend here, the better it’ll look in the end, this was a day of fun for sure!
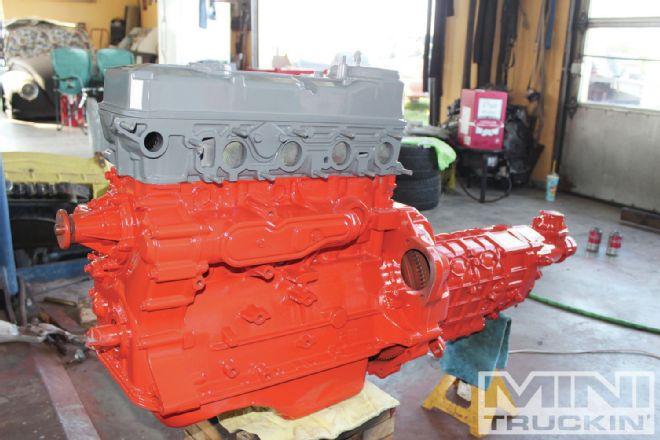
| With our power plant looking somewhat like one out of a model car, we couldn’t wait to finish up painting the brackets and bolt this thing into its home.
It’s hard to believe this frame was just sitting in the field behind it not too long ago.
Our manual valve block from Little Larry’s is just what the doctor ordered, giving us that old school flavor we’re looking for, not to mention a great price and some impressive machine work and stats. Can’t wait to hit the switches for the first time. Check back in the next installment.


