| suicidedoors Bolt On Back Half Install five Link Setup
For this installment of Daily Dime we spent a weekend and tore down the rear of the truck to install Suicidedoors.com new bolt-on back half five-link setup.
This kit is solid and leaves nothing to chance with no guess work. Everything is completely planned out and designed as a complete bolt-on setup so the beginner with moderate suspension knowledge and a good set of tools can tackle this job in their home garage with some help from a few friends. Follow along and see just how easy this kit went on. For more information check out the companies listed in the Source Box.
(1.)First we unbolted and removed the bed, then placed the entire truck safely on jack stands and leveled it out before we began the installation.
(2.)Everything will need to be unbolted to start with a bare frame. Lukasz began by removing the rear shocks.
(3.)The gas tank was next to go and was safely set with the save parts pile since the kit retains the use of your stock gas tank.
(4.)The rearend was setup on stands and the tension is safely loosened on the leaf springs removing them one at a time.
(5.)We no longer need the leaf spring mounts so they are cut away.
(6.)Everything is ground smooth on the frame and we're almost ready to mount our new rear rails.
(7.)The kit comes with templates to mark all the cut locations.
(8.)Now the fun part! Our handy sawzall does its duty making way for our new rails.
(9.)The new rails are clamped in place and mounted. It's a good idea to use cardboard or something to protect the powdercoat.
(10.)The rest of the mounting holes needed are drilled out.
(11.)The kit comes complete with new bed mounts and all the Grade 8 hardware needed to mount the rails.
(12.)Next, the new diff cover was mounted using the supplied hardware.
(13.)Moving right along, the front crossmember that also serves as the new gas tank crossmember is bolted in.
(14.)The rear crossmember is also easily bolted in place.
(15.)Moving back to the rearend, the super pivot link mounts are bolted up.
(16.)Next, the rear air tank crossmember is lined up and bolted in place.
(17.)At this point the gas tank can be jacked up and bolted back in.
(18.)With the rearend in place, the new wishbone is mounted.
(19.)Next, the lower link mounts are bolted under the rear crossmember.
(20.)The 'bags are mounted to the lower link bars.
(21.)Then the lower link bars are lined up and bolted to the super pivot joints installed on the rearend.
(22.)Now the shocks can be attached.
(23.)Before everything is tightened up the bottom link bars will need to be measured and matched, then any final adjustments can be easily made from there.
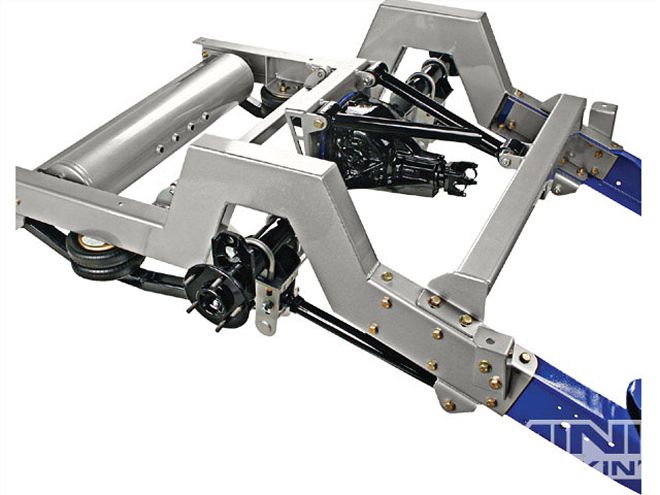
(24.)Now time for the fun stuff. Everything was buttoned up and the fuel lines are attached.
(25.)The brake lines and rearend breather are also run.
(26.)And there you have it! A completely bolt-on back half for your S-10.
(27.)Now all that's left to do is finish up the air management with SMC, Air Lift, and Air Zenith goodies. Stay tuned for a look at Air Lift's Auto Pilot digital control system, and how we tackle the front end.
(28-29.)Here's a look at the up and downs with plenty of lift to untuck a 22-inch wheel, and a smooth ride to boot.


