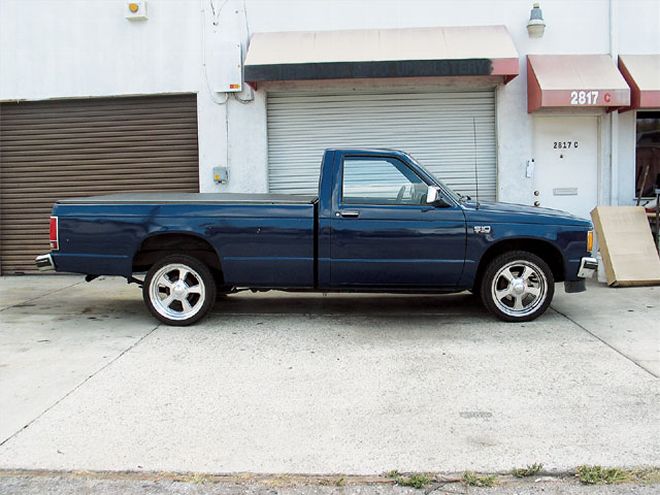
| Our Guinea Pig: Here is the truck at stock ride height with the 18-inch Paradox rims. The front tires measure 25-1/4 inches tall, and the rears are 25. Yes, the rear tires are shorter than the fronts, but that's temporary. I wanted to lower it first. That way, I can order the perfect size.
Last month, we showed you a cheap way to draw your own rendering. The subject of that story was a first-generation standard cab S-10 that I acquired from my mom that will be receiving a low-budget buildup. Initially, I decided to go with a military theme for the paint because I thought it would've been the cheapest to replicate, but that was not the case, so I'm still on the fence about what theme to go with. There will be other elements of the truck that will fall into the custom area, such as the wheels and suspension. That is what this story will focus on lowering the truck on any budget.
While browsing the lmc catalogue, I noticed there were lowering options ranging in price and amount of drop. The funny thing is the lower the truck the higher the price tag for the parts. I wanted the truck to be as low as possible without installing a C-notch, so I ordered the 4/6 kit. This kit includes 2-inch coils and 2-inch spindles for the front, and a new set of leaf springs and 3-inch blocks for theRear. This kit came with a $550 price tag, which is still within my budget but might be high for someone else. With that in mind, I installed the parts separately and broke the prices out for each. I'm hoping this will help you decide how much lowering you can afford.
Instead of filling the pages with how to install the parts, I skipped those pictures and focused on the parts and the results. If you still want to see parts being installed, log on to our website, www.sporttruck.com, where there are numerous lowering articles that show how to install the parts. I wanted to focus on the results of the parts and how much they will set you back. However, I did throw in a few little tips that will help anyone doing this job.
All of these lowering components were installed to complement a certa in wheel and tire combo. I picked up a used set of 18-inch Colorado Customs Paradox rims with some old tires from a close friend. Instead of cash, I re-covered his seat and door panels on his S-10 project. The amount of work I was doing for him would have been around $1,000 bucks, so that is the value of the wheels for me. Since this story is about lowering and not so much about rim choice, you will have to pick wheels that fall in your budget. I'm not going to send you shopping without some knowledge, so there is a sidebar with all of the sizing and backspacing information you would need to order rolling stock.
Instead of throwing the truck up on the lift in my shop, I decided to take one for the team and do the job out front on jackstands. A standard set of mechanic tools like wrenches, sockets, pliers, jacks, jackstands, a prybar, and a hammer did the trick. There was only one tool that might be considered special that was used in this install. An air-powered cut-off wheel was needed to remedy a problematic leaf-spring bolt. Check out the rest of the story, and see how the truck came out when I was done. Happy wrenching.
| lowering An S10 On A Budget jackstands
Tech Tip
Safety FirstBefore you do any work, make sure to secure the truck on jackstands. having two sets of stands will speed up your install. You will need the jack to unload the tension on the springs. So, if you don't have any stands, don't even try this until you can borrow some.
Extra Stuff You May NeedHere are the only extras I used for the install. A can of brake clean was used to clean grease off of my rotors, and the grease is for the wheel bearings. it's a good idea to get an assortment of cotter pins because most lowering kits won't give you all the ones you might need, like for the tie rods.
Drop One: $159
What's Under The Truck:So, here it is with the cheapest parts of the story. There is a 2-inch drop coil in the front and a 3-inch block in the rear. The front came down 2-1/2 inches, and the rear came down 3 inches. The front will be the only part of the suspension that the ride quality will change because of the new spring. It has a stiffer rating to control the truck in less travel. It won't ride harshly, just a bit firmer. With this setup, you can retain your factory shocks, front and rear.
Drop Two: $239.95Here is the truck with a 2-inch spindle in front and the same 3-inch blocks at the rear. The front came down 2 inches, and the rear came down 3 inches. With this setup, you can still retain your factory shocks, front and rear. This setup won't change the ride quality at all because the parts basically move things around. The blocks move the rear end up, leaving the springs alone, affecting only the driveshaft. The spindle has the snout/spud/ pin-whatever you want to call it-moved up in the casting, which moves the tires up closer to the fenderwells. (See the What's the Difference sidebar for comparison photos.)
Drop Three: $274.85Now we are getting somewhere. This has the spring and spindle up front, with the 3-inch block out back. The front came down 4-1/2 inches and looks perfect, while the rear is still a 3-inch drop. The rear still retains the factory shocks, but it's a little too high, now that the front is this low. i'm going to get different shocks up front, not because the stock ones won't fit, but because they are valved a little mushy for my taste.
What's The Difference?As you pull the stock parts off the truck, there will be obvious differences between these and the new lmc lowering kits. Here's a quick rundown on the lowdown:
Drop Four: $549.95
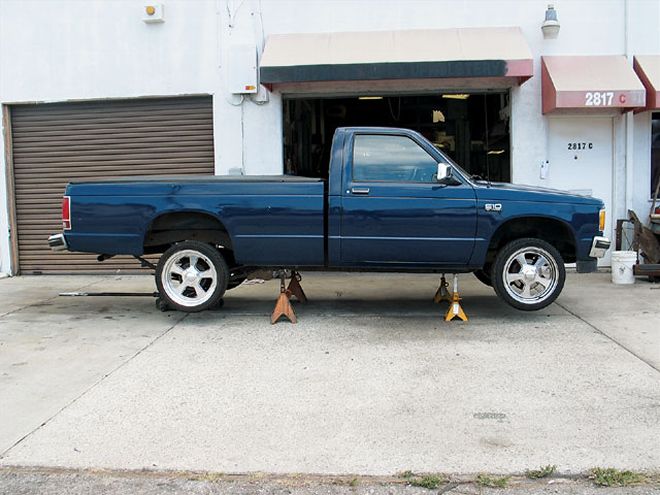
What's Under The Truck:Booya-fully dumped. here is everything installed in the truck. The front is the same as the previous image, but the rear has the new leaves and the 3-inch block. I like the look of this, but the rear is just too low. As a matter of fact, it's completely sacked out. (See Problems in the Rear sidebar.) I will definitely need new rear shocks now, since the install height is now 16-1/2 inches and the stock shocks bottom out at 15-1/2. It's not that I have anything against being low, but this is too much, so I'm going to adjust it to my liking.
Drop Five: $549.95 + $40*
What's Under The Truck:Here is my version of the lowering kit. I left everything intact, except for the lowering block. I cut it down to 1-3/4 inches, which gave me a little, hot-rod rake. This is exactly where I wanted the truck to sit, and now I can get a little taller tire for the rear for that ever-so-slight big-little effect. Before taking the truck to the alignment shop to get the front squared away, I installed new rotors, pads, seals, and wheel bearings. That way, everything is new, and I'm one step closer to having the truck mechanically sound.
*Forty bucks for an alignment.

| lowering An S10 On A Budget dropped S10
The Final WordThe truck sits 4-1/2 inches lower in the front and 5-1/2 inches lower at the rear. The stance is just a little higher in the rear for that hot-rod rake, which is perfect for me. For just $159, plus alignment fees, you could give your truck a 2/3 drop with lmc's low-buck kit. You could fork out about $600 bucks, like I did, and slam it. Either way you choose to go is all right, as long as you get in the garage and work on your truck.
The Wheel DealNow I know not everyone can sew up a custom interior for a set of wheels, but I have to save money where I can. Here are all of the technical measurements off my stuff. It might help you finding the right wheels for your project. The front is an 18x7-inch rim with 4-1/4 inches of backspacing and a P235/40R18 tire. The rears are 18x9-inch rims with 4-1/4 inches of backspacing and a P255/35R18 tire. The front tires rub just a little bit, but either dropping the size to a 225/40R18 or just rolling the inner fender will cure that issue.
Tech Tip
Pack Yo' StuffSince I was installing new bearings, I thought I'd show you the least expensive way to pack the bearings. I put a big glob of grease in the palm of my hand and scraped the glob with the bearing. Scraping the side of the glob forces grease into the bearing cage, instead of just smearing it around. The idea is to fill the bearing, not just coat it. You'll know it's full when you see it popping out of the top side.
Some Other StuffSo, I wasn't installing a bunch of worn-out parts on my new lowering components, I picked up new wheel bearings, seals, and brake components from a local parts store. These parts, plus the grease and the brake clean, cost $250 and were worth every penny.
| lowering An S10 On A Budget leaf And Block Combo Bottoms
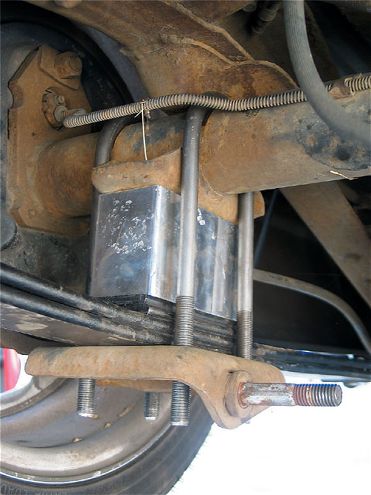
Problems In The RearAs you can see, even with the rubber bumpstops removed, the leaf and block combo bottoms the truck out. I'm going to cut off the bumpstop mount that is welded to the frame, which will give me almost 2 more inches of clearance.
| lowering An S10 On A Budget dropped Gas Tank
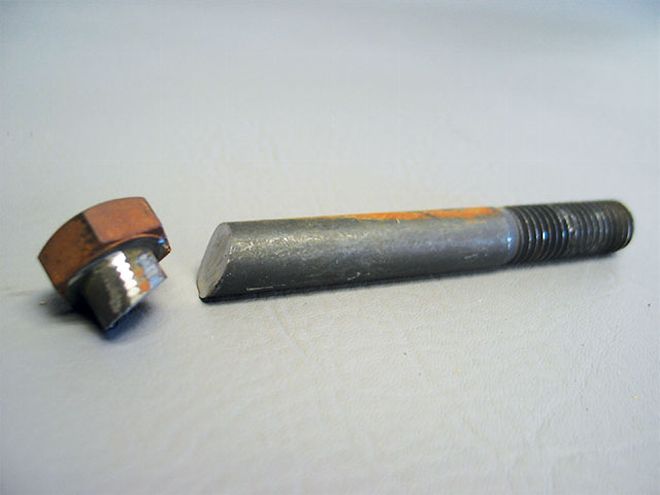
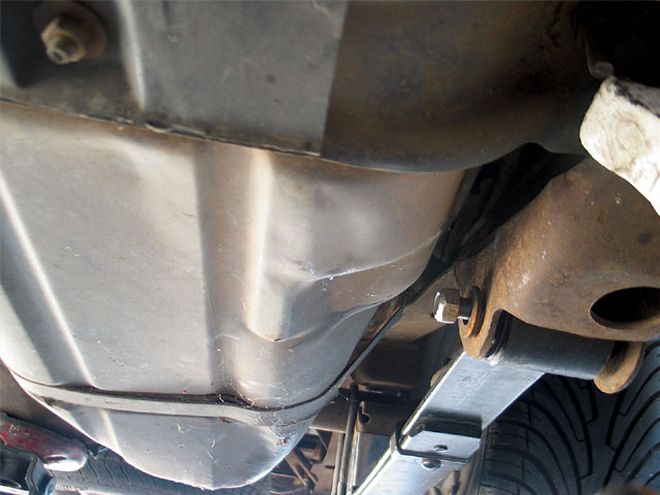
| lowering An S10 On A Budget front Leaf Bolt
Time SaverIn their infinite wisdom, the engineers at Gm installed the driver-side front leaf bolt from the inside out. This means you have to drop the gas tank in order to get it out in one piece. Instead of going through all of that, I cut the head of the bolt off with a cut-off wheel and slid in a new one from the other side.


