| toyota Tacoma Efi Kit Install nitrous
We here at MT love horsepower, so any little engine modification we make to a truck is because we are chasing the little green horsepower monster.
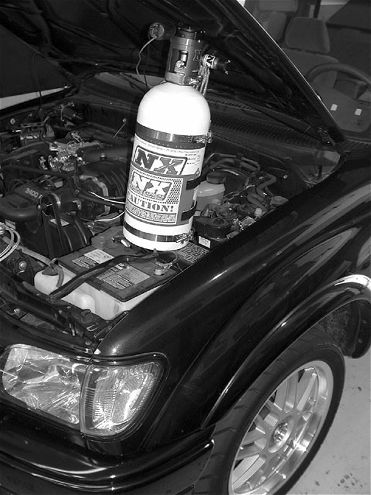
So, class, what is the next thing we should do? Nitrous. That's right. We contacted the folks at Nitrous Express (NX), the next generation in nitrous systems, and they shipped us their all EFI kit that covers '92-'00 Toyotas and will provide 35-75 hp, depending on the jets we install. The system comes with a bottle, a gauge, a steel braided line, solenoids, jets, and switches.
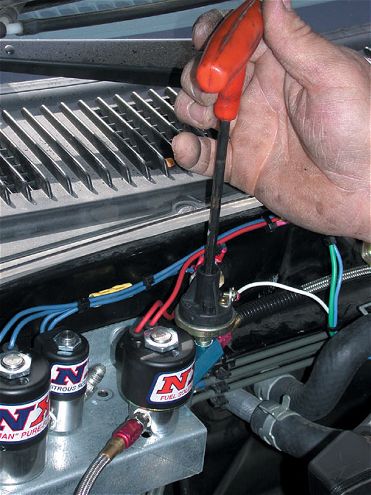
One of the key features in the NX system is the solenoids. They are the largest in the industry, have CNC-ported inlets for maximum flow, and also have a lifetime warranty. NX also provided us with a fuel pressure safety switch, which will protect us from encountering lean conditions from low fuel pressure.
| The unit is preset to 40 psi but it has an adjustable range of 20-60 psi. Because our Taco operates at 48-52 psi, he set it for 48 psi, but we should still install some gauges to fine-tune the system.
Once we did an inventory of parts, we called Jim Sleeper of Sleeper Suspension Development and asked him to throw in the kit while we snapped the shots. The first thing Sleeper did was mount the bottle and heater. We wanted it to be easily accessible, so Sleeper put it in the bed at the rear on the passenger side. This took up the least amount of space and gave us about 10 pounds of traction aid. Once Sleeper measured, marked, and mounted the bottle, he ran the D-4AN steel braided line down the frame.
In the front, Sleeper fabbed up a small bracket to mount the solenoids and the safety switch. Because the solenoid feed lines need to be 2 feet or shorter going to the nozzle, we mounted it to the firewall. With those in place Sleeper pulled off the air intake tube and drilled a 91/416-inch hole for the spray nozzle about 4 inches from the throttle-body. The nozzle was screwed in, making sure the nozzle discharge is pointing toward the throttle-body. To activate the system at only WOT, he installed a micro-switch off of the throttle cable mount.
The next step was to install all the feed lines and tap into the factory fuel line with the supplied T-fitting. Sleeper wired up the solenoids, safety switch, and micro-switch and ran the wires into the cab through the hole he drilled in the firewall.
Once inside, we removed the center console and drilled the holes to mount the master arm, a bottle warmer, and the purge switches. The switches were wired up per the instructions, and with no fluids in the system yet, we tested the switches and solenoids to make sure we could hear them click.
Bottle HeaterA bottle heater maintains proper psi within the bottle so when the pressure drops below 900 psi the heater is turned on to raise the pressure back to the optimum level, around 1,050. What makes the Nitrous Express heater different is that it is regulated off of bottle psi instead of temperature. This will help with more consistent use for better e.t.'s
Purge Etiquette1. Complete your burn out
2. Pre-stage
3. Push the purge button three times, 1 second each
4. Stage immediately, and hold on


