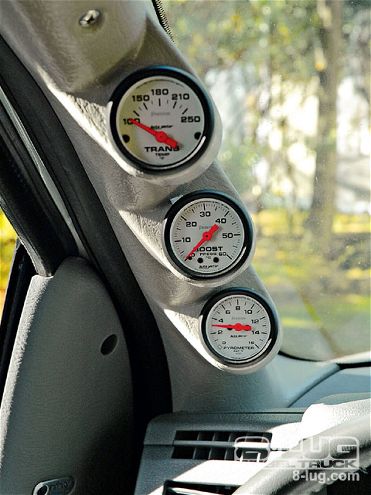
| Auto Meter's white Phantom collection matches the factory Dodge Ram gauges perfectly. Auto Meter's Triple-Gauge Pillar Mount puts boost, EGT, and transmission temperature at eye level.
The Chrysler engineers didn't get their degrees out of a Cracker Jack box. The engine and transmission on eight-lug trucks have been designed for OEM specs. Adding power chips, exhaust manifolds, and intake manifolds can result in huge power gains, but they can also drastically increase boost, exhaust temperatures, and transmission temperatures.
All of these, if not monitored, can result in very expensive repairs. Even if you haven't made any modifications, it's not a bad idea to know just what the powertrain is doing. Accurate full-sweep gauges are the answer.
Problem is, with today's plastic compound-curve dashboards, where to put them? Auto Meter, long respected for some of the most reliable instrumentation in the business, has an easy and very stylish answer. Auto Meter's white Phantom collection matches the factory Dodge Ram gauges perfectly, and its Triple-Gauge Pillar Mount kit puts boost (PN 5705), exhaust gas temperature (PN 5743), and transmission temperature (PN 5757) in constant view without taking your eyes off the road, or the "Christmas Tree" if you're pointed down the dragstrip.
We just happened to know of an '08 Dodge Mega Cab that really needed a cluster of gauges, so we had Top This Truck & Attitude in Grass Valley, California, do the clean installation. Philip Nunninck, the Top This Truck installer, had done these gauges before, and knew exactly where to start.
The first step was to remove the stock door pillar. There were two screws under the caps of the pillar handle. With that out of the way, we could start running wires and tubes up the pillar, behind the edge of the dash, and into the engine compartment, taping the wires neatly out of the way and leaving plenty of slack to work with.
Electrical connections were simple. Phillip found a good location for the ground wire just to the left of the hood-release lever. The 12-volt power was taken from the factory distribution panel using a Tapa-Circuit clip on an existing ignition-switched 20-amp fuse. Power for the lights was taken from the dash-light control circuit. Power and ground wires were run to the center of the gauge pod and butt-connected to the three illumination bulbs. Ignition hot wires were run to the back of the transmission temperature and pyrometer gauges. Before we went any further, the bulbs were checked for function, making sure they all worked, came on, and dimmed with the dash-light dimmer control.
Now we could install the gauges in the Auto Meter pod. Location, top to bottom, was simply a matter of preference. These mechanical gauges come with backlit bulbs. Red and green bulb covers are included for a custom look. Colored LED bulbs are available for more vivid and intense lighting.
The Phantom series 2 1/16-inch gauges slipped snugly into the pod. Their white faces give a factory look. The pyrometer and boost gauges have 270-degree sweep movements and durable nylon gearing which have made these rugged and long-lasting gauges a proven high-performance favorite for more than 25 years. Air Core meter movement of the pyrometer requires a probe (model 5244), which was included in the kit.
The boost monitoring tube was installed on the intake manifold. Not wanting to take any chances with debris getting into the turbo system, Phillip removed the intake manifold and took it to the bench to drill and tap it.
The fitting for the pyrometer probe must be attached to the exhaust manifold. We drilled with a 5/16-inch letter R (.339) drill bit and followed through with a 1/8-inch NPT pipe tap. A shop-vac hose held next to the drill bit picked up shavings. As an added precaution, we left the engine idling so that the moment the drill broke through, the jet of air ejected any possible metal particles.
With the fitting and probe installed, the shrink tube was pulled back from the screw connections, and the staggered ends of the extension wires were attached using small (No. 6) ring terminals to the probe using No. 6 screws with self-locking nuts. All connections and hardware are supplied in the Auto Meter gauge kit. After all connections were made and their function was verified, the shrink tube was installed using a heat gun.
The complete instructions caution that the extension wire is an integral part of the pyrometer calibration. It may not be shortened or lengthened without affecting the gauge calibration. We found a suitable location to coil the excess and secure it with a wire tie. All wires leading through the firewall were protected by rubber grommets.
The transmission temperature sensor was routed down to the OEM fitting on the transmission pan. All that remained was to connect the appropriate wires and tubes to the back of the gauges, and install the pod in place. The pods are designed to be painted the color of the truck interior if desired. In our case, the gray was a near-perfect match.
A drive down the highway showed all gauges were working perfectly. The pyrometer was amazing, reacting instantly to the slightest increase in throttle, and the boost was equally responsive. The transmission temperature stayed safely below 160 degrees, even when pulling up a hill. Now we could start adding some performance products with the baseline we were seeing on this stock vehicle. It was sort of like a surgeon being able to check and monitor all the vital signs before starting an operation. Stay tuned as we bring this mild-mannered Ram up to a tire-smoking 403.1 hp and 766.1 lb-ft of torque.
Product Profile:
Auto Meter Products Inc.
815/899-0801
www.autometer.com
Top This Truck & Attitude
530/273-6200
www.topthis.biz


