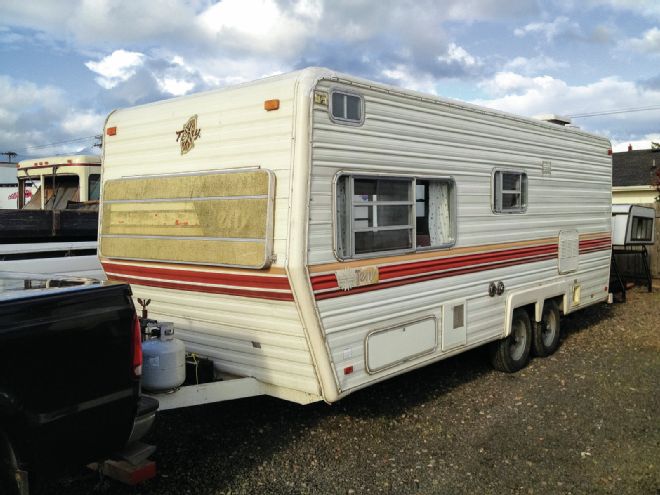
| Although our 1978 Terry travel trailer is in pretty good shape for its age, its groovy ’70s color scheme and outdated appliances make it a good platform for a trailer transformation.
I was talking to my lifelong friend Dan Tobiska in Bandon, Oregon, who has been restoring vintage camp trailers to their original quaintness. He’s enthusiastic about his hobby, and I can appreciate the craftsmanship of what he’s doing, but I’ve grown a bit accustomed to modern conveniences when I’m out “camping.”
That’s why RV projects can be restorations, which revive the original look and function, or they can be renovations, which can be highly modified to bring a whole new look and feel to a travel-weary vehicle—bringing it new life. A growing number of folks have learned that a renovation project can be both rewarding and economical.
Like a good home renovation project, RV renovations start with a good foundation, sound framing, and a workable floor plan. Not only does it update materials and color schemes, it also upgrades functionality with the latest technology in appliances, lighting, plumbing, heating, and air conditioning.
Time Travel
We found a 1978 Terry travel trailer that we think is a great candidate for an RV renovation. The colors, of course, are far out. You can almost hear John Denver’s “Rocky Mountain High” as you take in the harvest gold counters and burnt orange dinette seats with matching faux brick vinyl flooring.
Dated decor aside, this trailer has great bones. The subfloor is solid, the sides are straight, and the cabinets are in great condition. The open floor plan is similar to what we find in many newer models, with a large bathroom and plenty of windows.
We know it has some damage from water leaks. To quote our neighbor Wally, an RV industry veteran, “There are two types of travel trailers: one that leaks and one that’s going to leak.” So, the questions become: how much leak over how much time and with how much damage? We won’t fully know until some interior wall panels come off.
We’ve named our RV renovation “Project Terry, Extreme Mobile Makeover.” It has a number of RV industry corporate sponsors who are happy to showcase their products, which can help bring new life to an old travel companion. It will appear in the next several issues of RV Magazine and will include the following:
Running Gear: brakes, bearings, hubs, tires and wheels
Exterior: siding, awning, roof, vents, graphics
Plumbing and Electrical: lights, toilet, sinks, tanks
Appliances: furnace, air conditioning, fridge, range, water heater
Interior: furniture, counters, floors, woodwork
The wrap-up for Project Terry, Extreme Mobile Makeover will include a Road Trip Test and the sale of the trailer, with proceeds going to a charity yet to be determined.
Design Concepts
When we plan upgrades to a room in our house, we often refer to our copy of Pottery Barn Home for ideas. For RV updates, our reference book is the current Coast RV/Marine Parts & Accessories catalog, which is full of replacement parts and innovative upgrades for everything RV. Most of the RV-specific items we use for this project will come right out of the Coast catalog. Most of the other materials will come from the local home improvement center.
New Spin
We have a lot of design upgrades and color scheme items to address in this project, but before we do any of that, we want to take care of the trailer running gear by making sure that the tires, wheels, hubs, brakes, and bearings all function properly.
Before towing the trailer for the first time (to get it home), we tested brake and turn signal lights, inspected the tires and wheels, and checked tire air pressure. After going a few miles, we stopped and felt the hubs for heat in the bearing region. All seemed good, but we avoided the freeway in choosing a route home.
Safety Inspection
It was then time to get the tires, wheels, bearings, and brakes up to date. Like many trailer tires, which don’t get as much opportunity to wear out like car tires, these looked to be in good condition. They were ST tires with proper rating. However, upon closer inspection of the tire identification number, we saw that the tires were well beyond their life expectancy, which meant they could be unsafe. Time for new tires.
But, what about the wheels? Our first thought was to strip and paint them. That’s when we noticed that the wheel design left a good portion of the hubs exposed, which meant they had to be repainted along with the wheels and the look would still be very dated. Time for new wheels and hubs.
We already knew we wanted to replace the bearings, and we’d also heard that replacing the entire brake assembly was much easier and more effective than replacing individual brake components. Replacing the hubs meant we would get new brake drums in the process, which eliminated the need to have the drums resurfaced.
We pulled everything off back to the brake-mounting flange and installed an all-new brake assembly, bearings, hub, wheels, and tires. Because Coast sells wheels and tires as a package, we were able to order new ST tires mounted and balanced, which makes them convenient to install and saves the cost of mounting and balancing.
Here’s how we did phase one of Project Terry, Extreme Mobile Makeover!
Project Terry Sponsors
Awning: Carefree of Colorado
Air Conditioner: Coleman-Mach
Roof, Sealants, Blinds: Dicor
Brute Power Jack, Centerline Hitch, Super Foot: Husky Towing Products
Assorted Hardware & Electrical Products: JR Products
Refrigerator: Norcold
Portable Generator: Powerhouse Products
Cooktop/Range, Furnace, Water Heater: Suburban
Toilet, Chemicals, Bathroom Accessories: Thetford
Plumbing Parts: Valterra
Vents, Range Hood, Plumbing Stacks: Ventline by Dexter
Antenna: Winegard


