| 1994 Custom Chevy Truck Performance Shocks front Rear
We are coming to the end of our transformation of an ex-'bagged '94 Chevy truck into a canyon-carving G-machine. We wanted to create a truck that could rip the corners with the best of them but not be so performance-minded it would be impractical to drive every day. It took some preplanning, good parts, and the hard work of some very talented people to help us accomplish our goal. So, read on, as we recap the prior stories and hopefully teach you what we learned about handling and how a good set of shocks is a must.
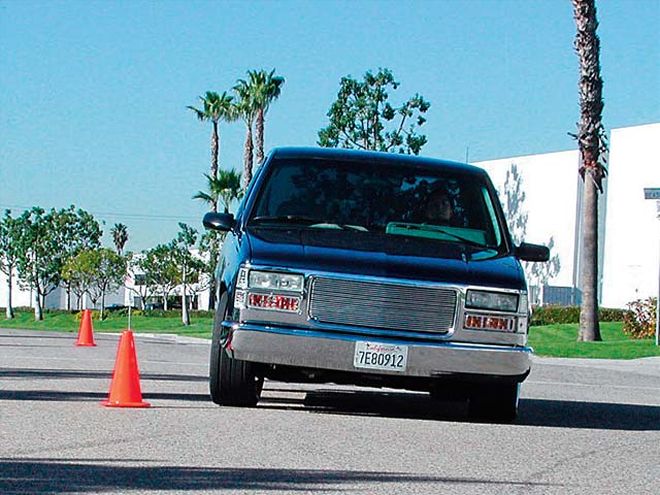
| 1994 Custom Chevy Truck Performance Shocks slalom
Step one, we dropped the truck to give it a lower center of gravity with a 2/4 drop kit from Stylin' Concepts that consisted of a new coil up front and a shackle hanger kit for the rear. Centrifugal force pulls at the center of gravity to lean the truck toward the outside of a curve, but by lowering it we reduced the leverage the centrifugal force has on the truck so we can push the truck harder through the corners. Step two was a wheel and tire combo that could provide the strength and traction we need and look good at the same time. We mounted a 295/45ZR18 Nitto NT-555 tire on an 18-inch Hot Schott rim from Ultra Wheel. This combo gave us enough sidewall to keep the ride smooth and an 11-inch-wide contact patch. This will provide plenty of nice soft rubber on the ground to hold the truck.
Step three was to have the 12-year-old rubber bushings replaced with a set of polyurethane bushings from Energy Suspension that will deflect much less, if at all. When you turn a corner, the bushing is subjected to increased load, and if the bushing deflects, then a lot of things can change, such as caster, camber, and the toe settings. Step four was to remove the lean or body roll the truck has when thrown around a corner. To do this, we installed a set of Hotchkis Performance sway bars, a 1-7/16-inch bar went on the front and a 7/8-inch bar went out back. The sway bars couple the left and right side of the suspension together and reduce body roll. When you go into a turn, the spring of the outside of the turn gets pushed upward or compresses. The arm of the sway bar travels upward with it, applying torsion to the sway bar that is transferred through the bar to the other side of the suspension, causing it to compress, as well. With these installed, the truck body stays relatively flat in the turn and increases our ability to corner faster.
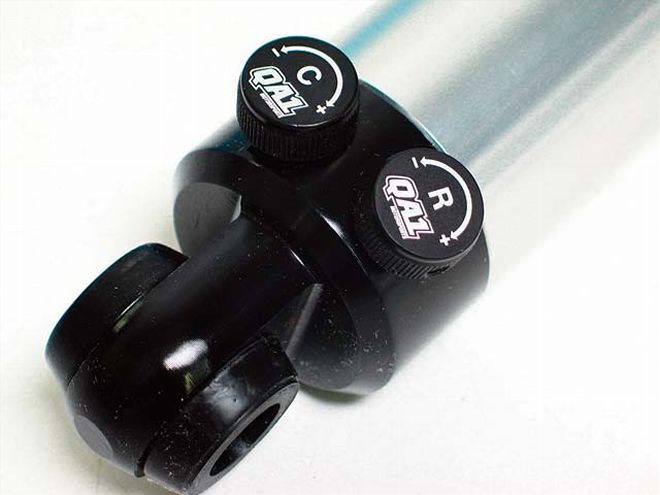
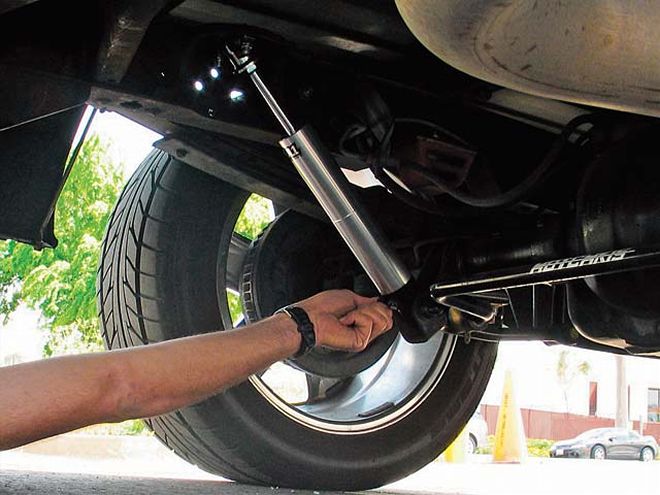
Step five involved removing the slop from the steering system and reducing the amount of movement we had to make to the steering wheel to get the truck around a corner. An AGR performance steering box with matching pump cut about a full turn from our lock-to-lock ratio. Also, the feel of the wheel is much better; it is firmer without being tiring and allows us to make turns without removing our hands from the wheel. Step six of our buildup will go over the installation and tuning of QA1's kick-ass Stocker Star double adjustable shocks. These bad boys feature 24 positions of compression adjustment and 24 positions of rebound adjustment, providing 576 possible combinations to allow you to set them perfectly to your driving demands. Compression and rebound are controlled independently; when the compression knob is adjusted, rebound does not change, and vice versa. The shocks are constructed with a forged aluminum body, which we know is stronger than billet and a 5/8-inch hard chrome-plated piston rod. So the shocks will last longer, the engineers have developed a three-step sealing system that has a double-lip seal with wiper to keep the fluid in and the dirt out. Before the shocks are sent to you, they are 100-percent dyno-tested, and in the event something bad happens, the shocks are re-valveable and rebuildable by an authorized dealer, so you just go to the QA1 website to find one near you.
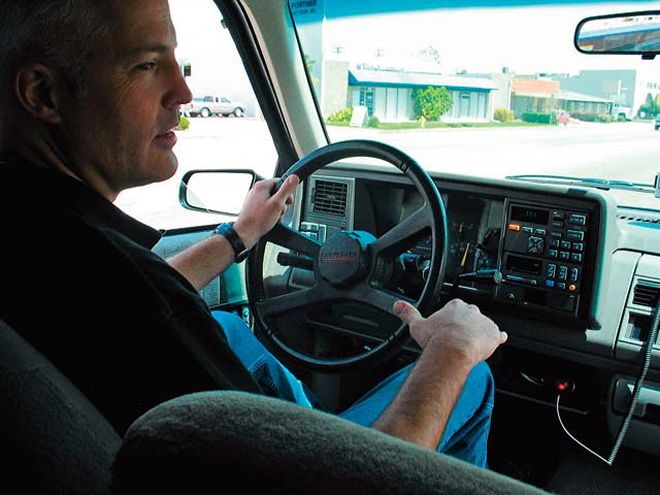
Because, as much as we would like to think so, we are not experts in shock tuning and these QA1s have so much adjustability we brought in a ringer to help. John Hotchkis has years of racing experience and suspension tuning under his belt, so when we asked, "Could ya give us a hand?" he simply replied, "OK." We went to his shop in Santa Fe Springs, California, to get the shocks bolted in place and have him tune them for overall street performance. We say street, because to tune them for the track is possible, but this truck will spend most of its life on city streets and highways that are way more inconsistent than a smooth track surface. Ever seen a speed bump or pothole on a track? We didn't think so. Read on, as we show you how they go in and how a professional gets the settings right.
| 1994 Custom Chevy Truck Performance Shocks test Drive Two
Driving the truck around John's makeshift route takes us over just about every obstacle you might come across in your daily drive. There is a set of raised railroad tracks, a few speed bumps, and numerous dips. John says, "This is the route I test all of my suspension kits on," so if it's good enough for him, it will work for us. Driving the route the first time showed us the shocks were just too soft; the truck did ride like an early Caddy but had almost no control when we hit the railroad tracks. It was time to turn the dials and really see what they could do to control the bounce. See sidebar for our notes concerning shock adjustment for this particular truck and how it reacted with each adjustment.
| 1994 Custom Chevy Truck Performance Shocks adjust Shocks
THE TEST DRIVEJohn stated the best way to tune in a set of adjustable shocks is to start with the compression settings first and then move on to the rebound. Then, you can go back and make any minor adjustments to either, once you have a good base line. John also recommended we see what the range the shocks have, so that is why the first two adjustments will be 12 clicks (half way) and then 24 clicks (full).
Adjustment
Setting
Effect
1
C-F&B- 12 clicks
Less nose dive on braking - morereactive on the steering response.
2
C-F&B- 24 clicks
Can feel every imperfection inthe road. John stated, "You could feel a nickel if you ran it over,right now" The rear jumped out over tracks, meaning the tires left theground, which is not good. Tight steering response, which means yourbody bounces all over inside the truck.
3
C-F&B- 18 clicks Responsive steering with nochatter over bumps. Comfortable ride, not too
sensitive, but not slushy - this works well.
4
R-F&B- 12 clicks
Stiffened up the ride - wordused harsh. Feels bouncy, John says, "That is the front and rear of thetruck fighting each other."
5
R-F&B- 24 clicks Bouncy and hard on the abs, nota good ride at all for a street truck.
6
R-F&B- 8 clicks Back feels good - feels likethere is not enough rebound in the front.
7
R-Fonly - 12 clicks
Perfect ride for the front.Tires are in control, with not a lot of bounce and great steeringresponse. Back now feels like it has too much compression.
8
C-Bonly - 14 clicks
Pleasant ride but bottoms outtoo easy.
9
C-Bonly - 16 clicks No bottom-out but a littlebouncy.
10
C-Bonly - 15 clicks Perfection, no bottom-out, andnot quite as harsh.
Key: C=Compression; R=Rebound; F=Front; B=Back
Final Settings:
Front:
C-18
R-12
Back:
C-15
R-8


