For years now, the problem of the dreaded pump rub has crept up on unsuspecting GM truck owners and bitten with a vengeance. In early 2012, we noticed a leak in the drivetrain but had a difficult time chasing the culprit down. Our ’04½ Chevy Duramax 2500 HD had 164,000 miles on it and we knew things were due to start wearing, but leaks are usually something you can find and stop immediately. After spraying off the oily residue from everything under the truck, we drove around town for a few minutes and came back to the shop for a look. The oil was contained to a small drip on the transfer case and nowhere else. With no obvious signs of an escape route for the fluid, we began rubbing the underside of the transfer case to see if we could identify a crack or possibly a loose bolt. As we pressed against the case to steady ourselves, a very small hole opened up and a small piece of the magnesium cover disappeared into the case itself. We found what we were looking for, but we knew there were bigger problems we couldn’t see from the outside.

| gm Transfer Case Pump Rub Repair gm Transfer Case
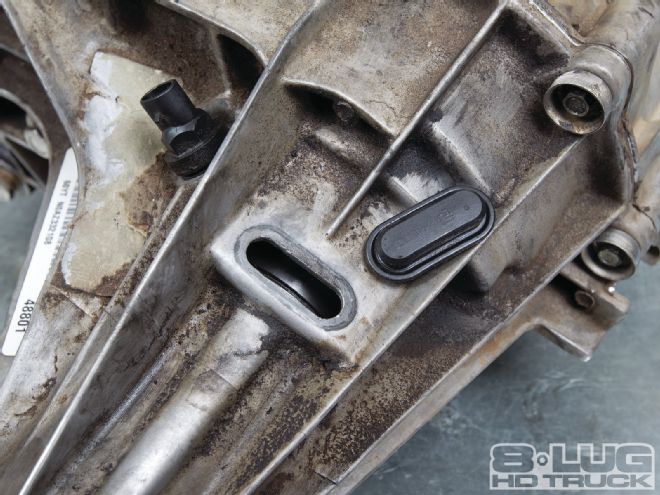
| 01. After removing the transfer case from the truck, you will want to find a clean, clutter-free spot to work on the piece. Drain any remaining fluid, and you’re ready to start. The first step we took was to remove the rubber plug that was hiding the snap ring, which holds the rear case half to a bearing on the mainshaft.
When searching for any information we could find on this issue, we came across a company that had discovered a fix for the pump rub. The owner of this company, Eric Merchant, developed a fix (including replacement components) for the pump to remedy this very problem and came highly recommended by others who had fallen victim to the problem. Eric informed us that the General Motors transfer cases subject to this problem were models 136, 146, 246, 261, 261HD, 263HD, 263XHD, and 261XHD. He explained that since the pump rides the mainshaft of the transfer case, it has to float in the rear housing. Over time, the five knife-like edges of the stock pump housing rub into the magnesium cover and create leaks.

| 02. Remove the speed sensor to reveal the reluctor wheel inside. Using the snap ring pliers included with the upgrade kit and a flat-blade screwdriver, we carefully manipulated the expandable snap ring from the bearing inside by pressing on the reluctor wheel toward the front of the transfer case. This can be aggravating, but be patient. You can then remove all the bolts and split the case.
After speaking with Eric, we decided to go with his repair advice. Merchant Automotive had the repair kit at our door (as well as a new rear case half) in just a few days. Our rear case half was too far gone to save, as reliably repairing these little holes can be nearly impossible. We also chose to replace the bearings and all seals for the case while we had it apart, but this may not always be necessary. In the next few pages, we will show you how to fix your pump rub before it destroys the expensive T-case.
The entire process was finished over a weekend after everything arrived. Keep in mind, you have to have moderate mechanical skill to tackle a job like this—it isn’t extremely difficult. We hope to drive our Chevy many more years, and with a company like Merchant Automotive standing behind every product it makes, we are sure it will be a smooth ride.
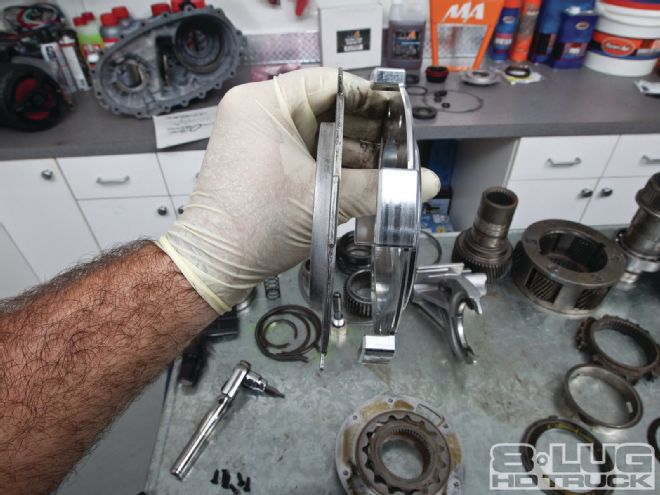
| 09. This photo shows the difference in the two parts. The knife-like edges on the stock pump cover (to the left) are where the problem originates. The Merchant Automotive upgrade is made of T-6061 aircraft-grade aluminum and has wide tabs to eliminate the pump rub.
10. When reassembling the pump, be sure to add a few drops of oil to the mating surfaces on the gears to help with startup when reinstalled. When reinstalling the Torx screws, add a small amount of Loctite (which is included in the kit) to each one. Tighten evenly in a diagonal pattern to ensure the cover seats evenly. Be sure to not overtighten the screws, as 80 in-lb should be more than enough. Then you will want to rotate the gears of the pump to be sure they are free.

| gm Transfer Case Pump Rub Repair oil Mating Surfaces
11. Once you have the pump placed back on the mainshaft, you can reinstall the reluctor wheel and bearing followed by the snap ring to hold the assembly in place. Be sure to reinstall the pump pickup tube as well and make sure the O-ring for the pump tube is in place.

| gm Transfer Case Pump Rub Repair reinstall Reluctor Wheel
12. The upgrade kit we received from Merchant Automotive was full of supplies, and when we began to mate the case halves, we noticed these guys had also included a tube of silicone sealant. Adding a thin layer of this to the mating surfaces of the case halves seals the unit to complete the upgrade. We also added Merchant Automotive’s magnetic drain plug kit to help keep any metallic trash located in the bottom of the transfer case out of harm’s way.

| gm Transfer Case Pump Rub Repair merchant Automotive Upgrade Kit
13. We cleaned the forward case half and added a new bearing and seal to the new replacement rear casing. The original rear case had three holes that were barely visible, so replacement was our only choice. Our transfer case has been upgraded and is now ready for reinstall in our ’04½ Chevy Duramax 2500 HD 4x4.

| gm Transfer Case Pump Rub Repair clean Forward Case Half
14. This Chevy truck gets used a lot. With the strain on our transmission as well as the weight of the transfer case, we decided we had to install some insurance for the package. Merchant Automotive has come up with a great support device to help carry the load of the transfer case and support the rear transmission housing. With the bright orange bracket in place, it was time to lift the transfer case back into its home.

| gm Transfer Case Pump Rub Repair reinstall Transfer Case
15. After reinstalling the transfer case in our truck, our final task was to install our transfer case fluid, which is included in the package of goodies. This is a little tough to do, but with persistence—and the will to drive the beast again—we made it happen.

| gm Transfer Case Pump Rub Repair transfer Case Fluid
Product Profile:
263XHD/261XHD transfer case pump upgrade combo kit
Includes the following:
- Merchant Automotive transfer case pump upgrade kit
- New rear housing assembly
- New rear output seal
- Merchant Automotive performance transfer case fluid
- Merchant Automotive magnetic drain plug kit
- Rear housing bearing snap ring
- Snap ring pliers
- Additional part: Merchant Automotive transmission rear housing support


