QuestionQUESTION: I found I have a broken connecting rod in my B&S engine model 170402. The engine is on my work bench, starter side down. I sanded the shaft a bit and removed the 6 bolts, but the cover won't budge. I tapped it with a wooden mallet a few times, but that didn't help. What's the secret of removing that cover so I can get to the connecting rod?
One other question. With the engine sitting upright, I removed the head cover to check the valves and piston. The piston has a small "V" shaped "groove" at one edge. Is that normal, a marker for installation, etc., or is it damaged?
ANSWER: Hello Jerry:
>>Make Sure you have Removed ALL the Bolts from the Oil Pan/Sump. Not All the Bolts are Located Around the Outer Edge of the Oil Pan/Sump. Some have a Bolt Counter Sunk Into the Oil Pan/Sump.
>>The Following File should Assist you in Removal of the Oil Pan/Sump.
1- The Oil Pan/Sump Removal.
>>The Following is a Basic Instruction File for Examining the Inside of a Small Engine and will Assist you in having Access to the Governor, Oil Pump (if Applicable), Cam and Crankshaft Gear. Any Input is Appreciated.
>>**This is a Simple Process. Drain the Oil and Remove the Engine to the Work Bench with the Oil Pan Facing Up. I have a Wooden Rest that was Especially Made to Hold the Engine when in this Position.
>>Using Fine Sand Paper, Remove ALL the Rust and Debris from the Crankshaft.
>>Remove ALL the Oil Pan Bolts.
>>After All the Oil Pan Bolts are Removed; Tap Lightly on the Sides of the Oil Pan to Loosen it from the Dowel Pins.
Sometimes you May have to Use a Flat Screw Driver or Chisel Between the Oil Pan/Sump at the Areas Neat to the Dowel Pin and Loosen the Oil Pan/Sump.
>>When the Oil Pan is Removed, you can See the Governor Resting on Top of the Cam Gear.
>>****If Required: Lift Off and Replace with a New Governor. Check the Engine Block for Debris from the Old Governor and Wipe the Inside of the Block With a Rag, Until Clean. Set the Governor Shaft So it will be Resting on the Governor whine the Oil Pan is Replaced and Carefully Replace the Oil Pan. If the Crankshaft Seal Was Not Leaking, then Leave it Alone. It Should be OK. You can Easily Replace it While Mounted on the Machine if Required Later. Make Sure the Governor Stays in Contact with the Governor Shaft while Replacing the Oil Pan. Re - Mount the Engine to the Machine. Refill With Oil. Your Internal Governor May Differ.**
2- The Piston.
>>The V is a Supposed to be there. It is a Marker for Installation. Be Sure it is Installed the Same Direction when you Replace the Connecting Rod.
3- Torque Specifications.
>>Small Engine Torque Specifications
>>Typical torque specifications for the 170000 Series Engines.
>>For proper operation and long life, you cannot just tighten critical nuts and bolts by feel. You really don't want the connecting rod cap to come loose while the engine is running! A Web site that has torque specifications for many popular engine models as well as other useful information is Outdoor Power Equipment.
Location Torque ---> Inch-pounds Foot pounds
----------------------------------------------------------------------------
Cylinder head bolts: 160 - 200 13 - 16
Connecting rod bolts (Durlock rod bolts):
2.5 - 4 HP small frame: 96 - 110 7.9 - 9.1
5 - 6 HP medium frame: 130 - 150 10.8 - 12.5
7 - 10 HP medium frame: 150 - 170 12.5 - 14.1
Cylinder cover or flange to cylinder: 65 - 110 5.5 - 9.0
Flywheel nut: 360 - 396 30 - 33
Spark plug: 180 - 360 15 - 30
Magneto stator to cylinder: 40 - 90 3.3 - 7.5
Starter to blower housing or cylinder: 40 - 60 3.3 - 5.0
Housing baffle to cylinder: 48 - 72 4 - 6
Breather cover to cylinder: 20 - 26 1.7 - 2.1
Intake pipe to cylinder: 72 - 96 6 - 8
Carburetor to intake pipe: 48 - 72 4 - 6
Air cleaner to carburetor (plastic): 8 - 12 1
Tank plate to bracket (plastic): 100 - 144 9 - 12
Tank to housing: 45 - 65 3.7 - 5
Muffler bolts to cylinder:
1 - 5 HP small frame: 30 - 45 2.5 - 3.5
4 - 5 HP medium frame: 90 - 150 8 - 12
Electric starter to cylinder: 50 - 60 4 - 5
>>Please, Do Not Hesitate, If you Hit a Snag, if I Missed Something or this Does Not Correct the Problem, I am Here if You Require More Assistance. Hope this Helps. Let me Know What Happens, Please. May the All Mighty Bless You and Yours. Thanks.
Good Luck
Respectfully
John
>>PS: I am Allowed to Answer 10 Questions a Day. If you See I am Maxxed Out, then Try Submitting your Question at or Just After 8pm EST (US). My New Day Starts then. Comments and Ratings are Greatly Appreciated. Thanks.
Respectfully
John
---------- FOLLOW-UP ----------
 B&S 170402 engine
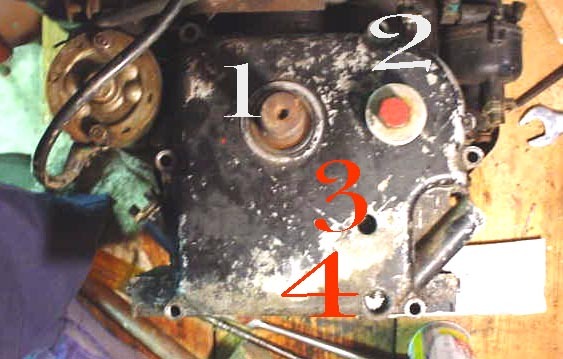
QUESTION: I looked and can't find any hidden bolts. I've enclosed a photo. Hope it come through ok. There are 4 numbered areas that I'll explain. Number 1 obviously is the shaft. Number 2 is a bolt with a washer and nut under it. The hole doesn't go inside, it bottoms out an inch or so down. "Hole" #3 isn't very deep, maybe 1/2" if that much. At the bottom of that hole there seems to be another hole in the center that has something in it. There's no screw slot. Looks like the alignment pins at the edges, but it's in an odd spot. Hole #4 bottoms out about 1/4" deep.
Tonight I did get the cover loose all the way around by tapping a thinly ground screwdriver at the joint, but that's as far as I got.
Does the oil seal around the shaft have to be removed first? Is there any way for a broken piece to jam the cover? As far as I can tell from the B&S manual I have, there isn't, but thought I'd ask. The manual is ok, but lacks some detail. For example, it explains how to replace the connecting rod, but doesn't explain how to get the oil pan off to get to the rod. I can't find anything about the seal.
Thanks for all the help.
ANSWER: Hello Again Jerry:
>>Sorry for the Delay. Snow Hit Last Evening and I have been Fairly Busy.
>>Usually if the Rust is Removed from the Crankshaft, then the Oil Pan/Sump will Slide Off the Block and Crankshaft.
>>Use a Screw Driver and Pop Out the Crankshaft Seal and Look for Rust Under the Seal on the Crankshaft. Make Sure you Push the Oil Pan Back Onto the Block when you Clean the Crankshaft of Rust and Dirt.
>>Is the Crankshaft Bent? If the Crankshaft is Bent it will Give the Problems you Described.
>>Since you were Able to Move the Oil Pan a Little, then All the Pan Bolts are Removed.
>>***The Oil Pan/Sump is a Machine Fit where the Crankshaft Rides During Engine Operation and Any Rust/Dirt will Cause this Machined Fit to Lock between the Crankshaft and Oil Pan/Sump when the Oil Pan/Sump is being Removed.
>>The Following is a Basic Instruction File for Replacing this Seal. Any Input is Appreciated.
>>Remove the Spark Plug.
>>**If you Must Tilt the Mower/Engine, then Tilt it so the Plug Hole is Facing Up.**
>>Turn the Engine and Watch the Center Blade Bolt as the Engine is Turned. If the Bolt Turns True, then the Crankshaft is Not Bent.
>>If the Center Bolt Wobbles, then the Crankshaft is Bent and this can be the Cause of the Lower Seal Leaking. Depending on How Bad the Crankshaft is Bent will Determine How Often the Lower Seal will have to be Replaced and if the Mower has a Vibration Also. >>I have Seen Engine that have the Lower Seal Replaced Every Year Due to a Bent Crankshaft. The People Still Operate the Mower, they Just Replace the Seal at the Start of Each Cutting Season.
>>To Replace the Lower Crankshaft Seal; **Remove the Blade and Blade Adapter. Sand the Crankshaft with Emory Cloth Sand Paper and Remove All the Rust and Burrs. Then Using a Small Flat Head Screwdriver, Pop Out the Old Seal. Sometimes, you have to Use a Small Cutting Chisel and Cut the Seal First.
>>I Use Pipe of the Same Outside Diameter of the Seal(Close as Possible) and 3" Longer than the Crankshaft with an End Cap on it. Place the Seal Into the Engine Base and Get it Started. Place the Pipe Over the Crankshaft and Drive the Seal Into Place. >>Sometimes, if you have a Full Tool Set; you can Use a Deep Well Socket to Drive the Seal Into Place. Make Sure it is Deep Enough to Miss Hitting the End of the Crankshaft.**
>>Please, Do Not Hesitate, If you Hit a Snag, if I Missed Something or this Does Not Correct the Problem, I am Here if You Require More Assistance. Hope this Helps. Let me Know What Happens, Please. May the All Mighty Bless You and Yours. Thanks.
Good Luck
Respectfully
John
>>PS: I am Allowed to Answer 10 Questions a Day. If you See I am Maxxed Out, then Try Submitting your Question at or Just After 8pm EST (US). My New Day Starts then. Comments and Ratings are Greatly Appreciated. Thanks.
Respectfully
John
---------- FOLLOW-UP ----------
QUESTION: I noticed today when I lift the oil pan cover with the screwdriver, the shaft lifts along with it. The starter side is down facing the bench and when I lift the oil pan cover, not only the shaft lifts, but the flywheel pulls up from the opposite side. Actually not the flywheel, but the electric starter gear which can be seen. I tapped around the oil seal but nothing budges. I lifted up on the cover then tapped down on the end of he shaft thinking that may loosen the seal, but it didn't work. What is the usual way to remove the oil seal?
The piston is down inside the cylinder. Is there any way that could somwhow jam the cover? I don't see how it could.
AnswerHi Jerry:
>>Lets Go About this Another Way.
>>Remove the Blower Housing (metal engine cover), Starter and Flywheel from the Engine. Now when you Attempt to Remove the Oil Pan/Sump, the Crankshaft and Cam should become Dislodged inside the Engine and the Oil Pan should Slide Off (a little wiggling and Turning of the Sump May be Required) with the Crankshaft Still in the Oil Pan/Sump; Provided the Broken Connecting Rod does Not Jam between the Crankshaft and Block. Once you have the Oil Pan/Sump with the Crankshaft Removed from the Block, then you can Set the Oil Pan/Sump in a Vice and then Remove the Crankshaft from the Oil Pan/Sump.
>>This Problem is a Common One in the Shop and you have to be Sure that "NO DIRT OR RUST" is on the Crankshaft where it Slides through the Oil Pan/Sump Machined Area.
>>The Crankshaft is Supposed to have "Play" in it as you Described, Especially when Removing the Oil Pan/Sump or the Flywheel.
>>Please, Do Not Hesitate, If you Hit a Snag, if I Missed Something or this Does Not Correct the Problem, I am Here if You Require More Assistance. Hope this Helps. Let me Know What Happens, Please. May the All Mighty Bless You and Yours. Thanks.
Good Luck
Respectfully
John
>>PS: I am Allowed to Answer 10 Questions a Day. If you See I am Maxxed Out, then Try Submitting your Question at or Just After 8pm EST (US). My New Day Starts then. Comments and Ratings are Greatly Appreciated. Thanks.
Respectfully
John