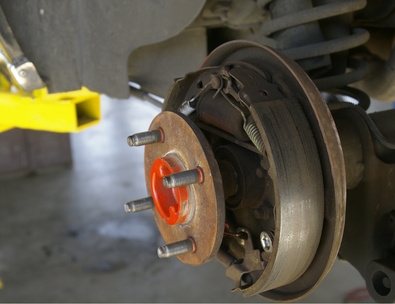
Not only are squeaky or grinding brakes loud and embarrassing, but they can also be dangerous. The noise is a clear indication that you need to adjust, clean or most likely replace your brakes. Jeep Cherokees are equipped with drum brakes in the rear instead of disc brakes. These type of brakes differ from disc brakes due to the use of brakes shoes instead of brake pads. Drum brakes have many components, which requires a little more patience and special tools when replacing the rear drum brake shoes.
Release the parking brake inside the vehicle. Loosen the lug nuts on each rear wheel using a tire iron. Raise the rear of the vehicle with a jack and support securely with jack stands. Place wheel chocks or bricks around the front tires to keep the vehicle from rolling forwards or backwards. Unscrew and remove the lug nuts using your fingers, remove the wheel and set aside.
Spray and air dry all drum brake components with brake cleaner. Do not used compressed air to remove brake dust or dry components.
Pull outward on the adjuster lever and turn the star wheel to retract the primary brake shoe. Pull on the self-adjuster cable, and push the adjusting lever toward the rear of vehicle, unhooking it from the secondary brake shoe.
Remove the primary shoe retracting spring using the shoe springs removal tool included in the repair kit. Lift and remove the self-adjusting cable and anchor pin plate from the anchor pin. Remove the secondary shoe retracting spring and self-adjusting cable guide using the shoe springs removal tool.
Remove the primary shoe hold-down spring and pin using the spring removal tool. Lift the primary shoe and adjusting screw from the backing plate and set aside. Using your fingers, pull and remove the parking brake link, making note of the small notch it is removed from.
Remove the secondary shoe hold-down spring and pin. Lift and remove the secondary shoe from the backing plate. Using a screwdriver, pry off the parking brake lever retaining clip from the pivot pin. Separate the lever from the secondary shoe with your fingers. There is a small washer located here that you can simply remove. Lubricate the brake shoe contact areas with high-temperature grease using the grease gun.
Lubricate anchor pins, support plates, self-adjusting cables, cable guides, screws, pivots and the parking-brake lever with high-temperature grease from the grease gun. Apply ample lubrication, but do not saturate.
Attach the new secondary shoe to the parking brake lever. Install the new spring washer and retaining clip on the pivot pin, then crimp the clip closed by squeezing together with the pliers. Install the secondary shoe and hold-down spring to the backing plate. Position the end of the parking brake link back into the small notch. Place the primary shoe against the backing plate. Install the hold-down spring. The parking brake strut and wheel cylinder pushrods will engage in the brake-shoe slots. Adjust with your fingers as needed to ensure they engage.
Install the anchor-pin plate and the self-adjusting cable. Hook on the open end of the secondary shoe retracting spring through the cable guide and into the hole in the shoe. Lightly pull and stretch the spring over to the anchor pin. Install the primary shoe retracting spring using the spring-installing tool.
Hook the adjusting lever spring into the hole at the bottom of the primary shoe. Hook the adjusting lever spring and cable into the adjusting lever, and pull the cable down and toward the rear of vehicle, inserting the hook on the lever into the hole on the secondary shoe. Insert a screwdriver or brake-adjusting tool through the adjustment hole, and turn the star wheel until the brakes drag lightly as the drum is turned. Turn the star wheel in the opposite direction until the drum turns freely. Keep the adjusting lever from contacting the star wheel by pushing on it with a screwdriver.
Mount the wheel, and hand tighten the lug nuts. Raise the vehicle off the jack stands with a car jack, remove the jack stands, and lower the vehicle to the ground. Tighten the lug nuts using a tire iron in a star pattern until all are tightened to torque specified in the owner's manual. Remove the heel chocks and perform numerous brake checks, checking for needed adjustments before driving in traffic.