Changing the front brake pads on a 2001 Mazda 626 will allow for greater stopping power and decreased stopping distance. The front brakes take on about 85 percent of all of the pressure when it comes to stopping your car. Replacing the front pads when they wear ensures a safer ride. The materials needed for this project are available at any auto parts store. Replacement should take no more than three hours if you're an auto maintenance novice.
Lift the front of the vehicle. Set jack stands underneath the control arms on both sides of the vehicle. Remove the wheels from the car with a tire iron.
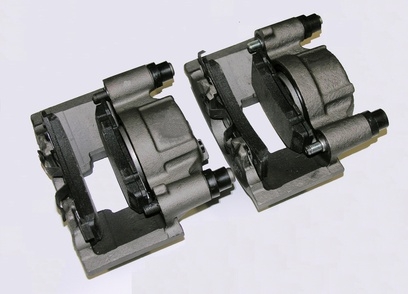
Remove the caliper mounting bolts on the back of the caliper using a 3/8-inch drive ratchet and socket.
Slide the caliper halfway off the brake assembly. Wedge a flathead screwdriver between the back of the rotor and the back brake pad. Pry the screwdriver inward, toward the wheel well, to compress the brake caliper completely.
Remove the brake caliper and set it on top of the lower control arm or tie rod end. Do not let the brake caliper hang freely. Doing so can damage the rubber brake hose or the caliper brake hose fitting.
Remove the old brake pads. Lubricate the outer tips of the new brake pads' metal backing plate with brake lube or caliper grease. Insert the new pads into the caliper mounting bracket. The caliper mounting bracket is the bracket that wraps around the brake rotor and holds the caliper and brake pads in position.
Lubricate the rear side of the brake pad backing plates with brake lube or caliper grease. Lubricating these plates will remove initial brake dust particles and reduce the chances of brake squeal or squeak.
Slide the compressed brake caliper over the new pads. Lubricate the caliper mounting bolts with brake lube or caliper grease. Lubricating these bolts will allow the caliper to slide in and out easier, and allow for even brake wear on both sides of the rotor. Tighten the brake caliper mounting bolts between 65 to 80 foot-pounds of torque. Use an extension bar over your ratchet for added torque if necessary. Spray the entire brake assembly down with brake parts cleaner to remove grease from fingerprints and excess brake lube or grease.
Repeat Steps 2 through 7 to replace the other set of brake pads. Leave the other side of the vehicle in tact while performing the first replacement so that you may have a visual reference on how the brakes should look when completely reassembled.
Reinstall wheels when the other side of the car is complete. Torque wheel nuts between 85 to 100 foot-pounds of torque. Use a torque bar or torque wrench if it is available. Lower the vehicle.
Pump the brake pedal repeatedly until you have a solid brake pedal. Perform this step before attempting to start the car.