The 1998 Ford Mustang is equipped with four-wheel disc brakes. Changing all of the pads on the vehicle should take a beginner about three hours to complete. All of the Mustang models for the 1998 production year use a single piston caliper, with the exception of the Cobra model, which uses a dual-piston caliper. The Mustangs with single piston calipers are covered in this article. All of the parts and tools for this job can be found at your local auto parts provider.
Loosen the front wheel nuts 1/2 turn while the Mustang's wheels are still on the ground. Do not remove the wheel nuts. You are simply trying to take off the torque for easier removal once the wheels are in the air.
Set the wheel chocks behind the rear tires. Raise the vehicle on either side. Set the jack stands under the lower control arms, on either side of the vehicle, for support.
Remove both tires from the front of the vehicle. Choose the side you wish to start disassembling, using the second side as a visual reference of how the brake assembly looks in its entirety. This will help you when you reassemble the brakes.
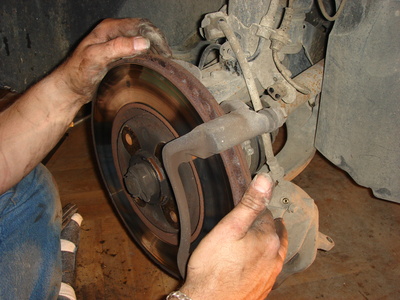
Use the 3/8-inch drive ratchet and the correct star bit to remove the caliper bolts. These bolts are found directly on the back of the caliper. The caliper is the piece that covers the brake rotor and holds the pads in place. Use the pry bar for leverage in removing the caliper completely from the brake assembly.
Place the caliper bolts in a small cup. Set the caliper on the lower control arm for the moment. Do not let the caliper hang freely, so as not to tear or break the attached line. Remove the old brake pads.
Set one old brake pad against the caliper piston (the circular piston protruding from inside the caliper). Place the C-clamp around the caliper. The C part of the clamp should rest on the back of the caliper, while the screw spline part rests against the old brake pad. Tighten the C-clamp gently, to push the caliper piston flush with the piston chamber shaft. Do not apply great force for this task, or you will risk rupturing the piston seals.
Set the caliper back onto the lower control arm. Set the new pads into their place on the caliper bracket. Lube the backing plates on each pad lightly, using a dab of caliper grease. This will reduce the initial squeak, as the pads wear themselves into the rotor. Do not get grease on the rotor directly.
Reinstall the compressed brake caliper over the new pads. Lubricate the caliper bolts thoroughly with grease prior to reinstalling them. Tighten the caliper bolts using 55 to 60 foot-pounds of torque. Spray the entire assembly, using the brake parts cleaner. Make sure that there isn't any debris on the brake rotors.
Repeat steps 3 through 7 to complete the brake pad replacement on the second side of the vehicle.
Tighten the wheels on the vehicle back to 80 to 100 foot-pounds of torque. Lower the vehicle. Get inside the vehicle and pump the brake pedal, with the vehicle shut off, until you get a solid pedal.
Repeat steps 1 through 10 on the rear wheels. Replace Step 6 with Step 12 for completing the rear brakes.
Use your "Caliper Tool Set" to twist the caliper piston clockwise, until it is flush with the piston shaft. The pistons in the rear calipers are rotating pistons. Do not attempt to compress them with a vice or C-clamp. Failure to follow this step will render the rear caliper, and/or the entire brake system, completely useless.