Brake rotors, sometimes called brake discs, are part of the front disc brake assembly on the Toyota Tacoma. When you apply the brakes in your Toyota Tacoma 4WD pickup, the brake caliper presses two brake pads against the rotor. This causes friction, which makes the vehicle slow down and stop. If the brake rotors get too hot, they can warp, causing a pulsating motion when you press the brake pedal. If this occurs, you must either replace the rotors, or have them repaired at a machine shop.
Loosen the wheel lug nuts on both front wheels.
Raise the front end of the vehicle until both front tires are off the ground. Support the truck using jack stands.
Remove the lug nuts and take off both front wheels.
Spray a liberal amount of brake cleaner around the entire brake assembly to soak any brake dust present. This dust is hazardous due the the possible presence of asbestos.
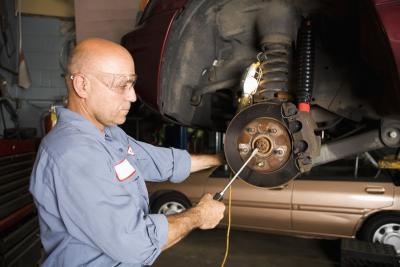
Locate the two brake caliper mounting bolts. They are on the side of the caliper closest to the engine. There is one bolt above and one bolt below the brake line fitting.
Rotate the caliper off the rotor. Avoid putting stress on the metal brake line. Secure the caliper to the vehicle using a piece of wire or string to hold it in place, so the caliper doesn't hang by the brake line.
Occasionally the rotor will be worn so extensively that a ridge will form on the outer rim. If this ridge has formed, you might need to compress the brake pads with a C-clamp to widen the caliper gap.
Pull the brake rotor off the axle. The rotor can sometimes stick to the axle, requiring you to lightly tap around its edges to break it loose for removal.
Place the new rotor onto the axle bolts. Replace a couple of the lug nuts to hold the rotor in place while you re-attach the caliper.
Place the caliper back into place. Even if you were able to remove the caliper without using a C-clamp before, you will likely need to use the clamp to compress the pads to fit the caliper over the new rotor. This is because the new rotor will be thicker than the one you removed. If you had the old rotors machined, the clamp will probably not be necessary.
Replace the two caliper mounting bolts. Use a torque wrench to tighten the bolts to 90 foot-pounds. Inspect the brake line to ensure you didn't damage it when you removed the caliper. Remove the lug nuts holding the rotor in place.
Replace the wheel and lug nuts. Lower the truck from the jack stands and tighten the lug nuts. Repeat the steps to replace the rotor on the opposite side of the truck.
Test-drive the vehicle in a safe location before driving it at high speed on a highway.