Propellers are frequently damaged by collisions with rocks, logs and other submerged objects. Any boat owner can remove and replace an outboard engine's propeller with only a few basic tools. Actually repairing the damaged blades is a complex procedure requiring specialized metalworking skills, but unless the prop has lost multiple blades, a propeller shop can usually perform the repair for less money than a replacement would cost.
Check the pitch and diameter of the old prop. These numbers are stamped on the prop hub, in a form such as "14 x 22" for a prop 14 inches in diameter with a 22-inch pitch. If the boat performed well before the prop was damaged, you can use a replacement prop of a similar style and the same pitch and diameter. If the engine couldn't reach rated RPM or the boat had performance problems, consult with the prop dealer about using a different style or size of prop. Buy a new prop, or find a shop to repair the old one, before removing it.
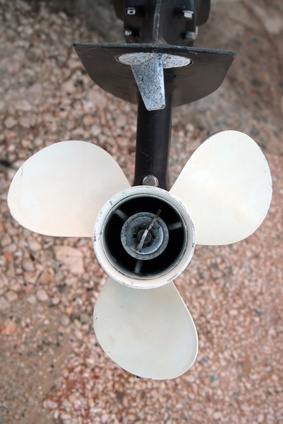
Disconnect the spark plug wires so that the engine cannot accidentally start. Remove the cotter pin from the castle nut on the prop shaft and throw it away. Wedge a block of wood between the propeller blades and the anti-ventilation plate to keep the prop from turning. Loosen the castle nut with a socket wrench, then spin it off the shaft with your fingers.
Remove the washer and the spacer, and note which way around they are installed. Gently tap the propeller free of its shaft with the block of wood. Pull the stopper off the shaft, and note which way around it goes.
Wipe the prop shaft clean and rub some waterproof grease on the splines. Slide the stopper back onto the shaft in the same orientation it was originally in. Slide the new or repaired prop onto the shaft, followed by the spacer and the washer.
Thread the castle nut back onto the shaft and wedge the block of wood in place between the blades and the anti-ventilation plate. Tighten the nut to the torque specified in your engine's owners manual: typically around 20 to 30 foot-pounds on a 20 hp engine, up to about 50 to 60 foot-pounds on engines over 150 hp. If you don't have a torque wrench, take your best guess: 30 foot-pounds with a socket wrench that is 8 inches from ratchet to hand grip means that you need to pull the handle with about 45 pounds of force.
Turn the castle nut a little bit farther if necessary to line up the cotter pin holes. Don't back off the nut to line up the cotter pin; tighter is better. Insert a new cotter pin and fold its end over to secure the pin in place.