The Dodge pickup-truck series was manufactured with various dashboard designs, most of which follow a standardized path to disassembly. Proper replacement of the dash does not require tremendous skill, but it does necessitate patience. The average backyard mechanic can replace a dashboard in a Dodge truck in about three hours.
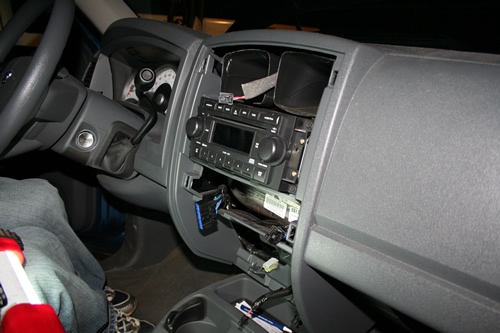
Remove the front dash panel by gently tugging on it until the retainer clips disengage. Older models may have two screws on the lower section that must be removed prior to removing the panel. Once free, any accessory switches can be unplugged and the panel can be set aside. Some models may require that the steering wheel be placed in a down-tilt position, or removed, before the panel can be manipulated out. Remove the stereo head unit by turning the retainer bolts counterclockwise, then slide the radio out and unplug its adapter. The gauge cluster can be removed also, by unscrewing its four to eight hex-head screws, then disconnecting it from the catch adapter. Some models will have a cable-driven speedometer that must be unscrewed from the back of the cluster.
The entire dash can now be unsecured from the firewall at the windshield bolts, which can be turned counterclockwise to release. Once these four to six bolts are freed, the dash is loose, and any extraneous wiring harness adapter plugs must be disconnected. The fuse panel will either remain attached to the truck or come out with the dash, depending on the model. Lighting, air-conditioning ducts, the air-conditioner control module, and the glove box must all be disconnected before the dash can be removed. The design varies, but typically the AC controls are vacuum-actuated and remain with the car. Glove boxes have several screws fastened to a hinge, and the AC ducts will either be incorporated into the dash or have several clamped duct hoses leading to the blower system. The dashboard can be manipulated outside through the passenger door, once all wiring is clear.
The new dash can be positioned into place with great care paid to the wiring connections and air-conditioning ducts. Some models of dashboards are heavy and cumbersome and can damage components. Line up the windshield bolt holes and attach the dash to the firewall by turning the bolts clockwise. Reconnect the wiring harness, glove box, and AC controls. Recheck all wiring work, then install the gauge cluster and radio by connecting their adapters then mounting their bolts in a clockwise direction. Do not tighten the delicate gauge-cluster plastic too far. Replace the front dash panel by pressing it into the retainer clips.