A tachometer measures the number of times an engine's crank shaft rotates per minute (RPM). For any engine, the RPM determines how much horsepower and torque is being produced at any given moment. Connect a tachometer to an engine and know when the engine is running at peak performance and when it may be working too hard. Too many engine revolutions will create excess heat, and reduces an engine's reliability. Protect any engine from excess wear and tear with the RPM data an easy to install tachometer can give you.
Work in a well-lit area with access to the equipment you need once you have begun to connect a tachometer to your vehicle.
Raise the hood and disconnect the negative battery cable from the battery and keep it from coming in contact during tachometer installation.
Locate the ignition coil and clean the negative side connector and any adapters that may be present. Remove any oxidation or debris from this location where the tachometer sender wire will be secured.
Find a good place to pass a wire through the firewall in front of the driver's compartment. If there is not existing wire or cable holes present, use an electric drill and ¼-inch drill bit to drill a hole for the tachometer lead to pass through.
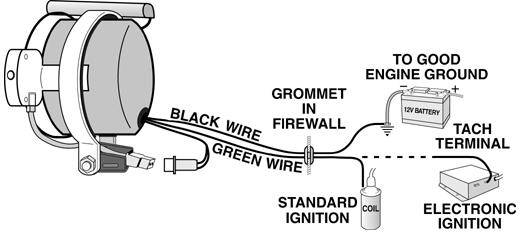
Position the tachometer over the center of the steering column and fasten it securely using a mounting clamp and bracket fitting to the steering column of the vehicle. The tachometer will have wires coming from the back of the gauge. One is a ground wire, one is a power supply sire, and one connects the vehicle's ignition system either via the ignition coil or through an electronic connection with the vehicles computerized ignition. A system without a distributor will need to connect to the electronic ignition. Check with the gauge manufacturer for the GREEN wire connection path that suits the ignition system installed in your vehicle. The steps for the power supply and ground wires on all tachometers are the same. The GREEN wire connections vary when no ignition coil is present.
Tape together the wires that are protruding out the back of the gauge until the wires meet the dashboard. Secure the wires under the dashboard with tie wraps or by using existing harness paths to run the wires in conduit that houses existing wires.
Find a pathway for the green wire to run through the firewall in front of the driver under the dashboard. Use an existing path for wiring or drill a ¼-inch hole to pass the wire through into the engine compartment. Protect any wires from chaffing inside a firewall hole by protecting it with a rubber grommet and silicon gel. This makes the wire safe and seals the hole from the outside.
Run the power supply wire to the fuse panel and tap into a fuse with a fuse tap. Find a fuse that operates on the turning of the ignition key. When the key is turned and the auxiliary power is supplied, the tachometer should also be lit for use. The ground wire must be secured in a paint free connection with the major parts of the vehicle. A great place to ground any gauge is at the mounting bracket for the pedal assemblies. Gas, brake, or clutch mounts are a great place to loosen a nut and insert a ground wire for an auxiliary component or electronic device.
Tie back all loose, hanging wires from around the driver's feet area. Do not leave wires to hang when driving to prevent pulling wires from gauges, or causing an accident while driving.
Connect the green wire to the negative post of the ignition coil. This connection will translate the electronic pulses of the ignition coil and translate it into a RPM gauge reading that tells the speed of the crank shaft during use.
Protect the coil wire from heat and moving parts by inserting into existing wiring harness conduit or supply wiring conduit to cover the wire for protection.
Tie back the length of wire to the firewall inside of the engine compartment all the way back to the firewall entrance in front of the drive. This wire is vulnerable to short circuits if not protected from damage.
Connect the negative battery cable and you are ready to test the new tachometer's performance as well as keep your own demand for performance within the safe zone of the engine you have.