The soft and easily bendable nature of aluminum is a double-edged sword when it comes to appearance. On the one hand, aluminum parts are easily scratched and damaged by abrasives like sand and rock; on the other, aluminum is fairly easy to restore to a mirror-like shine when it is damaged. The procedure is fairly labor intensive, but is fairly straightforward if you follow the required steps.
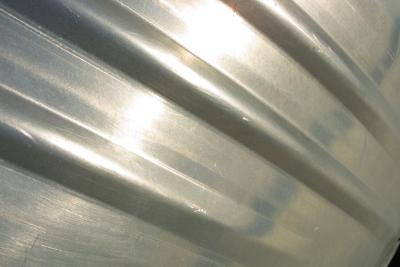
Aluminum gets hazy over time because of the millions of tiny scratches and pits that result from impact with abrasives. These small imperfections act like mirrors, reflecting light (or reflections) away from the source, giving the surface as a whole a flat and unattractive appearance. If you're unfamiliar with polishing, then think of the procedure as gradually reducing the size and depth of the aluminum's surface scratches until they're no longer visible to the naked eye.
To get rid of the scratches, you'll need to reduce the surface height to the lowest point on the deepest scratch. This means using rough abrasives to remove material, and using progressively lighter abrasives to remove the scratches left from the last compound used.
The abrasion rating of aluminum polish bars (a.k.a. "rouge") starts at about 2500 grit, so you'll need to sand the surface down to about 2000 before polishing. Start with 180-grit sandpaper on a DA (Dual Action) sander to get a rough finish, and repeat using progressively finer grit sandpaper (220, 400, 600 and then 800 grit). To get from 1000 grit to 2000, you'll want to hand-sand the aluminum with 1000, 1500 and then 2000 grit wet/dry sandpaper. Always remember to use a breathing mask and eye protection when sanding aluminum; that dust is nasty, and it gets everywhere.
You could use a standard machine buffer, but most experts recommend using a variable speed grinder and buffer pad attachment. The recommended polishing RPM is between 1500 and 2000.
The polishing procedure is essentially identical to the surface prep procedure, but you'll be using much finer "sandpaper." Polish rouge is essentially a hard sandpaper paste, and its grit is denoted by color. Different manufacturers use different colors, but the most common are: Brown/Yellow (used first for "heavy cutting"), Green/Purple for the intermediate stage and Red/White/Blue for final polishing. The color of your final-stage polish will color the aluminum slightly, so choose carefully.
To apply the rouge, install a fresh cotton pad on your grinder, turn the grinder on and touch a corner of the rouge bar to the cotton pad. Move the rouge bar across the pad's surface using very light pressure. The goal is not to cake the polishing material on; you'll know you have enough when the pad has taken on the color of the rouge.
With the rouge applied, simply run the buffing wheel over the aluminum surface until you get a consistent finish. Always wipe the metal down and use a fresh pad when changing compounds, and finish polishing with a hand-applied liquid metal polish and microfiber towel.