 Pete Trasborg
Brand Manager, Jp
Pete Trasborg
Brand Manager, Jp
Quite a while ago we played around with the idea of putting a TJ soft top on the YJ that later became Big Mini (“Updating Your Soft Top,” November, ’07). Anyone who has owned both vehicles and got caught in the rain knows how much faster and easier a TJ top goes up and down. Not only that, but the TJ top tends to be quieter as well. Trasborg doesn’t have a bender or notcher, so it was either an off-the-shelf pre-formed ’cage kit, or take the Jeep to a shop and get a custom ’cage built.
When we did the top swap, we also swapped a TJ factory roll bars and steel half-doors as well. A Jeep on 40s that is going to be wheeled needs a real ’cage but to keep the TJ top we needed to keep the factory TJ top mounting points which makes off-the shelf ’cage kits difficult. Still, going through the expense and difficulty of a full-bore custom ’cage just to keep a soft top made even less sense -- so we went pre-formed ’cage shopping. It turns out that there are a lot of decent kits out there with plenty of options, and the prices are actually fairly reasonable. But, after speaking with several companies about our particular application, we decided that a TJ kit would be the best match for our YJ.
After discussing the idea of a TJ kit in a YJ, several companies were hesitant to do it. But Synergy liked the idea and humored us with answers to measurement questions to the point that we finally took the plunge with its PPM-5203 TJ front ’cage kit and a few options. As we got further and further into it, we felt like we were playing on an adult jungle gym. Since we do all of our work in our driveway, our neighbors got to watch the hilarity. A few of them commented that we looked like monkeys while doing this install. That said, we kind of thought the water was going to be OK, and it was -- with just a few currents we found out about once we were in (ew, wet monkeys).
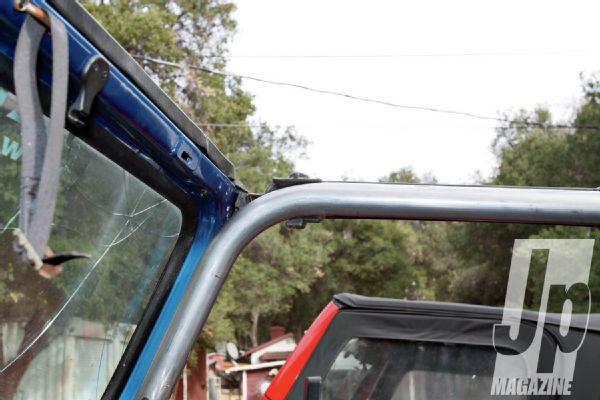
 There are two reasons why we decided to keep the factory TJ rear ’cage and add TJ parts to it. The primary reason is here, at the door surround. Unlike a YJ where the half-door top door surround is part of the top frame, on the TJ, it is separate. A pin goes through the tub, two hand-turn screws hold it to the windshield spreader bar, and it needs to hit the windshield at the right place. The side windows, top, and to a degree, the windshield header bar all require this to be in the right spot.
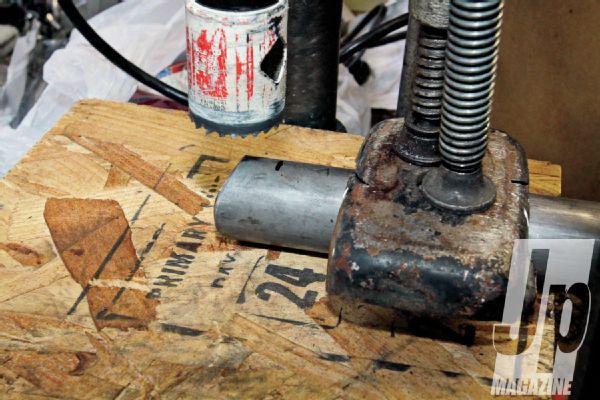
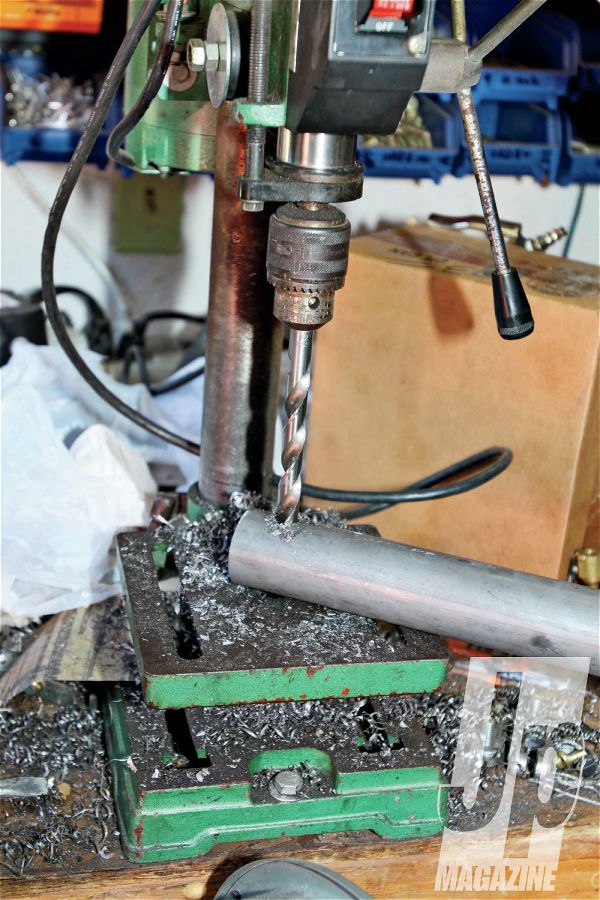 To keep shipping costs down, the front windshield spreader/A-pillar downtubes are shipped in two pieces with a sleeve. This saves overall size of boxes and keeps tubes from getting damaged. It also helps with bent Jeeps like ours. The foot of the tube at the floor, while made for a TJ, was cut at the correct angle for our YJ floor. We drilled some 1⁄2-inch-diameter holes to rosette weld the sleeve into the tube. We also ground a chamfer into the end of the tube to make a V-notch when they are butted together for a stronger connection than tube alone.
 The start of this was to pull the seats and soft top from the Jeep. If we cared about the windshield, we’d have removed or covered it as well. Welding slag can make safety glass practically explode on highways. You could ask us how we know, but are pleading the fifth. After several fitments, trimming, grinding, and more fitment, we came to the conclusion that there wasn’t enough “down” on the upper part of our downtube.
 It is important to keep the ‘cage away from plastic parts in the Jeep. While we would probably never hear it in this one, if you have a quieter Jeep, the squeaky, squeaky, squeaky of tube rubbing the dashboard or door can easily drive you slowly insane. So, we used a scissor jack and piece of DOM tube to get the downtubes spread out to where they needed to be. We got one side tacked to its foot and bolted to the floor, then we were able to get the other side.
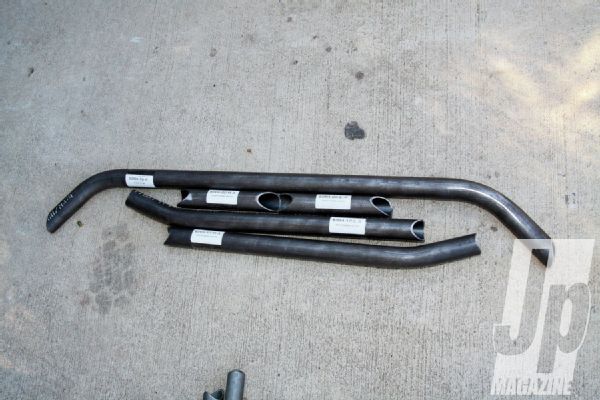
 At the end the upper bar needed to be slightly longer along the windshield (about 3⁄4-inch) and needed just a bit more of a bend than Synergy provided with its ’cage kit. After debating sleeving the foot of the downtube and heating the bend with a torch, we decided to have a new tube bent that would work better for us. (See sidebar, “Wrong Tool For the Job”).
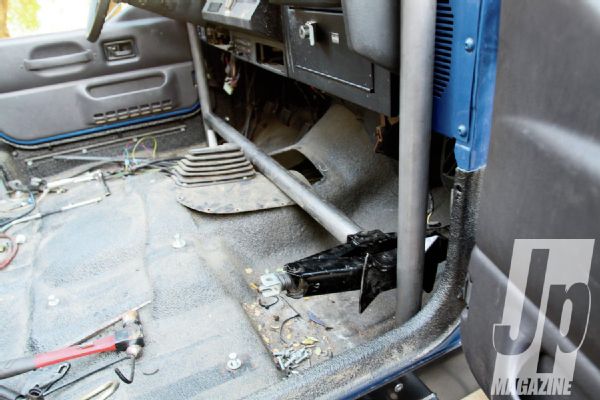
 Then we moved on to the dash bar. The instructions would have you put the dash bar in first but it was 1-inch too long for this YJ, which is odd, because we have TJ doors on this Jeep so the clearance should be the same. Maybe the YJ is 1-inch narrower across the dash. Once we got it cut down and notched, we used a piece of wood to space it off the dash. Since we were using the symmetrical lower down tubes for visual measurement, we leveled it based on the joint in the tubes.
 We added universal grab handles for front and rear seat passengers with just some modifications needed to the angle of the tube where it meets the ’cage. They do say right in their name they are universal, so we weren’t surprised. We then mounted them in such a way so as to help protect the grabee’s hand in a roll. The grab handles are smaller than the ’cage tubing, so we were able to mount them offset to the inside of the ’cage tube’s center line. We then also angled them inboard. The result is that the outer edge of the handle is about 21⁄2 inches inboard from the outer edge of the tube.
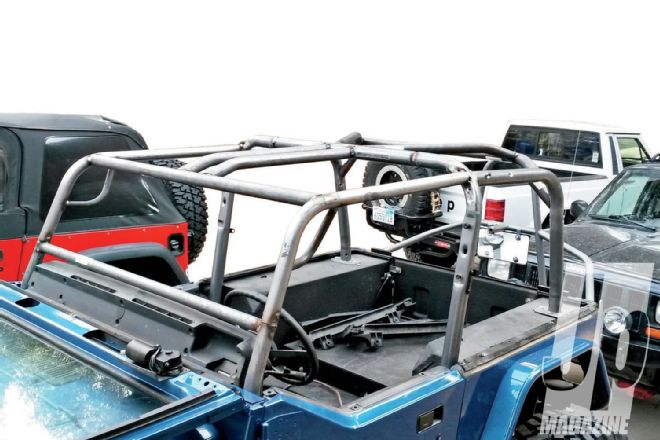
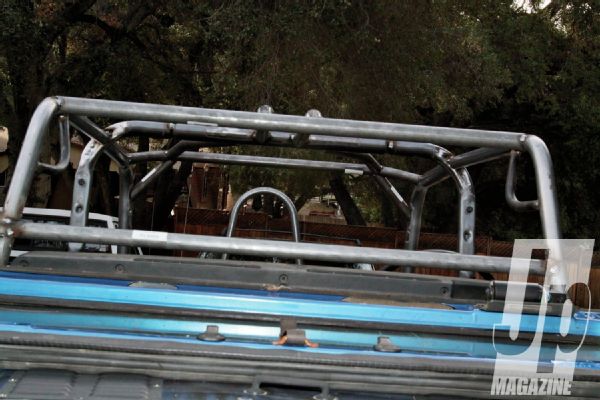
 Out back, the TJ Rear ’cage kit (PN PPM-5204) ties the B-pillar back to the C-pillar and provides much needed strength through triangulation as well as protection for rear seat passengers. It includes five tubes, including two diagonal spreaders that go back to a horizontal spreader, and is then tied into the C-pillar downtube with diagonals. All the tubes in both kits are 1.75-inch diameter, 0.120-wall DOM except the 11⁄2 diameter dash spreader. We had to grind only 1⁄8-inch off this one tube to get it to fit well.
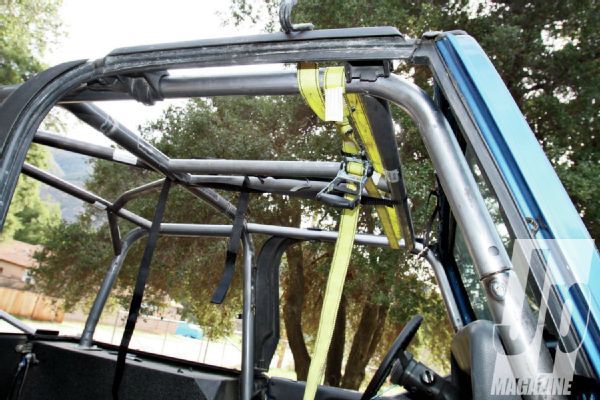 Of course, with that last caption we just oversimplified a few days of head-scratching, running a grinder, and climbing in and out of the Jeep measuring stuff and holding up bars. But what we aren’t over simplifying is this: The bars for the spreaders up top went into the ’cage as-supplied with no problems. We used ratchet straps to hold it in place while we measured and squared everything.
 After we had it all tacked up we put the factory top and bows back on to test fit everything. We marked where we would need to trim the door surrounds for the front tube and marked where the windshield needed to be for the weld-on tabs. In YJs and earlier Jeeps, if you go this tight to the dash you won’t be able to put the windshield down without pulling the ’cage. On a TJ, the bolt to lower the windshield is on the outside of the windshield built into the hinge with no plate to remove inside the Jeep.
 Factory ’cage mounting points might be enough to handle a flop or slow roll, but the TJ ‘cage in our YJ didn’t use any of the factory mounting points and that sheetmetal just didn’t give us the warm fuzzies if we were to ever roll it.
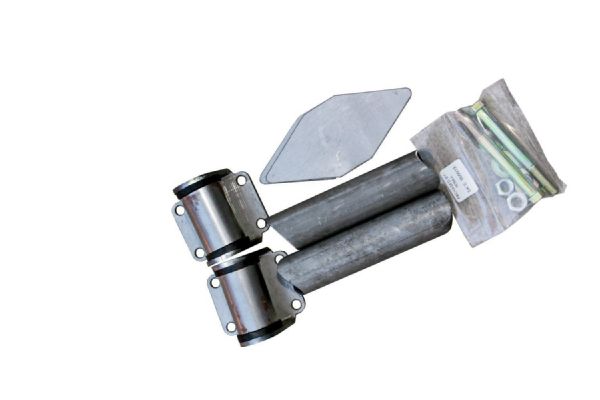
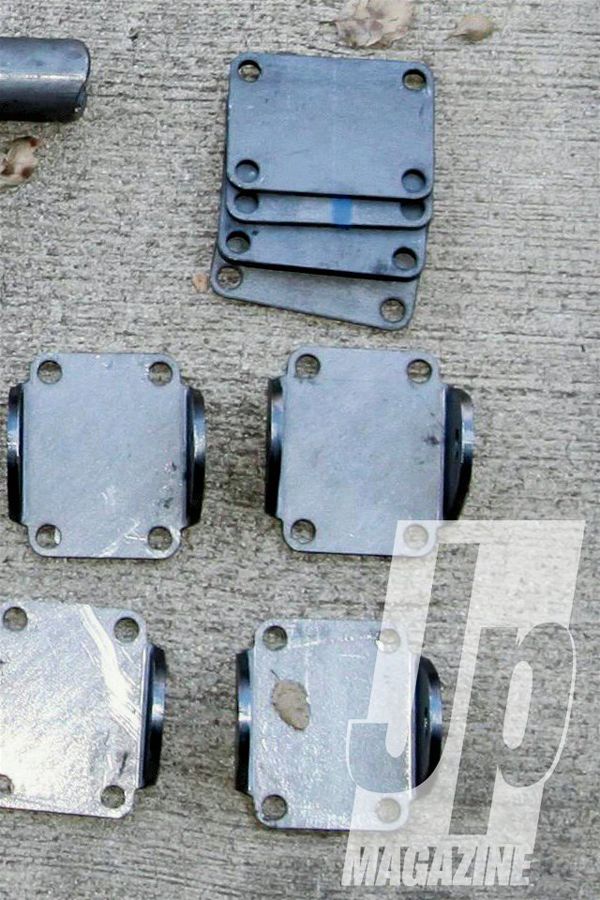 If you plan on really whomping on it you might want to add tie-ins too. Synergy has TJ-specific tie-ins for the A-pillar (top), but for the B-pillar and C-pillar the company only has these universal kits (above). The universal kit covers only one leg, so we needed four of them. Also, you need to provide your own bolts and DOM tube for the universal kits. In both kits the plates are laser-cut and CNC-formed 3⁄16-inch-thick steel and include a bushing and sleeve to isolate vibration.
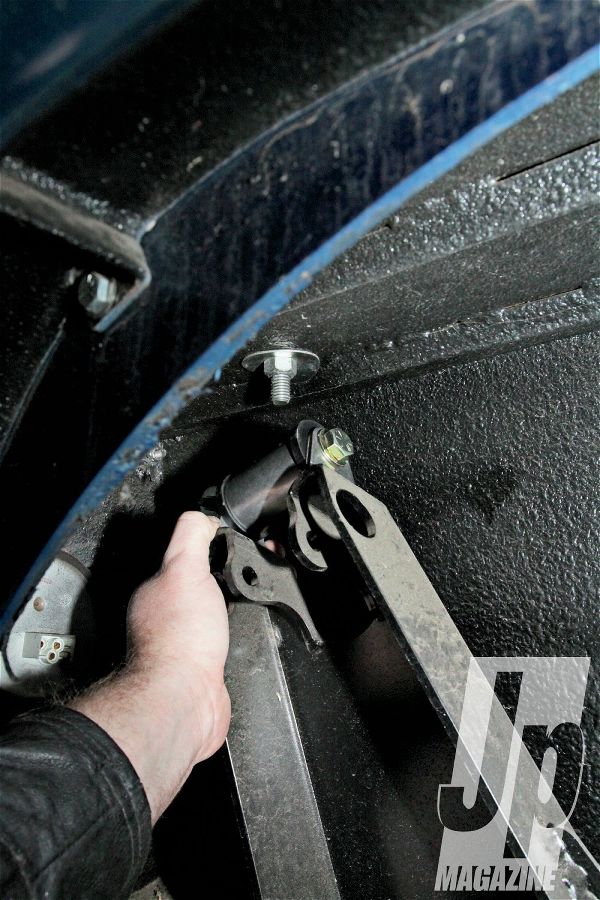
 The A-pillar feet inside became a problem because we put them in how they best fit our floor. This turned out to be a mistake. In our defense, the instructions don’t specifically state the orientation (although we noticed afterwards the picture clearly shows it). At this point, it was too late to change the A-pillar foot inside, so we had to modify the mount underneath to work. We got lucky in that we also had the wrong rockers on the Jeep. Shown is a TJ rocker, which gave us the clearance to bolt this together without cutting the bottom of the rocker guard such as a YJ or CJ guy would have to do.
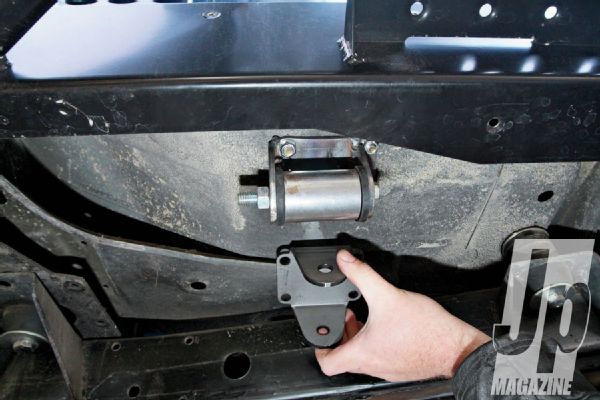
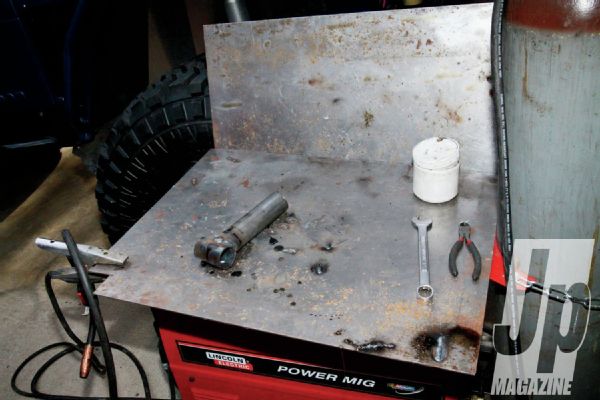 We then took the included tube and found it was about 1-inch too short to reach the frame. We cut and notched our own. Make sure to pull the bushings out before welding as that polyurethane can’t take the heat. Sometimes we convert our Lincoln into a welding table in this fashion to put parts together off the Jeep. The bottom plate gives us a table while the vertical plate blocks the wind. Just be careful to not put too much heat into the bottom plate (it should never get too hot to touch).
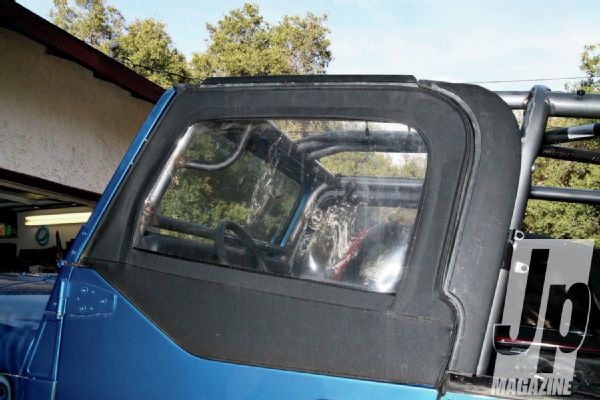
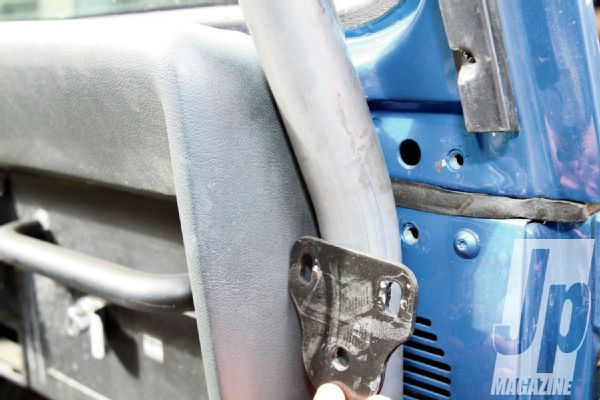
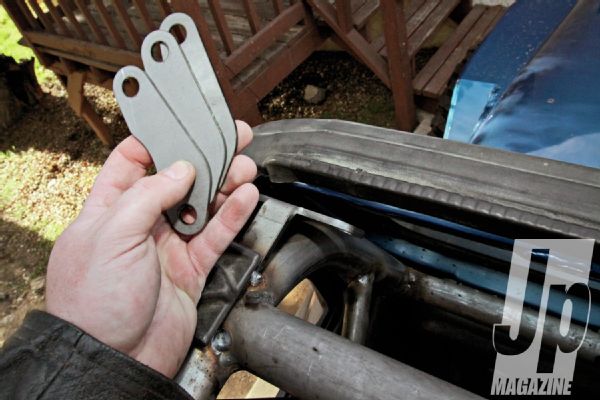 The TJ top header fastens to the header of the windshield frame with latches rather than the plastic in the groove of YJs. So, it might look odd to you older Jeep owners, but the space between the windshield and the front header bar of the ’cage is deliberate. However, we still had to cut about 11⁄2 inches off of our top levers to get them to clear the tube. Also note the location of the included tabs and tab spacers that Synergy includes with the kit. In a YJ, this is now all that will hold our windshield up when we have the top off.
 Here’s the finished view of the A-pillar tie-in. We had to make our own body and frame-side plates for the B-pillar, but it came together much the same way. The plate at the frame shown here is included with the TJ-specific kit and is there because TJ frames (and all short wheelbase Jeep frames for that matter) are only 1⁄8-inch-thick. That means in a bad roll, the tube going to the frame is stronger than the frame itself. This can result in bending or tearing of the frame.
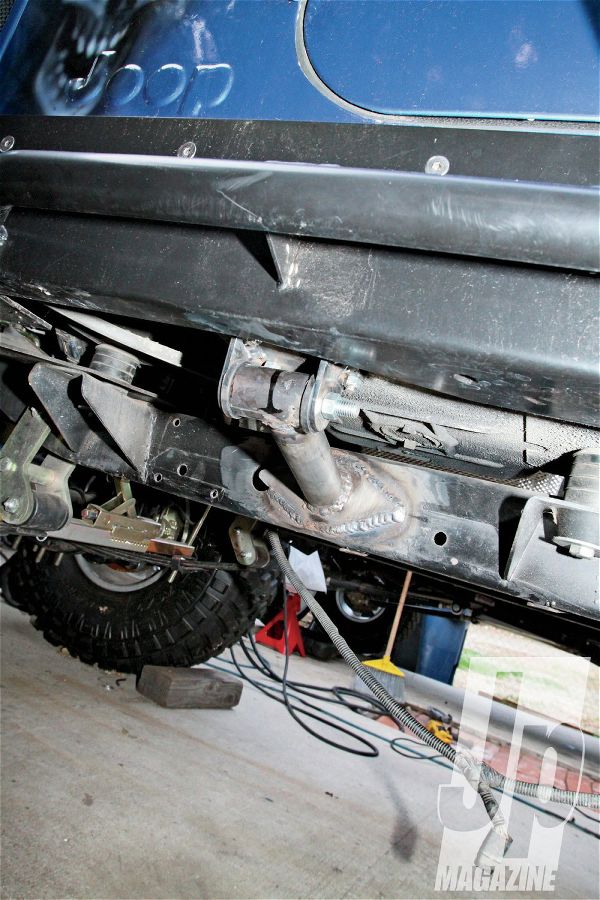
 Out back, the C-pillar foot is barely 2 inches above our rear shock towers so we went the other way around. There was just no way we could have snuck a tube around the shock tower to go back to the frame. We used some tabs welded directly to the shock towers and then ran the tube back to the underside of the fender. Both the tabs and the towers are made from 3⁄16-inch-thick steel so we have no worries about this setup holding up in a roll.
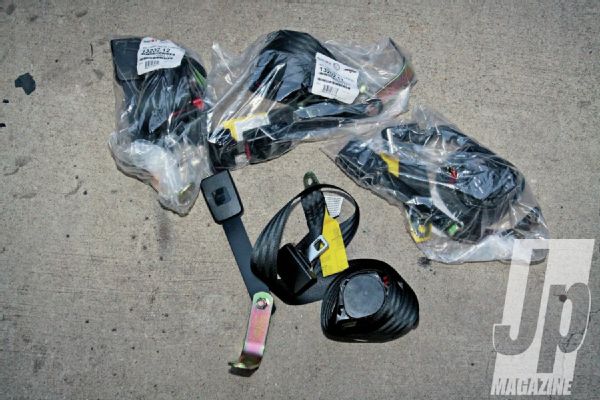 The factory rollbar we originally put in the Jeep was sitting outside for years before we got it rendering the seatbelts sun-faded and useless. Not only didn’t they retract, but we wouldn’t have used them if they did because of how bad the webbing looked. However, we found good hardware so we went to Omix-Ada to get replacement TJ seatbelts. TJs used three-point belts front and rear for all years and front and rear belt assemblies are the same. They are only available in black, but if they are ever needed, we could care less what color they are, only that they work.
Brave Manufacturers
We’ve seen the factory drawings for Jeep frames and bodies and variances where plus or minus 1⁄4-inch is acceptable per the blueprints. That means that right from the factory your Jeep could be up to 1⁄2- inch different than the one that came before it. Add abuse over the years, and that is likely to get even worse. In our case, one of the last times this Jeep was driven was into a living room. The front end sheetmetal wasn’t salvageable, and we had to have the frame straightened. So, even if we were using the correct kit for our year/make/model, we’d have been shocked if everything fit. You don’t want to cut corners putting a ’cage in, so taking our time, it did take us several days to get this done. When you consider that you want no more than about 1⁄8-inch gap at any tube, and that the Jeep itself is lucky to be 1⁄2-inch out, it amazes us that any company can sell kits like this. But in many places we were happily surprised by how easily the kit went together as-delivered (as in with no grinding, cutting, or bending). And where it didn’t, it was no one’s fault but our own for putting the square peg in the round hole on a tweaked Jeep with the wrong top.
Wrong Tool For the Job
With few notable bolt-in exceptions, a rollcage is going to require some special tools and skills. We already had an excellent Lincoln Electric Power MIG 255 and knew how to use it, but Trasborg lacked the bender and notcher to pull off a custom at-home job. Learning a new bender isn’t the way to go on a deadline which is why either full-on shop-built custom or pre-bent were the options. While we did have a chop saw, which is critical to all straight cuts, no bender or notcher was available. In a straight TJ, we are confident that this kit could be installed in a day or two. With our bent YJ and lack of proper tools, we ended up doing a ton of bench grinder notching and trial-and-error fitment testing so it took us a lot longer. However, we were willing to spend the time to avoid taking too much off or leaving too big of a gap in the tubes. In the end, it took us more like six solid, albeit winter, days to get it done in our driveway. If you are planning on putting the wrong ’cage kit in your Jeep, either use the right tools or do it when there is more light (as in summer). All-in-all, we are very happy with the results. We didn’t waste any tube, and that the factory TJ top still fits like factory on our YJ.