Speedy Auto > Car Tech > 4x4 > Engine

Onboard Air Anatomy - Air Free - Jp Magazine

Onboard Air Anatomy - Air Free Pete Trasborg Brand Manager, Jp onboard Air Anatomy kilby Photo 15245399 
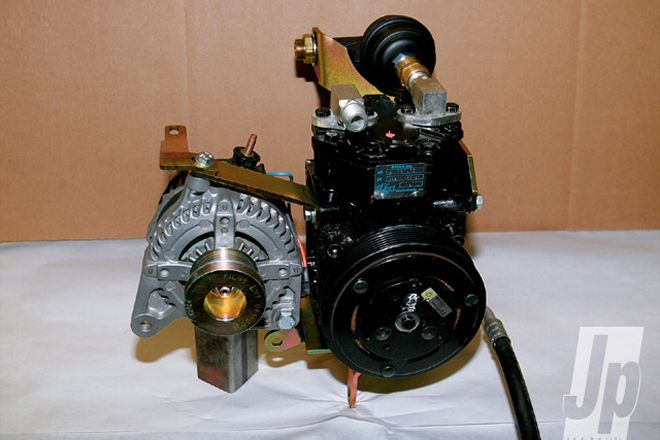
This a Kilby Enterprises setup for a JK. While you can put the parts wherever you want, this is a very well thought out way to locate the parts that are involved with the compressor.

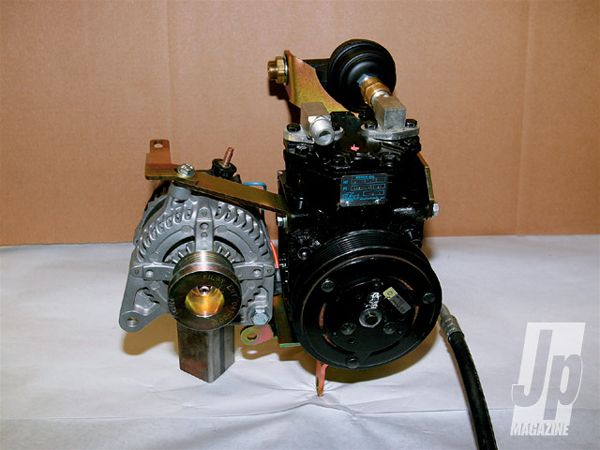
Engine-driven onboard-air systems can be confusing to understand. The belt-driven compressor is obviously needed, but are all the switches, valves, gauges, and everything else needed? What specs are important? What separates the good parts from the crap parts? The first time we built an onboard-air system we wasted a lot of money buying parts, hoses, and fittings multiple times. After spending so much money on things we didn't need, we decided to seek professional help to help you avoid some of the mistakes we made buying and breaking cheap parts. So, with the help of Kilby Enterprises, here is everything you need to know about onboard air.

Expert Source
For those of you that haven't heard of Kilby Enterprises, the company has been building bolt-on onboard air systems for Jeeps for 12 years now. The company also now builds onboard air systems for many popular late model pickups. Thanks to years of experience with parts that fell short, Kilby had perfected such parts as the pressure switch, pressure release valve, bolt-on engine brackets and more. All the parts shown in this story are available from Kilby Enterprises.

PhotosView Slideshow One important thing to remember about the York compressor is that the suction side needs to be above the discharge side if you're mounting it horizontally or at an angle. The side marked "S" or suction is the intake for the compressor which is basically a small 2-cylinder engine. See the two round areas cast into the head? The cylinders are in there. One of the parts that takes a lot of time, and effort, not to mention welding and fabrication skills to make, is the actual mount for the compressor. This is for a '00 TJ. Unless you have a YJ with no A/C, to properly mount a compressor for onboard-air means a lot of measuring. The most important thing is fore-to-aft belt alignment. You need to get the compressor pulley exactly in line with all the other front end accessories or you will throw or chew up belts. The coveted York compressor is the 10 cubic inch unit. While the manufacturer puts a tag on the compressor, many of the ID tags are gone, or could even be switched. The way to tell what York you have is by the end of the crank (where the pulley attaches to). The one shown is the 10ci model. You can tell by the clean cut tip. Check out kilbyenterprises.com/york-manual/pdf/19.pdf for how to identify the 6ci and 9ci models. The York compressor has no way to keep pressure in, and without a one-way check valve, it will bleed pressure out from downstream, making the compressor work harder. In the A/C usage, the oil and freon that flows through the compressor also cools it, so there has to be a shut down period. Without a check valve, the pressure switch will be turning the compressor on more often which can overheat the compressor. And since this should be mounted close to the heated air of the compressor's outlet, it should be able to withstand 250 degrees as well. There are three different attachment styles for the York compressor. They are flange mount, Rotolock, and Tube-O fittings. When the lines are hooked up, the flange mount (shown on left) is at least 1-inch shorter than either the Rotolock or the Tube-O style fitting which makes it more desirable for applications where clearance might be an issue. After the Coalescing filter pulls the oil out of the air stream, it collects in the bowl. More oil in the filter means there is less in the compressor. You can either drain the filter out into your hand or on the Jeep fender, or you could use this oil return kit to feed the oil back into the compressor. Just fire up the system so there is some pressure in it, and move the 1/4-turn valve. The York wants to have about 10-ounces of oil in it, and 6-ounces is actually out of oil so keeping tabs on this is important. Just like your Jeep engine, you want a good filter on the intake (suction) side of the compressor. The unit shown here features a high-temp polyester filter, a full metal body, and a silencer tube. The full metal body keeps a lot of under-hood and trail dirt from the element, and having the element in a metal can cuts down on the noise from the system when it is running. There is no oiling system in the A/C compressor, per se. It is designed to constantly circulate oil, so whatever oil is in the unit gets pumped back out into the system. It doesn't matter what compressor you use, you should put a filter on the outlet (discharge) side of the compressor. This coalescing filter has a full aluminum body, the foam filtering element is rated to 250 degrees, and the sight glass is small. The oil in the compressor can eat large plastic sight glasses, and the heat created from the compressor can melt lesser filtering elements. There is an arrow on top of the filter that shows which way the flow of air needs to go. This Kilby Enterprises manifold assembly showcases more parts that are needed to run the system. Without the pressure switch, the compressor doesn't know when to turn off. If the pressure switch fails and there is no pop-off or pressure release valve, you could blow a line or the tank. This Goodyear Instagrip hose has a working pressure of 300psi and is designed to work with the push-lock barb fittings without damaging the inside of the hose. As shown here, the more pressure on the hose, the more the hose itself clamps the barbs. The pressure gauge is kind of an optional part, but without it, there is no way to really see what is going on in the system. While the liquid filled gauge is about double the price, there are some advantages. As the compressor pumps, there are pulses and they can be reflected in as much as +/-25 psi increments on the gauge. Not only does the bouncing make it harder to read, but it can greatly lessen the life span of the gauge. Manifold AssemblyThis is the pressure release valve. Many people mount them in the tank under the Jeep, but the problem is that leaves the valve vulnerable to rocks. By mounting it under the hood it is protected from damage. The pressure switch turns off the compressor at 150 psi, and most of the parts are rated to 250psi, but this valve pops at 185psi to keep other parts from exploding. A lot of us use barb style fittings to attach the air hose from one component to the next. The type of fitting is important. The fitting on the left requires a hose clamp on the line; the problem with using a hose clamp on a rubber line is that the hose clamp will either cut into the line, or not exert enough pressure to keep the hose on and results in leaks. The right fitting is a push-lock barb which doesn't require any hose clamp. In fact, if you use a hose clamp on a push-lock style barb, the barb itself will cut into the hose. Also, using a swivel-type fitting makes it way easier to attach the hose because the hose can then stay stationary while the fitting is tightened down. Unless you are going to mount the pressure gauge in the cab and manually turn the system on and off, you need a pressure switch. The pressure switch is the brain of the system and this particular switch will turn the compressor on at 120psi and off at 150psi. Make sure to get a quality pressure switch. Cheap Chinese switches tend to lose accuracy from the set points, often requiring frequent replacement of switches. Spend the money the first time. This is the only control you should need in the Jeep. Run a switched positive lead to this switch (which can be a simple single-pole, single-throw switch) and then from this switch run the power through the pressure switch under the hood and to the compressor clutch. This accumulator tank provides a reserve capacity for the compressor but it also collects any oil that manages to get past the coalescing filter. This is where all the air outlets should be plumbed from unless you like oil in your air lines. There should be a drain in the lowest part, and outlets or 3/8-inch NPT plugs in all the others. Note, the hose wouldn't attach directly to the tank as the tank normally mounts under the Jeep, this is for illustration only. By using a coiled flexible hose like the one shown with a 1/4-inch female connector at one end and a 1/4-inch male connector at the other it is possible to easily interchange tools or air chucks and easy to take the hose from one end of the Jeep to the other. The Tank AssemblyOn a tank with enough bungs, you can use the push-lock barb fittings and Instagrip hose to run compressed air to anywhere in your Jeep. The two most convenient spots are at the front by the grille and at the rear by the tailgate. With a universal 1/4-inch female adapter you can borrow your friends' hoses or most any shop attachment. You can use a petcock for a drain on the tank, but it is vulnerable to rocks and other debris. And its not uncommon for the valve to require a pair of pliers to get it to seal completely with no leaks. If you are going to use a tool, why not just put a 3/8-inch NPT plug in the downward-facing bung and use an Allen key to remove it? The plug is more resistant to rock hits too. Use What You GotA lot of guys want to just use the existing compressor on their Jeep when the A/C dies or starts blowing hot. There are a few issues to be aware of with the Sanden compressor. Many of them don't have an oil fill/check plug (arrow), and if they do, in the Jeep applications, the fill/check plug is often on the side. In case of not having a plug, the only way to oil the compressor is through the intake or suction side. And then, there is no way to be sure how much oil you are putting in it. If the plug is on the side, then the accessory belt or belts need to be removed, the compressor unbolted (and possibly the lines unbolted too), turned and mounted so the plug is facing up so it can be checked or filled. Kilby Enterprises offers a dipstick for the Sanden compressor so that if you do have a fill plug, you can accurately check the fluid level.