Rough Countrys 4-Inch Suspension Lift For The 09-10 Ford F150 - Four Wheeler Magazine

Ken Brubaker Senior Editor, Four Wheeler

Ford redesigned the F-150 for the 2009 model year and the changes were substantial. The truck got a stronger frame, longer leaf springs for a better ride, a retuned coilover-shock IFS, and a new interior, among other things. For those of us who love the dirt, the FX4 package got a brand-new rear electronic locker in addition to all the other FX4 goodies like increased skidplating, specific shock tuning, 3.73:1 gears, and 32-inch tires. The result was a truck that worked very well in the dirt.

rough Countrys 4 Inch Suspension Lift lift Kit Table Photo 34183965 
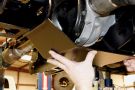
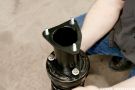
Here are all the components included with the 4-inch F-150 kit.

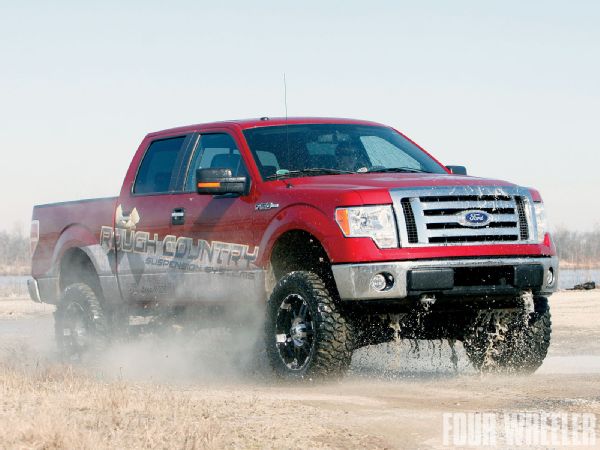
But like any vehicle, there's always room for improvement. The '09 F-150 FX4 had an unremarkable 23.7-degree approach angle, 20.7-degree departure angle, and 8.7 inches of ground clearance. Fortunately, the aftermarket has ways to improve those numbers and make the F-150 in all trim levels even more capable in the dirt.

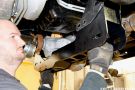
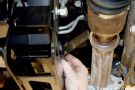
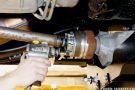
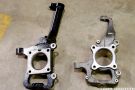
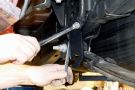
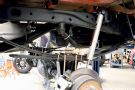
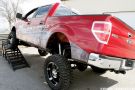
We recently had the opportunity to travel to Rough Country Suspension in Dyersburg, Tennessee, and install their brand-new 4-inch suspension lift for the '09-'10 F-150. This kit is one of three kits that Rough Country offers for this generation of F-150. It's joined by a 21/2-inch leveling kit and a 6-inch kit. The 4-inch kit includes everything you need to lift the F-150. Up front, it includes crossmembers, knuckles, strut spacers, differential drop brackets, and driveshaft spacer. Out back, it includes lift blocks, U-bolts, Performance 2.2 shocks and various brackets. The kit has an estimated install time of eight to ten hours and requires minor cutting and drilling. When installed, the kit allows fitment of up to a 35x12.50 tire on an 8-inch-wide wheel with 41/2 to 5 inches of backspacing. Best of all, at time of print this kit was selling on their website for a very competitive $1,299.95.

rough Countrys 4 Inch Suspension Lift rough Country F150 Front Passenger View Photo 34183968

So, how did Rough Country approach lifting the F-150 four inches and how did the kit install? Read on.

By The Numbers Measurement Stock Modified Change Ground to front bumper 12 in 19 3/4 in +39.2% Ground to rear bumper 22 1/2 in 27 in +20% Angle of approach* 38.5 deg 55.6 deg +44.4% Angle of departure* 29.7 deg 35 deg +17.8% *measured from passenger-side tire to bottom of bumper

Bottom Line
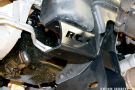
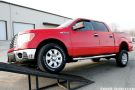
The kit installed without any headaches and we liked that there was no mystery as to where to make the cuts in the rear crossmember thanks to the easy to use templates. This specific truck was fitted with 35x12.50-20 Mickey Thompson Baja MTZ tires. Stock, the F-150 traveled 531/2 inches up a 20-degree ramp to earn a RTI score of 369. After the kit was installed, the truck traveled 67 inches up the ramp to earn a score of 462.

After the install, the truck rode great. In fact, we were surprised at how nice it rode. Off-highway, we threw the truck through various water holes and on rough trails at speed and it performed well, with no weirdness in handling or steering. We really appreciated the improvements in approach and departure angles when we got into undulating terrain along the Mississippi River. It made a great pickup even better.

rough Countrys 4 Inch Suspension Lift stock And Lifted F150 Front Shot Photo 34184001 PhotosView Slideshow Like any other kit, all of the factory components that are in the way or are going to be replaced need to be removed from the vehicle prior to installing the new kit. With this kit, the first step to installing the new front lift is to tape the provided templates on the front and back of the driver-side rear crossmember and follow the instructions to trim the crossmember mount with a reciprocating saw. This must be done so the differential can be lowered from the vehicle. A hole is also drilled through the crossmember to mount the new rear crossmember. This is how the front end of the vehicle looked with the factory components removed and the crossmember trimmed. The front differential is relocated downward (to keep the correct axleshaft CV angles) via a pair of differential drop brackets. These brackets (passenger-side shown) mount to each side of the vehicle in the factory differential mounting points using the stock hardware. With the differential drop brackets installed, the front differential is reinstalled in the truck to the new brackets. Made from 1/4-inch-thick steel, the new rear crossmember is attached to the factory rear crossmember with the factory hardware. This new crossmember is the rear mount for the lower A-arms. Driver- and passenger-side swaybar drop brackets are included with the kit and they mount to the frame and rear crossmember. They serve a dual purpose. They allow the factory swaybar to be reused, and they help support the new rear crossmember. A passenger-side differential brace bolts to the front differential assembly and the rear crossmember. Like the rear crossmember, the new front crossmember is made from 1/4-inch steel and it mounts in the factory A-arm pockets. This new crossmember is the front mount for the lower A-arms. A 3/16-inch-thick skidplate bolts to both the front and rear crossmembers and helps to protect the front differential. New hardware mounts the factory A-arms to the new crossmembers. Adding lift to the front suspension means that the front driveshaft will be too short, so a steel 3/4-inch machined billet aluminum spacer is used to compensate. This kit is designed to reuse the factory struts. Like the driveshaft, spacers are used to compensate for the lift. New studs are installed in the spacers and then the spacers are mounted to the struts using the stock hardware. The strut assemblies are then installed in the vehicle. Hardware is supplied for the upper mounts and the factory hardware is used at the lower mounts. Longer knuckles are included with the kit to compensate for the increased distance between the upper and lower A-arms. Shown here is a new knuckle (on left) positioned next to a stock knuckle for comparison. These knuckles are designed so that a stock wheel can be used on the vehicle. The factory stock bearing assemblies and hub mechanisms are simply transferred to the new knuckles and then the knuckles are installed. During the 2009 model year, Ford made a change to the caliper bolt size on the F-150. Here you can see the smaller bolt they used in early '09 compared to the larger bolt they used after that. If your F-150 has the larger caliper bolts, you'll need to enlarge the caliper boltholes in the knuckles using a 41/64 drill bit. Here's how the front end looks with the kit installed. The kit also includes brake line relocation brackets for both the passenger- and driver-side. Installation of the rear suspension begins by removing the shocks. The kit includes a new brake line bracket and emergency brake cable bracket (shown). The brake line bracket bolts onto the frame in existing holes, while the emergency brake bracket requires drilling a new hole in the frame. Dual-purpose rear blocks not only lift the rear of the vehicle, but also help to decrease axlewrap. New U-bolts hold everything in place. Here's how the front end looks with the kit installed. The kit also includes brake line relocation brackets for both the passenger- and driver-side. 129 1009 12 o+rough countrys 4 inch suspension lift+stock suspension f150 ramp 129 1009 16 o+rough countrys 4 inch suspension lift+lifted f150 ramp