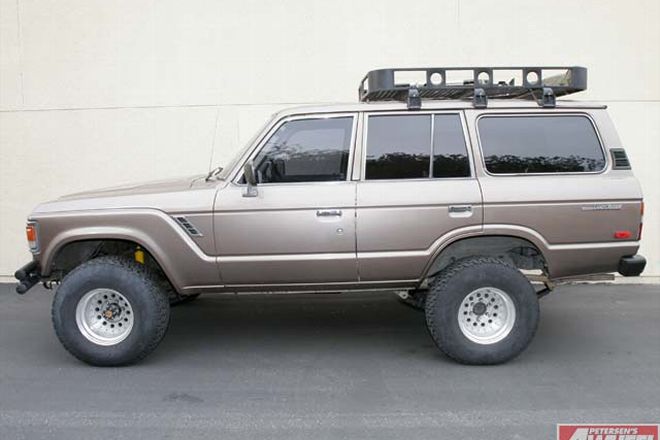
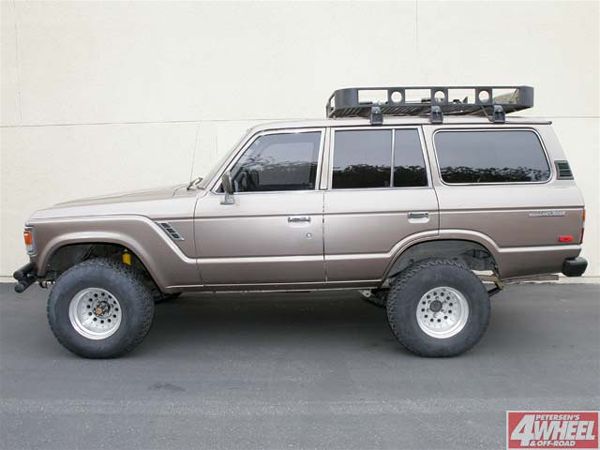
 Take a look at the Cruiser with the Old Man Emu kit. Now, it's ready for heavy loads and the ride is much better.
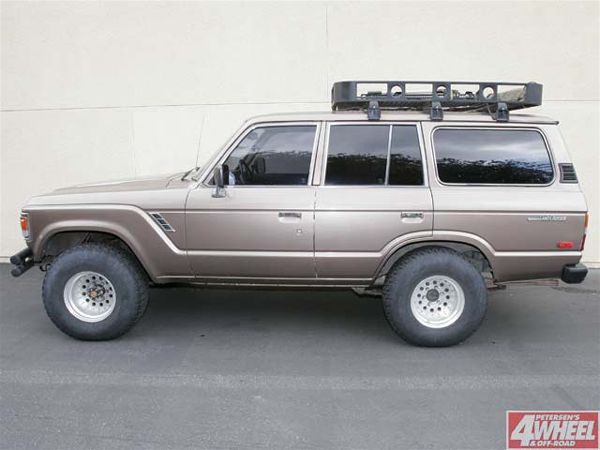 Here's the FJ-60 with a 20-year-old lift kit. Notice how badly the rear of the truck sags with no cargo. You don't even want to know how the ride feels.
So, you have a truck riding on leaf-springs, and you want to add a lift kit, but you don't want to pay someone else to do it? Don't be scared! It's not as hard as you might think. All you need are the right parts, the correct tools, your buddies, and a clear plan of attack. Here's how two lift kit rookies were able to raise an FJ-60 in a weekend (read this, and you should be able to do it in just one Saturday).
When shopping for a suspension kit designed to fit an FJ-60 Land Cruiser, it's almost impossible to ignore Old Man Emu parts. They are named after the flightless Australian bird with powerful legs that blasts over rough terrain while its body barely moves. OME stands out because their kit is specially designed for the Cruiser, it includes greaseable shackles, and is extensively tested off-road, keeping performance (and comfort) in mind. Not something you expect from a lift kit maker - but it's something you should expect. We chose a medium heavy duty setup because it allows a lot of camping gear to be carried in the back, but doesn't require modifications to the driveshafts or the steering system.
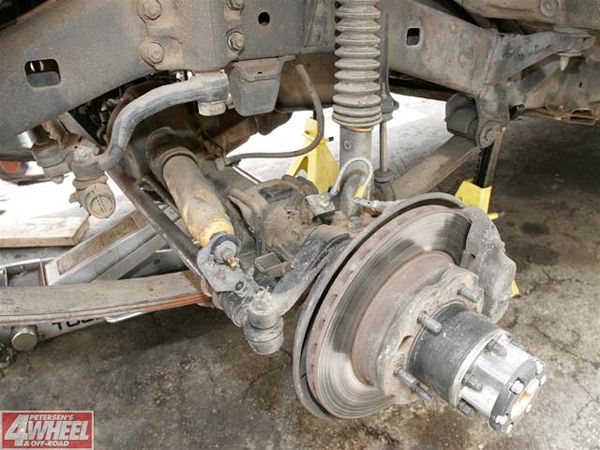
Our project truck is a 1985 Toyota Land Cruiser FJ-60 that was bought with suspension lift that included aftermarket shocks and add-a-leafs inserted in the original spring packs. It's performance off-road is quite admirable, but a recent trip to Truckhaven Hills near the Salton Sea proved the tires were rubbing too much, and the suspension also resulted in one "stuck" that required a yank from a nice guy in a Jeep. A consultation with 4-Wheel and Off-Road Editor, Rick Pw, revealed the existing kit was hot poop about 20 years ago. Not bad, but it looked like nothing had been replaced in the suspension setup since the late-1980's. The springs were obviously flat from wear, allowing the 33x12.5 tires to rub in the wheelwells and leave cuts in the sidewalls. The ride suggested the shocks were no longer hot - just poop.
 The Time Bandits arrive.
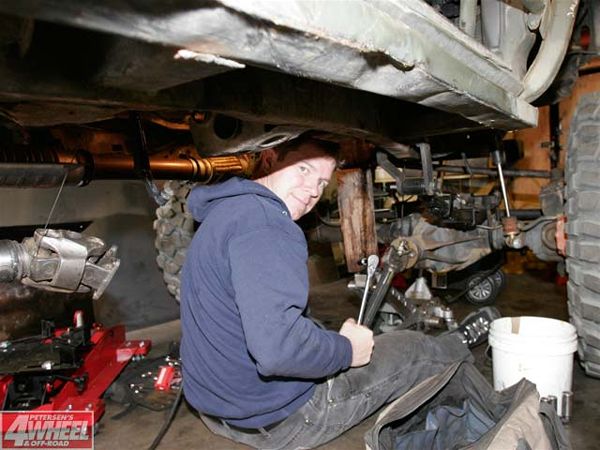
Rick was kind enough to volunteer Tech Editor, Fred Williams, to help two web guys install the Old Man Emu kit during a weekend at the Warehome while he worked on his '86 Toyota Project, Clampy. We brought a couple of cases of PBR to help repay Fred for the use of his driveway, tools, and patience. He did a good job of looking happy to see us when we arrived.
Before we got started, Video Producer John Adolph talked to Fred about some tips gleaned from various Land Cruiser Message Boards on the Internet. Crazy Uncle Freddy gave us some safety tips and general advice before getting back under Clampy to replace the clutch and a leaky main seal.
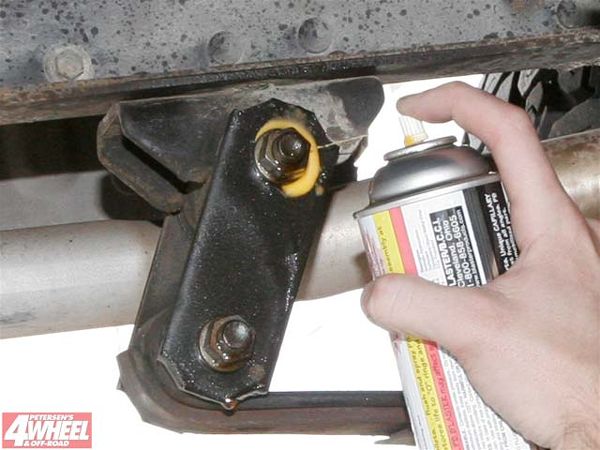
A week earlier, we had sprayed down all the suspension connections with PB Blaster to make removal easier (WD-40 or JB-80 will also work). This is an especially good idea if you live somewhere rust is a problem - or if your truck lived in the rust belt or near the ocean. Another spray of Blaster was applied before we started removing anything from the Cruiser.
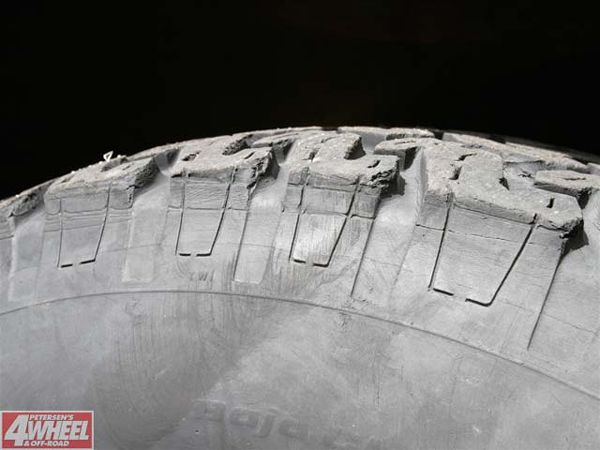 This is what happens when you fight fenders with 33x12.5 tires.
We decided to take some measurements and photos to know how much lift we gained once the last bolt is tightened. Plus, that provided some time for the new coating of Blaster to soak in. In the rear, the tires were about 3 1/2 inches from the fenders. The front tires, (which were constantly being cut by the fenders), had about 5 1/2 inches of room for travel. The current setup also left the rear end sagging, which was ugly, and problematic when heavy camping gear was stored in the cargo area (along with a 175-pound Mastiff in the back seat).
We had ordered a number of Old Man Emu parts to upgrade the Yota. They included:
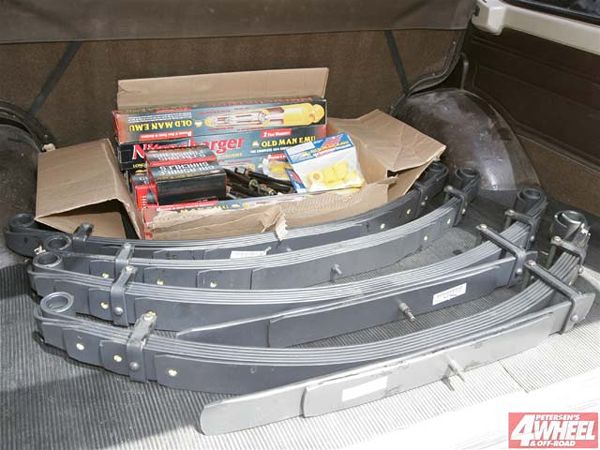
Four OME long-travel Nitrocharger shocks
Two OME Dakkar front leaf-springs
Two OME Dakkar rear leaf-springs
Four greaseable spring pins
Four greaseable anti-inversion shackles
Twenty-four polyurethane suspension bushings
Four front U-bolts
Four rear U-bolts
Another thing we did before going to the Warehome was inspect all the parts received in the mail to make sure everything had arrived. Just like Santa, we checked our list twice, 'cause nothing is worse than giving the school bully a Red Ryder BB gun, or removing your daily driver's suspension and finding out you don't have the right parts to get it rolling again. Just think about how many times you get the wrong parts on your hamburger. That really sucks, and it doesn't even leave you stranded.
You should make sure you have all the tools needed for the entire project, plus another working vehicle at your disposal - unless you enjoy walking four miles to the nearest auto shop, or running to get there before they close the doors. During this project we needed the following tools and supplies:
Floor jack (two is better)
At least four jack stands
Safety glasses
Work gloves
PB Blaster (or WD-40, JB-80, etc.)
Impact gun (optional, but very helpful)
Metric ratchets (long and short sockets)
Lug nut wrench
Torque wrench
Metric wrenches
Hammers
Wheel chocks
Bushing grease
Shackle grease
Grease gun (with proper adapter)
Plastic bags and labels for parts that must be reused
Shop towels and rags
Box for trash
PBR (or other payment for your buddies)
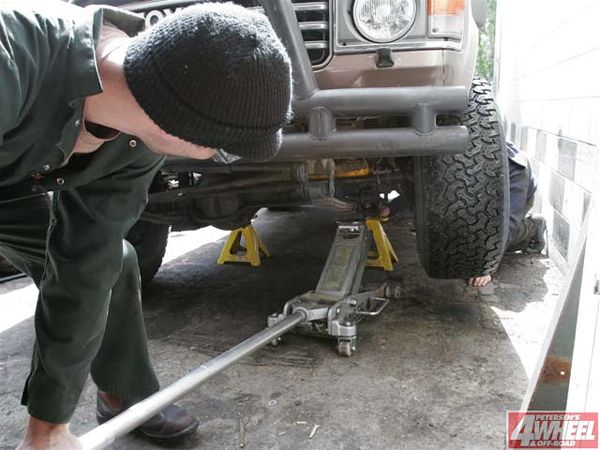
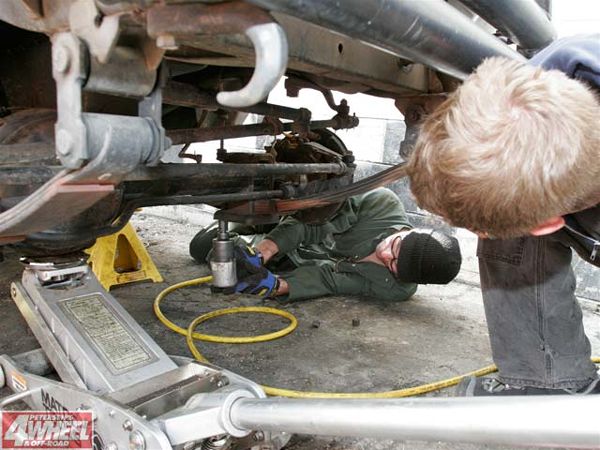
Once it was clear we were not diving into an empty swimming pool, we found a flat area on the asphalt, (conveniently in the middle of Fred's driveway), where we'd have room to work on the truck and safely place our jack stands. We positioned the jack stands as close to the spring perches as possible so they could be raised once the truck was lifted into the air. With the emergency brake applied, the floor jack was placed under the driver side spring and the FJ was lifted. The jack was then used under the differential on the other side to raise the truck enough to place the other jack stand at the same setting to make the truck level. The floor jack was then positioned under the diff to keep some weight off the springs and help keep the truck steady.
With our workspace ready, it was time to remove the wheels. Fred's impact gun made short work of the lug nuts, (which were stored in baggies), and the wheels were rolled out of our way. That gave us access to our first targets: the shocks.
Box wrenches made it easy to remove the once mighty nitrogen shocks that were probably installed around the time Back to the Future II was in movie theaters. We made sure to keep the mounting bolts out of the trash box because some would need to be used again. These were placed in bags with "front shock bolts" labels to help keep the curse words used to a minimum. A busted steering stabilizer shock was also tossed.
Next, we used the impact gun to remove the U-bolts from the bottoms of the leaf-springs.
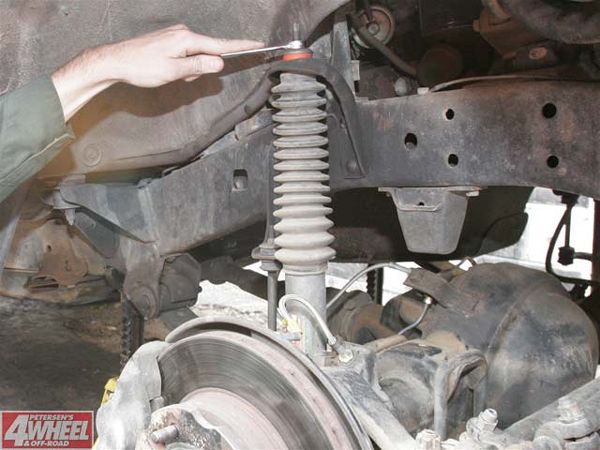
Before we removed the leaf-springs, additional jack stands were placed under the axle tubes. Detaching the springs will release the axle from your truck, so make sure it is secure and that none of your body parts are in danger of being squashed if it slams to the ground. On our project truck, the sway bar, (which Fred hates), keeps the front axle from falling to the ground, but you should still keep your body out of the way at all times. Also, keep in mind that the leaf-springs are heavy, and will crash onto the asphalt when you pull out the bolts. After you remove all the old bushings, you will have a truck with NO front suspension. Good thing you checked your new kit for all the parts that are supposed to be included. Right?
Once the shackles and other mounting parts were assembled, we lightly greased the pivot points in the bushings to help ease our installation. With the leaves lifted into place, we hand-tightened the bolts in the shackles to allow for some wiggle room during the installation of the U-bolts and the shocks. The U-bolt mounts were placed on the alignment posts built into the springs which assure the mounting is centered, then the nuts were attached. This required applying some muscle to the axle and use of the jack to compress the springs so they would line up correctly. Once the mounts were attached, we could reinstall the shocks with attention to the placement of the bushings and washers. After those were connected, we tightened all the bolts, using a torque wrench to match the specifications required by the manufacturer. Then it was time to get out the gun and fill the greaseable parts of the suspension which will assure a nice, quiet ride. Then, the front wheels were ready to go back onto the truck. It's not a bad idea to loosen the shackle bolts, then re-torque them to spec once your truck is back on the ground.
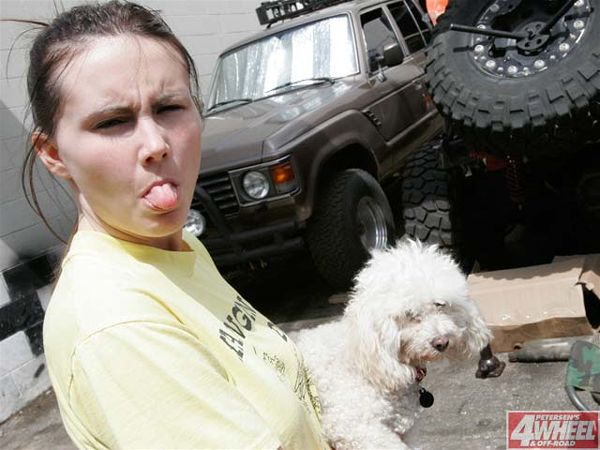 Leah and LuLu say it's time to go home.
Being lift kit infants, and stopping to take video and still photos, it was almost dark once we completed the first half of the installation. Fred wouldn't admit that he was sick of us, but unpaid 4WOR intern, Leah Light, told John he looked like Gumby in his jumpsuit, then said we had to, "Get the 'F' out," (I'm still not sure what the "F" stands for). I think she was joking, but we didn't want to risk the wrath of her poodle LuLu.
We arrived on Sunday morning ready to install the rear part of the lift kit. Since the back of the truck houses the parking brake, we had to make sure the FJ would not move while we were working. That involved chocking the front wheels, locking the front hubs, putting the transfer case into low range, and placing the manual transmission into gear. With jack stands in place and ready to be raised, we used the floor jack to get the "arse" end of the Cruiser into the air and snatch the wheels off the truck.
Removing the old suspension was just like the front, but we had to be extra careful because there's no sway bar to keep the axle from taking the express route to China. So, we placed jack stands under the axle tubes, and kept the floor jack under the axle for added security.
The rear shocks were a little harder to reach than the front units, but were pretty easy to remove. The mounting bolts were saved to be used again. The U-bolt nuts were zipped off, and the shock/leaf mounts were put in a safe place. With this done, the rear leaves could be dropped from the truck. That was easy, but removing the rear shackles came to a halt when we realized the exhaust hanger was in the way. Not a big deal, but it's one of those unexpected time burglars. We found the proper long socket ratchet and removed the bolts attached to the frame. To make sure the hardware did not get lost, we screwed the bolts into the other side of the hanger.
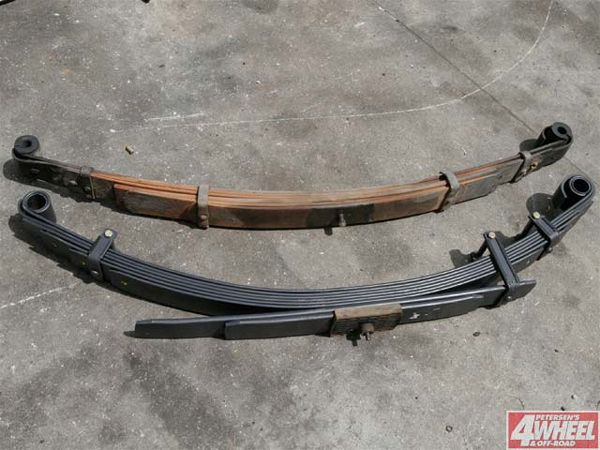 Old vs. new.
Another time bandit robbed us when we realized the new rear leaves weren't identical. One had a code that ended in an "A" and the other was a "B." Not willing to proceed in the wrong direction, we scanned the Internet until we determined with this Old Man Emu kit, the "A" always goes on the driver side for North American, (left-hand drive), Land Cruisers. OK, back to work.
We assembled the rear shackle without the anti-inversion pin since the arch of the new springs would make it impossible for anyone other than The Incredible Hulk to pull the spring eyelet back far enough for mounting. With the bushing pivot points greased, the rear leaves were attached with the army wrap side mounted toward the front of the vehicle.
You have at least two options for installing the anti-inversion pin after the leaves are attached. We chose to use a pry bar just above the eyelet to push the shackle down to a point where the pin could be inserted. You can also wait until the truck is lowered to the ground, and allow the weight of the vehicle to compress the springs and push the shackle into the right position.
Since we chose the first option, the next step was reinstalling the U-bolts and the plates with the shock mounts (and we kept the stock rubber spacer between them). Once again, we had to fight the axle a bit to get the mounting pin to seat correctly. With this done, we could install the new shocks (large side up, so dirt and water will not become trapped). We added grease and tightened the leaf bolts before throwing the wheels back on and lowering the truck. As stated earlier, it's a good idea to loosen the bolts, and then torque them to manufacturer specifications once the truck's weight is over the suspension.
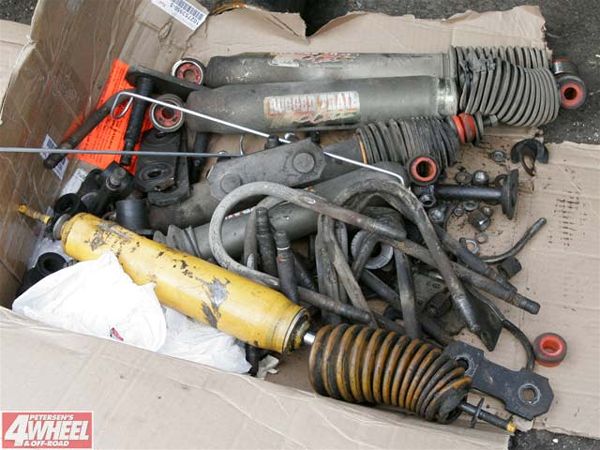 Good riddance!
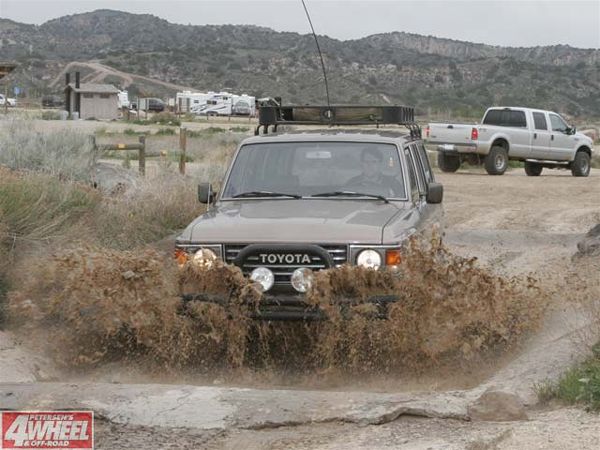
Visually, the change in ride height was immediately noticeable. The rear jumped up by about 3 1/2 inches, and the front gained almost an inch. There is now a slight rake to the truck's stance which will be helpful when the FJ-60 is full of gear (and a very large dog). On-road performance is much smoother than before, and more predictable. Plus, the front tires don't rub on the fenders or any of the steering components. Nice!
Off-Road
After a few weeks of daily driving, the springs had broken in and we went to Hungry Valley SRVA (a.k.a. Gorman) to get some off-road observations. Our friend Jon Santana brought along his '88 Range Rover and we traversed the practice area to try the Land Cruiser on various terrains including a rock trail, water pit, dirt trenches, and some high-speed whoops. The Old Man Emu suspension kit made for big improvements in the ride quality and predictability in off-camber maneuvers. Tire rubbing was eliminated except in extreme flex situations, but the truck owner has already ordered slimmer tires that will tuck the tires into the fender wells. He is also considering a front shackle extension to provide more lift over the front tires.


 PhotosView Slideshow


