Skyjacker Lift Kits For Jeep TJ - Four Wheeler Magazine

Skyjacker Lift Kits For Jeep TJ - Installing Flex Ken Brubaker Senior Editor, Four Wheeler jeep Wrangler Tj driver Front Side View Photo 9290168

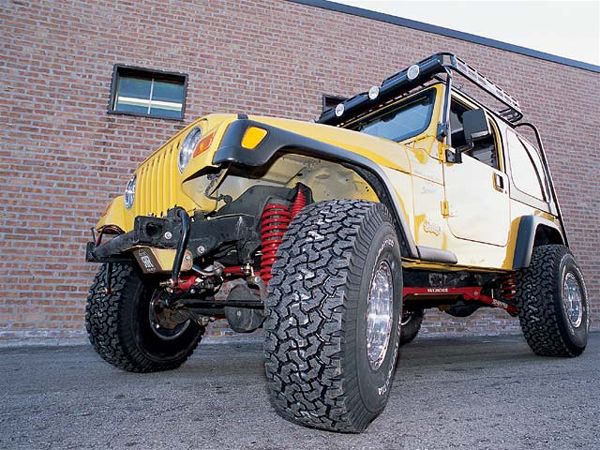
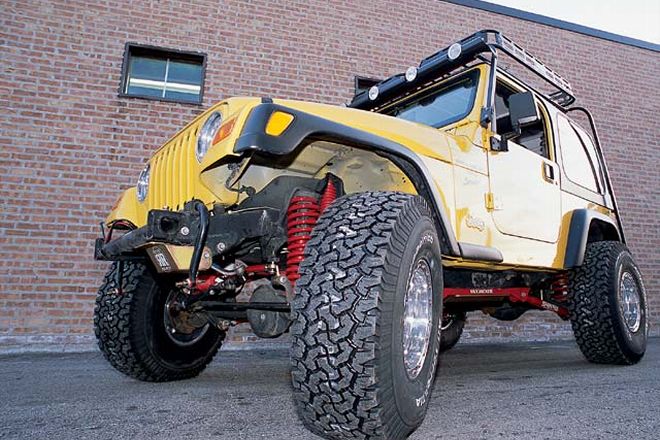
Joining the existing 6-, 8-, and 10-inch Skyjacker Rock Ready Long Arm family of suspensions for the Jeep Wrangler TJ is a new 4-inch lift, and we're here to provide an exclusive first look at the installation of this brand-new, fresh-outta-the-box system. This kit is designed for serious trail enthusiasts who want the highest level of function from their rigs in a moderate-height lift. In addition to the top-quality components included in the kit, we also installed Skyjacker's High Clearance Transfer Case Skid Plate, Skyjacker's Rock Ready Steering Gear Box Skid Plate, and Skyjacker's Rock Ready Transfer Case Shifter Bracket. Other options include Skyjacker's optional Skyking coilover shocks, heavy-duty replacement tie-rod tube, and slip-yoke eliminator kit.

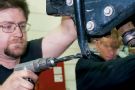
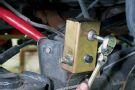
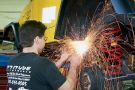
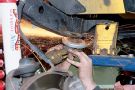
The installation was completed at Attitude Performance in Elk Grove Village, Illinois, by shop owner Matt Dinelli. Skyjacker estimates the average install time for this kit to be 10 hours, but the highly experienced Dinelli had the kit installed in less than 8 hours. The kit is mostly bolt-on, but you will need either a plasma cutter or cutting torch to remove the stock upper and lower control-arm mounts at the frame, and welding is required to mount the new two-piece subframe which holds the transfer case skidplate and mounts for the lower control arms. The result will be a suspension that allows for fitment, and full travel, of 33-inch tires.

129 0207 Flex01 Z Photo 9290171

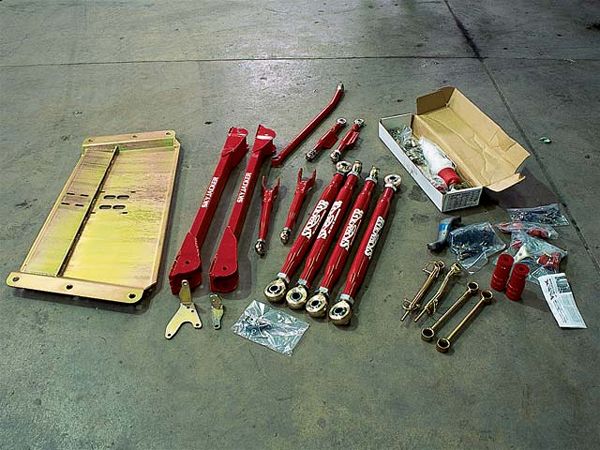
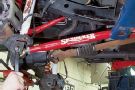
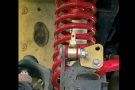
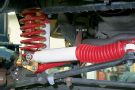
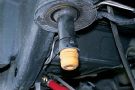
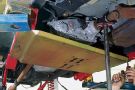
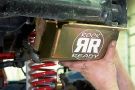
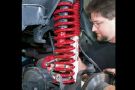
The Skyjacker 4-inch Rock Ready Long Arm kit includes new front and rear coils, new upper and lower Double Flex Long Arms with spherical rod ends at both ends of each link, four Softride Nitro or Hydro shock absorbers, front and rear stainless-steel braided, polyurethane-coated brake lines, double-disconnect front antiroll-bar end links, extended rear antiroll-bar end links, front track bar, integrated two-piece subframe assembly, heavy-duty steering stabilizer, and dropped pitman arm. Also pictured is the Skyjacker High Clearance Transfer Case Skid Plate and Rock Ready Shifter Bracket.

129 0207 Flex02 Z Photo 9290174

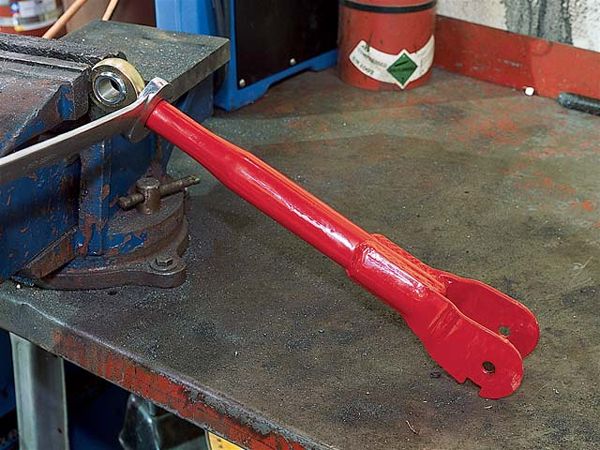
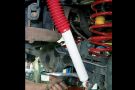
1: The first step is to set the length of the new Rock Ready upper and lower link assemblies. To do this, swivel the ball socket so the bushings are exactly centered, and measure the length of the link assembly from the center of each eye on each end. Rotate the rod ends as needed, being sure to keep the ends square with each other until the link assembly measures the pre-alignment measurements given in the Skyjacker installation guide. When the measurements are correct, tighten the jam nut against the steel tubing. These are pre-alignment measurements only; final measurements will be set when the vehicle is aligned.

PhotosView Slideshow 2: With the vehicle safely supported either on the ground or on a vehicle hoist, remove the front wheels, shocks, steering damper, track bar, pitman arm, both antiroll-bar end links, left-front coil spring retainer bolt and clip, both coil springs, and the bumpstops. 3: Install the new drop pitman arm and reinstall the drag link to the pitman arm and tighten. 4: Install the new extended bumpstops, new coil springs (make sure you reinstall the spring retainers), and shock absorbers. Reinstall the wheels and lower the vehicle to the ground. At the front lower link adjustment cams, mark the vertical line on the cam and the reinforcement bracket for reference so you can realign the marks after the installation of the new components. Raise the vehicle and remove the factory upper control arms and mount the new upper control arms by placing two small stepped spacers into the end of the rod. Place the ends of the control arms into the OEM brackets using the original hardware. 5: Remove the lower factory control arms and the factory lower control arm mounts at the frame. A plasma cutter works great to remove the mounts due to its low heat, thus creating less chance of damaging or distorting nearby metal. 6: After removing the factory control-arm mounts, grind the area smooth and paint. 7: The optional Skyjacker Rock Ready Shifter Bracket eliminates the attaching point to the TJ's body, and it's a must for the 4-inch kit to guarantee proper operation of the transfer case shifter. With the shifter relocating bracket fully assembled, cut both ends of the torque shaft flush with the top-hat Teflon bushings and discard (shown). 8: Scribe and cut the shift rod 51/2 inches from the end of the shaft. Insert 3/8-inch tubed spacer (being certain that the scribe marks are inline) then weld to produce a new shaft length of approximately 93/4 inches. 9: This is how the finished bracket looks when it's properly assembled. To install, loosen the trunnion lock bolt at the adjusting trunnion, and install assembled shifter assembly onto the original transfer case mounting studs using the factory hardware. Insert the torque shaft rod into the range lever and the shift rod into the transfer case shift lever assembly by using channellock pliers. 10: Install the new subframe rails using six flat Allen bolts. These bolts will drive directly through the new subframe rails and into the factory mounting holes in the frame that was used for the factory skidplate. Once mounted, mark the areas of contact on both the frame and the subframe with a marker, then remove the subframe and grind the marked areas of the tops of the subframe and frame to remove paint and foreign material in preparation for welding. PhotosView Slideshow 11: Reinstall the subframes using six Allen bolts and weld along the outside and inside of the subframe contact points. 12: The new lower front control arms mount to the OEM lower location at the differential and to the new position on the subframe. Insert two large stepped spacers into each rod end of the new lower control arms and fasten using original hardware. 13: Install the new adjustable track bar into the OEM steering damper location on the passenger-side differential (not the original track bar location) and fasten the other end into the stock track bar location. Then install the new steering damper mounting bracket using the original steering damper hardware, and install the new antiroll-bar end link. 14: After installing the front steering damper, this is how the passenger side of the front differential will look, sans installation of the Skyjacker Double Disconnect front antiroll-bar end links. 15: The antiroll-bar end openings must be drilled out to 5/8-inch in order to achieve more flex from the antiroll-bar end links. After drilling, install the new end links and the new extended brake lines. 16: The rear of the vehicle is next. Start by removing the rear wheels, shock absorbers, rear track bar, antiroll-bar end links, and rear coil springs. The factory bumpstop is lowered via a graphite spacer that fits between the factory bumpstop cup and the original mounting position. At this time we removed the stock upper and lower control arms and installed the new upper control arms, which include a built-in adjustable brake line mounting bracket. 17: Mount the new rear track bar relocation bracket on the OEM mount and place the right side of the track bar in the OEM mount and the left side in the new relocation bracket, but don't tighten. Follow the drilling instructions included with the kit. When completed, don't tighten completely--that should wait until the vehicle is sitting on the ground. 18: Remove the lower control arm frame mounts in the same fashion as the front, and then install the new rear lower control arms. The rears of the arms mount to the OEM location at the differential while the fronts of the arms mount to the new position on the subframe. 19: To complete the rear, install the new shocks and extended brake lines, wheels, and lower the vehicle to the ground. Now tighten up the track bar at the new relocation bracket and the OEM location. The vehicle's wheels now need to be aligned. 20: The optional Skyjacker High Clearance Transfer Case Skid Plate is available in two models. One fits either automatic transmission-equipped TJs or models with an Atlas II transfer case, and the other fits manual transmission TJs. It gains 21/2 inches of ground clearance and with a Z-bend internal crossmember for strength. It simply bolts onto the new Skyjacker subframes, and is designed to allow easy access to the transfer case without removing the lower control arms. 21: Another option we installed was the Skyjacker Rock Ready Steering Gear Box Skid Plate, which is formed from 3/16-inch steel for strength and protection. jeep Wrangler Tj passenger Rear Side View Photo 9290240

Behind the Wheel
We didn't waste any time commandeering the Jeep once the Skyjacker 4-inch Rock Ready Long Arm kit was installed. We would've liked to have spent about a week experiencing the kit in a variety of situations, but the owner wanted his Jeep back (go figure). Since our 4x4s have to pull double-duty as daily commuters and weekend warriors, we tend to put a lot of stock in day-to-day driveability. With that said, we were pleased with the ride and handling of the kit on the road. The ride stiffened a bit over stock, but it still retained the TJ's inherent fine ride quality. The most noticeable change was in how the suspension reacted to minor road imperfections at speed--we could feel 'em more. This is due to the fact that spherical rod ends are used at the ends of the links instead of rubber bushings, thus they don't absorb these small impacts, which are transmitted to the frame and body. It's a small price to pay for the awesome articulation this kit generates, though.

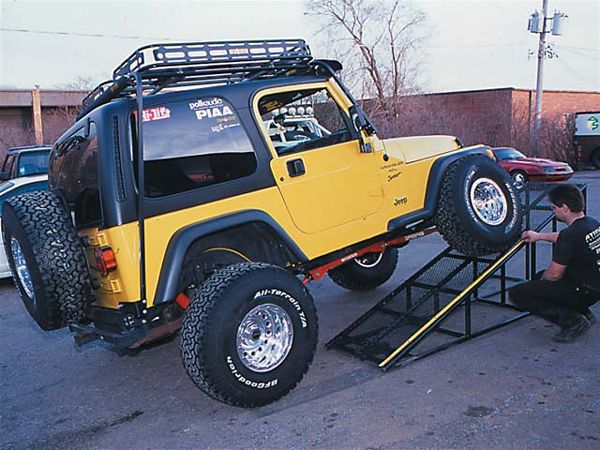
Off-highway, the kit shined on obstacles that required wheel travel, and the Softride springs' compression and rebound made climbing obstacles easy and comfortable. The owner of this Jeep chose to mount 35-inch BFG All-Terrains, which are a bit big for a 4-inch kit. We ramped the Jeep after installation, but the tire contacted the lip of the front fender before we came close to using up the available travel of the Long Arm kit. Thirty-three-inch tires would be perfect for this application and would complement the full capabilities that it has to offer.