Jeep Wrangler JK CV Driveshaft Replacement - Jp Magazine

Jeep Wrangler JK CV Driveshaft Replacement - Shafted John Cappa Former Editor, Four Wheeler cv Joint And Driveshaft Replacement close Up Photo 15373511

With nearly 50,000 on- and off-road miles on our '07 Wrangler Rubicon you could say we know it pretty well.

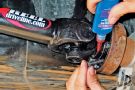
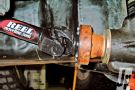
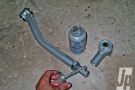
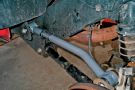
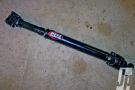
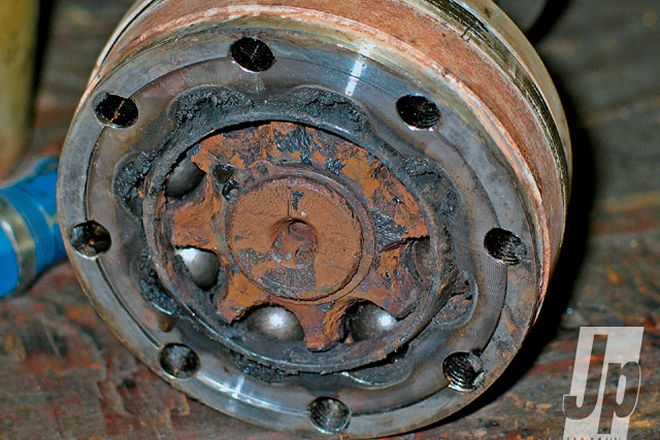
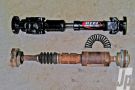
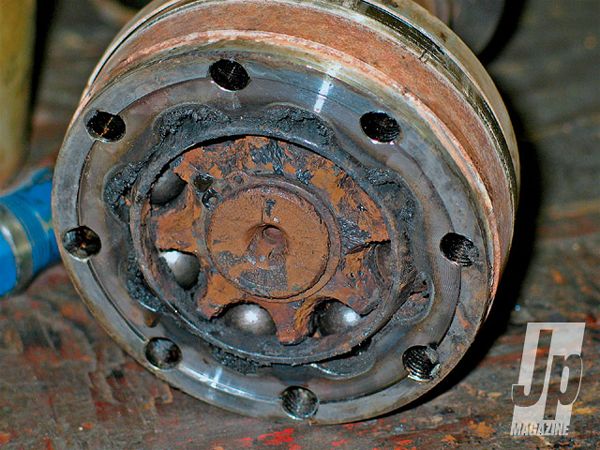
As somewhat expected, around 5,000 miles after lifting our two-door JK 4 inches we smelled burning grease and heard a whirring coming from the underside. A quick inspection revealed the protective boot on the rear driveshaft had fragged. The CV joint had ejected all of its grease and it was just about ready to go molten. In all truthfulness the stock rear driveshaft lasted a little longer than we thought it would. Anyway, we removed the rear driveshaft, put the T-case into 4-Hi, and limped the Jeep home on the front driveshaft to order and install some much-needed upgrades from J.E. Reel Drive Line Specialists and Rubicon Express.

If you plan on lifting your two-door JK, it's best to put a J.E. Reel U-jointed rear driveshaft on the lift kit shopping list. The longer four-door (Unlimited) model can get away with the stock driveshaft for a while, but we'd still consider the upgrade mandatory. The front driveshafts on two- and four-door JKs are identical. They are positioned so that they can survive with up to 4 inches of lift. However, since we were already under our Jeep we decided to replace ours with J.E. Reel components as well, just to be safe.

PhotosView Slideshow The factory driveshaft CV boot can be damaged by trail debris, overextension or running at maximum angle for an extended period of time. Once the boot tears, the grease flings out and the CV will burn up in less than 100 highway miles much like ours did. J.E. Reel offers several driveshaft replacement options. For 99-percent of us the simple bolt-in shaft (top) is the best route to take. This version is the easiest to install since it does not require complex driveline flange removal. It bolts directly to the factory Jeep transfer case and axle flanges and comes complete with the necessary mounting hardware. Only basic hand tools are required. Simply unbolt the factory driveshaft and bolt in the J.E. Reel part. Be sure to use thread-locking compound on the hardware before snugging it down. In the rear you can see that the new double-Cardan driveshaft is not lined up properly. The rear axle needs to be rotated upward to put the pinion inline with the driveshaft. To do this you'll need to install adjustable upper control arms. We opted for Rubicon Express adjustable upper control arms (left) to replace the non-adjustable stockers (right). Our Rubicon Express arms have a rubber bushing on the axle end (bottom) to deaden road noise and a greaseable spherical joint on the chassis end (top) to allow full suspension movement without binding. Unscrew the adjustable arms and coat the threads with antiseize to prevent corrosion. Install the zerk fittings on the spherical bushing ends and grease 'em. Place jack stands under the rear axle, remove the factory upper control arms and use a floor jack and angle finder to properly locate the pinion angle. We picked up this magnetic angle finder at an Ace Hardware for $9. To eliminate vibrations and unnecessary wear rotate the pinion until the flange angle and the driveshaft angle are the same. With the pinion angle correctly located you can adjust and bolt in the Rubicon Express upper control arms using the factory mounting hardware. Then tighten the large lock nuts on the adjustment threads of the arms. The stock JK front driveshaft has a U-joint on the axle end and a booted CV on the transfer case end. Much like J.E. Reel's rear shaft, this front version has a U-joint on the axle end and a double-Cardan joint on the T-case end. It's not a mandatory upgrade for lifts lower than 4 inches, but it's much more heavy-duty and will last longer than the factory components, so we think it's a worthy upgrade. No pinion angle adjustment is needed. The J.E. Reel front driveshaft simply bolts in place of the old one.