Jeep Wrangler Axle Regearing - Jp Magazine

Jeep Wrangler Axle Regearing Christian Hazel Brand Manager, Four Wheeler wrangler Axle Swap seperated Photo 33218700

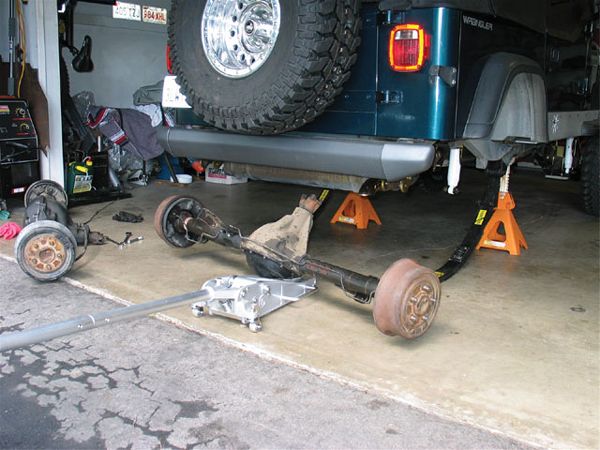
Let's say you inherited some property in downtown Crackville. Do you build your dream house there, or do you sell it and put the proceeds towards building your house in a nicer area? That's the way we looked at the Dana 35 rear axle in our '95 YJ. We sort of inherited it when we bought the vehicle, but when it came time to regear our axles, there was no way we were gonna put our hard-earned money into something that would always resemble a rundown dump.

What we did have, however, was the Chrysler 8.25 rear that came with our '99 project Cherokee, JR. More comparable to a Dana 44 in strength, the Chrysler 8.25 offers few drawbacks, namely limited gearing and traction-device choices. And with just about every Cherokee owner swapping them out for a Ford 9-inch or Dana 60, they seem to be everywhere. Since 4.56 is the deepest gear you can get, this may not be the ideal swap for a four-cylinder YJ owner running 33s, but if you've got a 4.0L Wrangler, swapping in an 8.25 will save you some scratch in the long run.

wrangler Axle Swap tools Photo 33218706

Parts, tools and More parts
You can get an ARB Air Locker, several lunch-box lockers, a Detroit Locker, a Trac-Lok or an Auburn limited slip for the Chrysler 8.25. Since we really didn't want to put a locker in this vehicle, we picked up the phone and called Randy's Ring & Pinion for a Yukon Gear 4.56 ring-and-pinion set, a Yukon installation kit and an Auburn limited slip. For the front high-pinion Dana 30, we opted for a Truetrac from Tractech, along with a Yukon Gear installation kit and 4.56 gears. In a fit of bravado, we thought we'd try our hand at setting up our own gears. Randy's offers a full set of tools for this purpose, but unfortunately the crew can't come to your house and hold your hand through the install. That's why, when we ran into a little difficulty with our story deadline fast approaching, we once again headed to MIT Drivetrain Specialists in El Cajon, California. It's becoming a habit for us to turn to the shop to fix our mistakes, but that's the only way we're gonna learn.

Tools or Shop Time
As we said earlier, installing gears yourself is largely a matter of time and patience, with a little experience thrown in. If you think it's something you want to tackle, you can buy some or all of the tools listed below for about the same price as a gear installation for two axles at a reputable shop. Or, if your time is more valuable, you can leave it to the pros. You decide.

Quoted shop labor: $650, labor only, to install front and rear ring-and-pinion
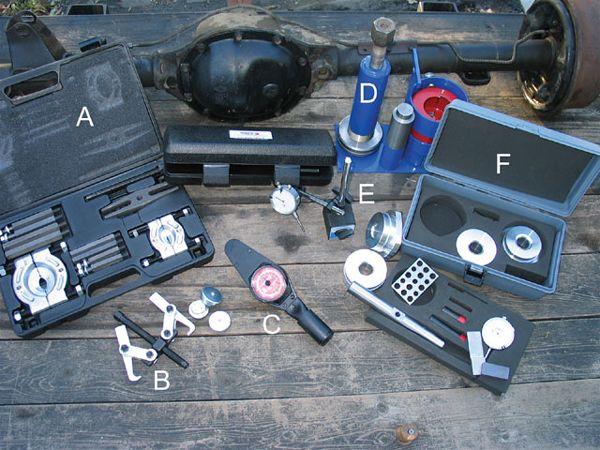
Tools: Here's where they're from and what they're for:
A. Matco professional bearing separator set with case (PN MST4518). Includes 2- and 3-inch bearing splitter pullers, 91/416 driving screw, 5-inch puller crossbar and several lengths of hex puller legs. Basically lets you get under virtually any bearing on a pinion, carrier or transmission. $119.95.

B. Matco differential bearing puller (PN P57). Includes three adapters to plug axleshaft holes in differential and puller. Lets you easily pull carrier bearings, especially when used in conjunction with MST4518. $51.65.

C. Matco 31/48-drive 150-in/lb dial-torque wrench. Allows you to properly set and measure pinion-bearing preload so your nice new gears don't get destroyed. $160.95.

D. Yukon Gear & Axle bearing puller. Includes main puller body, small and large bearing clamshells, retaining ring, two adjuster rings and axleshaft hole plug. A different way to pull bearings than the conventional bearing puller. Quick and easy to use, but may damage some bearings that aren't sized similarly to clamshell halves. $337.00.

E. Yukon Gear & Axle dial indicator, stand and magnetic base. Allows you to secure base to any housing and position dial indicator correctly on ring-gear tooth to measure backlash. $46.00.

F. Yukon Gear & Axle professional pinion-depth setting kit. Includes dial indicator, varying-length extension tips, magnetic and nonmagnetic target plates, cross-shaft and aluminum bearing hubs. In-depth booklet walks you through how to properly measure for pinion depth using a master-housing dimension (MHD) and the measured pinion-head thickness (PHT) to get the pinion depth (PD) in order to determine the proper shim measurement. Basically eliminates pinion-depth-setting trial and error. $373.00.

PhotosView Slideshow We started our regearing at home on the Chrysler 8.25. We used the dial indicator and magnetic base stand from Randy's Ring & Pinion to check the backlash of the original gearset before pulling it apart. It spec'd out at about 0.010 inch, which is normal for a used axle. Just for fun, we played around with the Yukon Gear & Axle bearing puller (PN TLSP20), pulling the carrier bearings off the old Trac-Lok. It's best to learn how to use the tool with the old bearings before you start messing with the new components, just in case you destroy them. In this case, we learned the hard way that you need to install the bearing races on top of the bearing when using this puller, or they get ruined fast. The Auburn Gear limited slip is a high-performance differential that uses cone-type clutches for very smooth operation on the street, yet excellent traction off-road. With some thicker gearsets, such as our 4.56s, you will need to either nip a little off the ring teeth or grind halfway down the cross-shaft so it can be removed enough to put the "C" clips on the axleshafts. Chrysler 8.25s use adjustable spanner nuts in the housing under the carrier caps to adjust backlash, so you don't need to mess with shims under the carrier bearings. With the cross pin clearanced, we reinstalled the ring gear on the Auburn and then drove the carrier bearings on. One final bit of caretaking when installing an Auburn into an 8.25 is that the case needs to be clearanced near the top-right carrier-cap bolt hole to clear the differential case. You don't really remove a lot of material, and the Auburn Gear install directions walk you through exactly where and how much you need to grind. With the carrier all squared away, we drove out the old races in the housing and tapped in the new ones included in the Yukon installation kit. To get the pinion depth close to correct, we first measured the thickness of the stock pinion shims and added the same amount under the bearing of the new pinion. This will usually get you close enough to the stock pinion depth to run a pattern to check the gear mesh. We installed our pinion, lightly torqued down the yoke without the oil seal or crush sleeve, set the backlash to 0.007 inch with the adjuster nuts and ran a pattern. It indicated that we needed to add shims under the pinion bearing to move the pinion closer to the carrier. Unfortunately, we didn't know that unless you buff off the blackish coating that comes on some aftermarket pinions, the bearings are nearly impossible to press off. None of our garage tools would do it without toasting the bearing, so we were off to MIT. Properly setting up gears takes time and patience, or lots of experience. We don't really possess any of these qualities, so we loaded up our Jeep and parts and headed to the experts at MIT, where virtually every technician descended on our junk. While Mike Cope and Moises Prado put our YJ on the lift and tore apart the frontend, technician Christian Garcia expertly regeared the 8.25. That big contraption was used to hold the pinion yoke still under the nearly 500 lb-ft required to crush the crush sleeve when setting the pinion-bearing preload. While the front was being torn apart and the rear was being regeared, ace gear guy Andy Thomas began preparing the parts for the front Dana 30. The Truetrac is a geardriven limited slip with no friction material to wear out over time. Although it offers near-locker-like traction off-road, it's supersmooth and virtually unnoticeable on the street. Unlike the 8.25 axle, Dana axles use shims under the carrier bearings to set the backlash. Thomas says that most Dana axles respond well to shim packs of 0.040 inch under the ring-gear side and 0.050 inch on the other side. Sure enough, these measurements got us the perfect backlash. In front-axle applications, you need to install an oil slinger (big-fat shim) under the carrier bearing. This oil slinger factors into the overall shim-pack thickness, so don't forget it when you're adding things up. Once the correct pinion depth and contact pattern are determined, the pinion-bearing preload is set by installing or removing shims in 0.003-inch increments until you get it to about 14 in-lbs. Then the yoke can be removed and the new pinion seal driven on. With the front end totally rebuilt, Thomas slapped the front together and called it done. We should mention that along with rebuilding axles, T-cases and manual trannies, the staff at MIT are experts at axle swapping. They were gung ho to remove our Dana 35 and install the 8.25, but we were boneheads and forgot to bring along the axleshafts and drums. Our punishment was to install the axle ourselves at home. With the freshly regeared 8.25 home, we whipped out the Miller Spectrum 625 plasma cutter to gouge out the welds on the spring pads. Then we knocked them off with a hammer so we could move them underneath for the YJ's spring-under suspension. The Cherokee spring pads are wider than a Wrangler, so forget those illusions of an easy spring-over swap. We were able to swap the e-brake cables from the Dana 35 right onto the 8.25. Both axles measure out at 61 inches wide, have a 5-on-4.5-inch bolt pattern, have the brake line tee and vent in the same location and even have similar-sized brakes. As for differences, the Dana 35 has 27-spline, 1.16-inch axleshafts and 251/48-inch axletubes, and our '95 had a 1330 yoke. The 8.25 has 29-spline, 1.21-inch axleshafts, 3-inch axletubes and a 1310 yoke. We put the axle on the springs and first centered the axle left to right. Then we installed some new 3-inch U-bolts and the spring plates from the Cherokee and tightened them down enough to hold the vehicle's weight so we could set the pinion angle. With the weight of the vehicle on the springs, we set the pinion angle to 2 degrees under the driveshaft by putting a jack under the pinion and rotating the housing up. When we had the pinion where we wanted it, we tack welded the pads on then removed the axle to fully weld the pads and install the YJ's shock mounts.