Are Rear Disc Brakes Worth It? - 4-Wheel & Off-Road Magazine

Rick Péwé Editor-in-Chief, 4Wheel & Off-Road

The majority of us are saddled with factory-equipped drum brakes on the rear of our 4x4s, and quite a few of us still pump the pedal to stop drums on the front axle as well. Without a doubt, disc brakes on the front of any vehicle are an improvement over drums. Recognizing that, most manufacturers started switching to discs on their 4x4s in the early '70s, or at least offered the option. In fact, one of our most-asked tech questions is how to retrofit older GM rigs with later-model front disc brakes, which we show how to do this month in "Dana 44 Front Disc Swap."

131 9803 Are Rear Discs Worth It rear Disc Brake Close Up Photo 31154689

In the four-wheel-drive arena, the rear disc scenario has been severely lacking, even though performance and passenger cars have used them for quite a few years. As SUVs became more popular, four-wheel discs on a four-wheel drive became a reality, with the Jeep Grand Cherokee and the Isuzu Rodeo among the first to have them. These manufacturers know that disc brakes on the rear make for better stopping on the road and lead to safer handling characteristics, not to mention superior off-road performance.

131 9803 Are Rear Discs Worth It rear Tire Removal Photo 31154698 
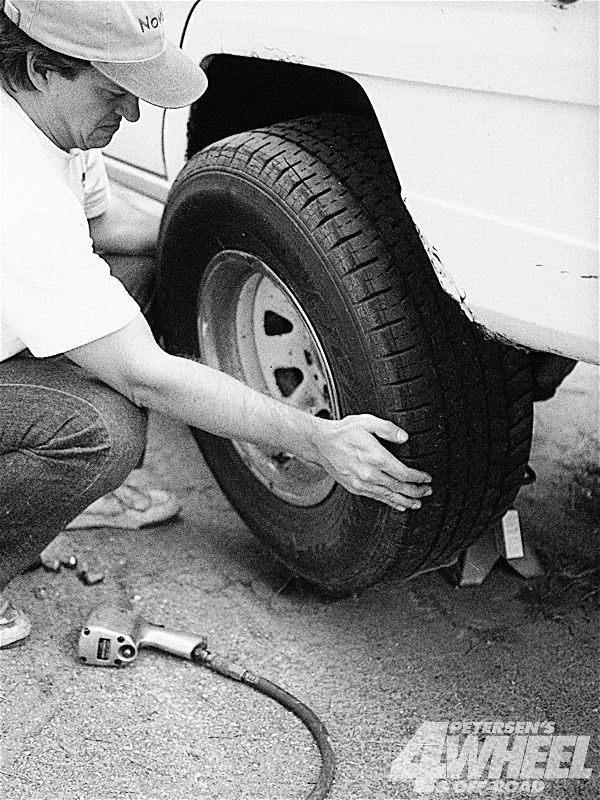
After securely blocking the front tires, place the rear axle on jackstands and pop off the rear tires and wheels. Remember that neither the transmission nor the parking brake is restraining the vehicle because the rear axle is in the air. The old drums need to come off next, which can cause some grief on older systems. The brake shoes sometimes need to be retracted from the drum by turning the adjuster screw inside the assembly with a brake spoon or a screwdriver. Keep some penetrating oil handy also, as the center of the drum may be rusted onto the index circle of the axleshaft.

But grabbing a set of slick stoppers off one of these rigs at a junkyard for a swap costs more than you think, even without considering the fabrication costs incurred to figure out how to bolt them onto your older rig. And going to your local fabrication or race-prep shop can set your bank account back even further, if you even have a bank account. One common trick is to use front disc stuff and weld weird brackets in place and hope for the best. We've seen this done, and while quite a few setups are way trick and work great, others are downright dangerous, either falling off the axle or breaking while braking.

So how does the unlucky drum driver do a rear-disc conversion the right way the first time? We pondered that question for a while, wondering if the amount of work involved, as well as the bottom-line cost, would be worth the increased safety and reliability of converting to rear disc brakes. At our disposal for testing was a '79 Jeep Cherokee used for towing a trail-rig-laden trailer weighing about 5,000 pounds, for a GCVW of about 10,000 pounds. The factory drum/disc combo on this fullsize boat is barely adequate without trailer brakes, so Los Angeles freeway morons and steep mountain downgrades stress the factory brakes-and our nerves-just a tad too much.

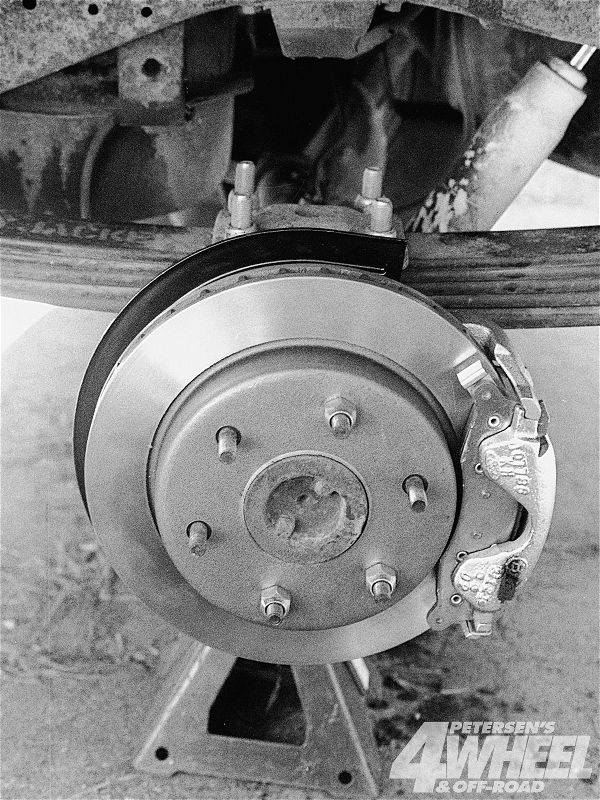
To decide if disc brakes were affordable, easy to install, and worth the effort, we talked with Mike Jonas at Stainless Steel Brakes. Jonas suggested the company's new disc brake kit for '74-'91 fullsize Wagoneers and Cherokees with Dana 44 rears. Featuring single-piston floating calipers and semimetallic shoes, the kits come complete with all attaching hardware and parts, even the brake fluid and gear oil you might need. Jonas said the kit is a true bolt-on, with no cutting, grinding, or welding involved, and that any regular backyard mechanic can handle the installation.

131 9803 Are Rear Discs Worth It axle Flange Hole Photo 31154701 
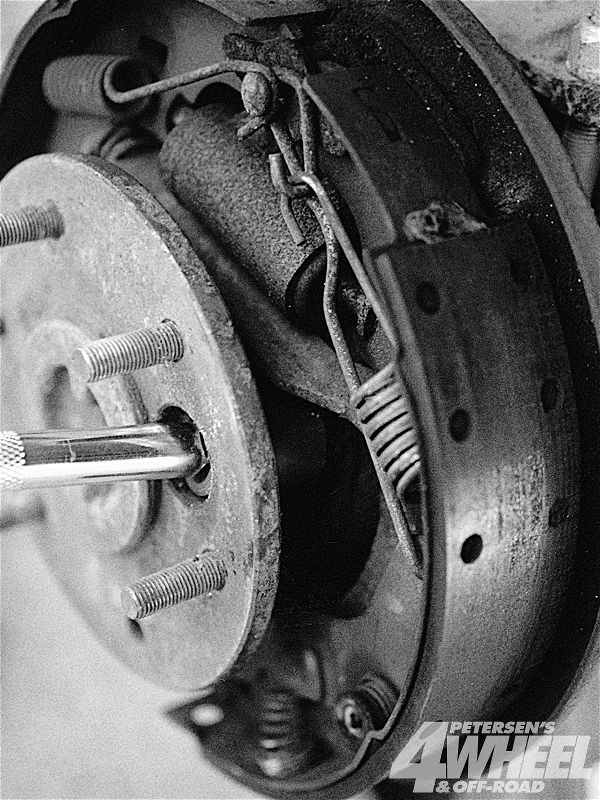
On this Dana 44 axle, the backing plate and axle retaining flange are held to the housing by four bolts. These can be accessed through the hole in the axle flange by using a deep socket or an extension. With a drum setup like this, sand and grit can get washed in during stream crossings and packed into every cavity. The only way to clean out the crud is to take the drums off and hose everything down.

After a phone call, a few days wait, and a few hours of installation time, we found the results impressive. The kit truly is bolt-on, the braking is better than ever, and the technical support over the phone was excellent. Going to discs in the rear seems to be decidedly safer than the old drum setup.

PhotosView Slideshow With the bolts removed, the axle can be slid out and set aside; now would be a good time to check the bearing and seals for wear or leakage. Use a line wrench to remove the hydraulic brake line from the back of the wheel cylinder. Then, after unhooking the parking-brake cable and detaching it from the backing plate, remove the backing plate.
Precision-machined brackets bolt to the axle flange with new Grade 8 bolts and self-locking nuts. These plates hold the axle, the bearing, and the seal into the housing, and the two-piece design eliminates the need to remove the bearing from the axleshaft. The plates are also marked left, left rear, right, and right rear for proper positioning in the housing.
On the backside of the bracket is a machined recess (A) to properly position the seal and set correct preload on the bearing. The original backing plate slid over the seal (B), and the retaining flange (C) held the seal in position, which preloaded the bearing. With this new design, the recess is the same dimension as the backing plate, so the retaining flange simply strengthens the new thicker bracket.
After applying a thin coating of RTV to the bracket, bolt it to the housing flange. The caliper brackets (A) can then be bolted to the axle bracket with spacers (B) between them for proper caliper positioning. The optional dust shield (C), which keeps debris from hitting the rotors, was installed to give the kit a finished look. And yes, the missing wheel stud on the axle flange was replaced before the job was completed.
Slip the new rotor over the axle flange and index it to the studs with small bushings or fitting rings (arrows). These rings keep the rotor positioned on the axle, since the center lip on the axle may not fit perfectly. These rings reduce the radial runout of the rotor to an acceptable amount and must not be left off. Make sure the beveled side of the rings face the axle. Regular lug nuts are installed with the flat face to the rotor for proper rotor retention and subsequent installation of the caliper. If you're running acorn- or shank-style lug nuts on your wheels, get standard threaded ones for this step. Special calipers for this kit feature a parking brake to comply with government regulations. Basically a modified Ford caliper from an '84-'87 Mustang SVO rear axle, the new caliper's internals are stainless steel for corrosion resistance. While we chose semimetallic pads for less fade on hard stops, Stainless Steel Brakes offers a variety of pads, rotors, and caliper designs. Two large bolts with self-locking threads hold the caliper to the caliper brackets and are torqued to 110 lb-ft.
Since a caliper has to be able to move to do its job, a flexible brake line is needed between the caliper and the hard line. Standard rubber hoses are normally supplied with the kit, but we chose the optional stainless steel braided lines for their increased abrasion resistance. The hoses are not the normal skinny lines found elsewhere, but genuine DOT-approved lines. The banjo end of the line is attached to the caliper with a special hollow bolt and copper crush washers on each side of the banjo fitting, and is torqued down on the caliper to 25 lb-ft.
With the old brake line removed, the new line is installed to the junction block, and then to the braided-steel flexible line. The factory clamp for the old hard line can be reused to hold the flexible line, although a bracket and a clip could be welded to the axle for a factory appearance. With the driver side completed, all of our experience made the passenger side a snap. The regular emergency-brake cable housing fits into the supplied bracket, but with a lift kit the cable housing may be too short. In this case, Stainless Steel Brakes has an option for flipping the supplied housing bracket around and bolting it on with a hex spacer. This allows the cable housing to fit the bracket, even under extreme droop and articulation of the axle. When the brake cable itself is long enough, this neat slotted bolt and nut will retain the cable on the caliper parking-brake lever. A clevis and pin design is also available if the distance is too great even after adjustment at the front of the cable. The parking brakes are self-adjusting once the system is bled and used, but often a few extra clicks are needed to fine-tune it. If you play with the lever before everything is installed and adjusted, you may have to buy a special tool to re-adjust the parking brake. 131 9803 17 o+131 9803 are rear discs worth it+brake piston diagram Proper front and rear pressure is necessary to make the disc brakes work up to their potential. To get full pressure to the rear calipers, the proportioning valve must be modified. This valve meters and proportions brake pressure during heavy brake application and limits the pressure rise to the rear brakes. After the rear brake line is removed, the valve is taken apart and the seal and spring are taken off the piston. The piston is then put back in the valve, the end nut snugged up, and the rear line reattached. The stock master cylinder on most rigs works well, but some models have a residual check valve in the rear outlet port. Take the line off and use a toothpick to probe inside the port. If you feel a spring-loaded disc inside the port, the master cylinder has this check valve, which must be removed. A small sheetmetal screw can be screwed into the brass port and then pulled out with a pair of pliers. After removing the spring and the disc, take the screw out of the port and reinstall it with a small punch, being careful not to damage the soft brass. It's usually best, and easiest, to replace the master cylinder with one designed for a four-wheel-disc application and to use an adjustable proportioning valve to fine-tune the system.
After the master cylinder, combination valve, and rear calipers have been installed and plumbed, the entire system must be filled with high-quality brake fluid and bled to rid the lines and components of trapped air. Conventional bleeding or pressure-bleeding techniques can then be used, but the Phoenix Systems Reverse Fluid Injection system featured in our article "Easy Brake Bleeding" (Jan. '98) works slicker than anything we've tried, and after this conversion there will be a lot of air in the system.
Final testing and adjustment is done after about 30-40 pumps of the pedal, which adjusts the parking brake and sets the pads about 1/16 inch away from the rotor. The brake pedal endplay should then be set by adjusting the push rod under the dash or between the master cylinder and power booster as shown here. Usually one of the rods is adjustable.