GM 14-Bolt Axle Swap - 4-Wheel & Off-Road Magazine

Rick Péwé Editor-in-Chief, 4Wheel & Off-Road Photographers: Rick Péwé

Snapping a rear axleshaft is a sure way to ruin a fine day of 'wheeling, especially when you knew it wasn't strong enough to handle what you were going to dish out. That's why one of the most popular upgrades on a 4x4 is the rear axle. Most late-model factory offerings are generally undersized in this department, either to save weight or cost, but the addition of bigger tires and engines can snap a shaft like a toothpick.

131 9809 14 Bolt Swap undercarriage Shot Photo 29445665

Some of the more likely candidates for rear-axle upgrades are the late-model Chevy and GMC 1/2-ton trucks, Blazers, Tahoes, and Suburbans. These heavy trucks were designed to use the Corporate 12-bolt rearend, which was more than sufficient in the strength department. However, from '81 models on, these big vehicles received the woefully inadequate Corporate 10-bolt axle, and gear shops once again made a good living. Swapping in the earlier 12-bolt is good for a stronger ring-and-pinion, but the axle diameter and strength is still the same.

One way to really beef the rear under these 1/2-ton jobs is to replace it with a 3/4-ton truck axle, but as "Rear Axle Swap Tips," in this issue, will show you, other problems (read: dollars) will be encountered. But something better for the hard-core GM 'wheeler is readily available, with a minimum amount of hassles and a reasonable amount of money.

131 9809 14 Bolt Swap driveshaft Caliper Measurement Photo 29445668 The axleshafts are the same length between the 10- and 14-bolt axles if overall axle assembly is the same, but the spline count and diameter are different. The early 28-spline 10-bolt (right) measures 1.20 inches, as opposed to the 14-bolt shaft, which is 1.37 inches in diameter. The higher 33 spline count of the 14-bolt also adds strength and durability.

The GM 9 1/2 Corporate 14-bolt is used in a variety of 3/4-ton GM products, is much stronger than the 10-bolt and even the 12-bolt axles, and is relatively cheap and plentiful. But wait, you say, isn't the 14-bolt an eight-lug, heavy-duty axle? Yes, all of the early 14-bolt axles had 10 1/2-inch ring-gear, full-floating axles and an eight-lug wheel pattern. But the later 14-bolt axle is a semifloat design with a 9 1/2-inch ring gear and is available in eight- and six-lug designs.

Vehicles with the smaller 14-bolt axle have been equipped with various widths. To match the track of your truck, measure the wheel flange-to-flange dimension of your truck's rearend and the 14-bolt rearend that you want to swap in. Gear ratios vary, but if you verify that you have a match to your truck or what you want the gear ratio to be, even more money can be saved. In this case an '85 Suburban received an axle from a '96 Tahoe, and although the flange-to-flange measurement was the same, a ratio change needed to be performed.

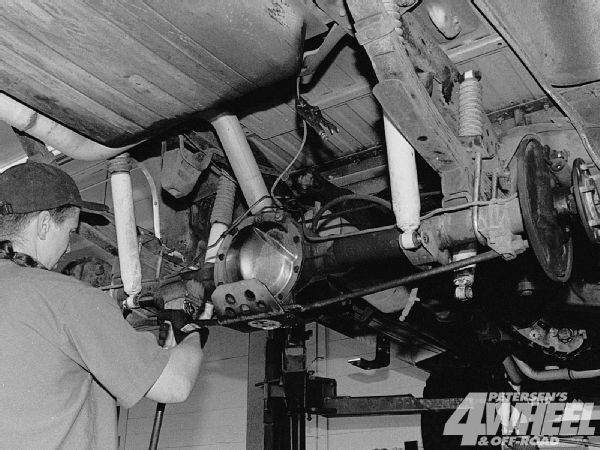
Although the 10- to 14-bolt swap isn't a direct bolt-in, any competent shop should be able to handle the details we'll show you here. We went to Drivetrain Service Center, where manager Rody Jarve performed this operation, which he has done many times before. Even on custom jobs with a bunch of nonstandard items being addressed, the whole job should take less than a day or two. The procedure led to a much stronger rearend for the heavy-hitting Suburban.

PhotosView Slideshow The 9 1/2-inch-diameter ring gear dwarfs the 10-bolt assembly on the right, which is only 8 1/2 inches in diameter. The larger carrier and spiders also contribute to the overall strength of the new setup. For this application, a ratio swap and ARB air locker install was done for ultimate off-road ability. The emergency-brake cables were pulled out of the original backing plates after the brakes were disassembled. The old cables fit into the new 14-bolt backing plates, making the swap much easier. If the new axle needs brake pads, this is a good time to replace them. The metal brake lines were left in place, but the rubber drop hose was clamped shut and disconnected. The old axle had a truss and dual shock brackets installed, but the old U-bolts could be removed around them. New, larger U-bolts are used with the new axle, so the old ones can be cut off if necessary. The old shocks were also unbolted at the axle and left dangling from the top mounts. Finally, the driveshaft was unhooked from the pinion yoke and strapped to the frame for safekeeping.
With the 10-bolt housing removed, the axle-pad-mounting dimension needed to be measured on the old axle so that the pads on the 14-bolt could be properly installed. Using the aftermarket blocks on top of the spring pads allowed the tape to be held straight across the centersection for an accurate measurement. The replacement housing needs to have all of the old brackets and spring pads cut off. This special cutting tip on the torch leaves a clean surface so that minimum grinding and cleaning is needed. Since the Suburban has custom dual shocks installed, the shock tabs were cut off as well. An angle finder was used to adjust the new pads correctly to the proper pinion angle, which was measured from the original housing. The original settings were duplicated so that the driveline angle would be the same. The pads need to be welded once they are properly located. If the angle of the pinion or pads needs to be adjusted, tack-weld the pads in place and mock up the assembly before final welding. Installing the axle safely requires a hoist and special fixtures, although a floor jack and jackstands can be used. The lift blocks should be indexed into the axle pads and the spring center bolt, and then the U-bolts can be installed. When using aftermarket spring pads, check if they are the same height as the stock one on the left. The new axle tube is a larger diameter, which will raise the vehicle a bit, and the new pad raises it even higher. In this case, the rear of the Sub was lower because the stock springs had sagged, so the height increase leveled out the vehicle. Shock brackets needed to be custom-made on this application, but factory tabs off the old 10-bolt can also be used. Shocks should be measured for proper length and travel before welding the mounts on the new housing, and any other brackets can be welded on now as well. Because the diameter of the 14-bolt housing is larger than the original, new U-bolt plates are needed. The stock units can be used in a pinch, but the sides of the holes will need to be hogged out quite a bit. Using the 14-bolt plate makes the swap easier, although Jarve opted to make a plate and drill holes in it for this application. New U-bolts and plates were bolted to hold the axle securely in place. A small brake-line retaining bracket was in the way of the U-bolt and needed to be removed, then everything snugged up nicely. Be sure to get the proper-length U-bolt, which depends on the spring stack, blocks, axle pad, and tube diameter. Most 4x4 shops carry an assortment of U-bolts and can easily set you up. The brake lines and hoses on this particular swap needed to be modified. The junction block for the hose on the 10 bolt was standard thread, while the 14-bolt lines were metric. Cutting off the fittings and swapping them was best in our circumstance, but using a combination of parts might be better on other trucks. The 14-bolt pinion yoke was the same dimension and cup size as the 10-bolt, so the stock driveshaft U-joint fit right in. The yoke terminated at about the same point as well, so no driveshaft length changes were needed. Brackets to hold the emergency-brake cable were in the same location and popped right in. The cables were also attached to the backing plate, and the brakes were put back together. The stock vent line was also in the same location and snapped right into place.
Featuring larger bearings than the 10-bolt, the 14-bolt is still a C-clip design, semifloating axle. The axles were slid through the cylindrical roller bearings in the end of the axle tube and retained by a C-clip inside the differential. The bearing journal on the axleshaft and the bearing itself are substantially larger and stronger than the 10-bolt's. After the axles were slid in, a magnet was used to insert the C-clip inside the ARB air locker. The axles were then pulled out slightly, seating the C-clips in a recess in the side gears. Notice the 14-bolt holes for the cover as well as the distinctive pattern they form; this is one way to identify the 14-bolt rearend with the 9 1/2-inch ring gear. To finish off the project and provide a bit of flash, a fancy aluminum cover from Off Road Unlimited sealed up the back end. The new cover features increased oil capacity, better cooling with the finned design, and most importantly, a drain plug for proper servicing of the gear oil. Once filled with oil, the new gears were broken in, then the fluid was changed.