
We recently ran into muscle car collector Bill Wortman while he was looking at brake options for his 1965 Pontiac GTO. He said, "I drive my cars—a lot—and I'd like to increase my GTO's all-around performance and reliability without sacrificing its original look." Wortman had just added a set of redline radials to the GTO and found that he liked the handling and look of these tires, but he felt that the car's original drum brakes were not up to the type of driving he does. He also didn't want to make any changes to the car that could not easily be undone for a concours restoration or to sell the car to someone who wants a stock GTO.
We asked the folks at Stainless Steel Brakes Corporation (SSBC) what they had in the way of disc conversions that would fit within the stock 14-inch-diameter GTO wheels, and they showed us a setup that offered exactly what Wortman had in mind.
Wortman's GTO was shipped to Ralph Straesser's Mooseworks shop in Oceanside, California, for the installation. While Straesser lifted the GTO on a hoist, the installation can be accomplished with the vehicle on jackstands. Also, when starting any major brake job, drain and collect the car's brake fluid. In addition to being a hazardous material, it can easily damage any painted surface.
Front Brakes
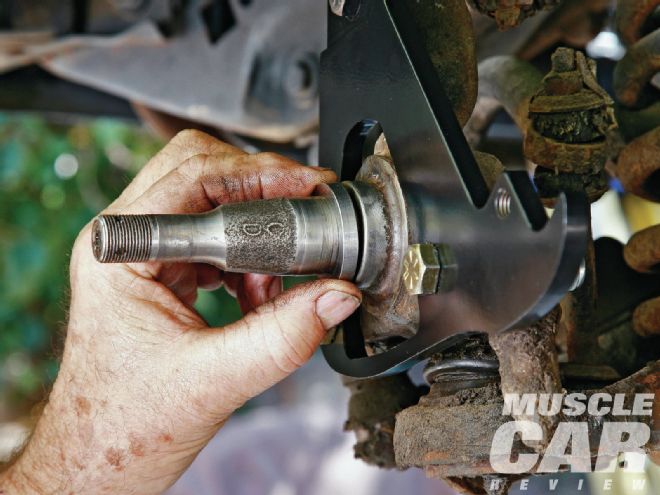
We started our installation by cleaning and packaging all of the original brake components in case they are needed for a restoration. SSBC's front-brake components include black powdercoated, CNC-machined caliper mounting brackets that bolt to the car's existing spindles. Our GTO's steering arm was originally attached to the spindle with a pair of 7/16 bolts, but the kit necessitated drilling these out to ½ inch for the new lower bracket attaching bolts. The upper bracket bolt sits in a slight recess to ensure that it clears the inside face of the rotor. As this bolt doesn't have a lock washer, we added a dab of Loctite prior to tightening it to the torque spec.
SSBC provides a new set of vented rotors with the inner and outer bearing races installed. The age-old, messy—but very important—job of packing bearings has not changed. What has changed is the quality of grease; we used a high-quality, high-temp version. Prior to adding grease to the races, we cleaned them thoroughly with brake cleaner. We set the inner and outer bearings in the races, spun them to spread the grease well, wiped off the excess, and installed the outer bearing seal. We slipped the round spindle spacer onto the spindle, followed by the rotor and then the outer bearing, retaining washer, and nut. We torqued the nut to spec, backed it off one flat while turning the rotor, and added the cotter pin and dust cap. With all the handling of the rotor complete, we used brake cleaner to completely degrease the rotor surfaces.
After assembling the inner and outer brake pads to the caliper, we slid the caliper over the rotor and attached it to the caliper bracket using the two provided spacers (after lubricating the caliper mounting bolts with silicone-based grease). We finished the front brake installation by attaching the banjo fitting end of the new flex line to the caliper. With the horseshoe clip temporarily holding the other end of the line to the frame bracket, we turned the steering/brake assembly through a full cycle left and right to ensure that we didn't have any binding of the flexible line. Once confident of its fit, we tightened it using a flare nut wrench.
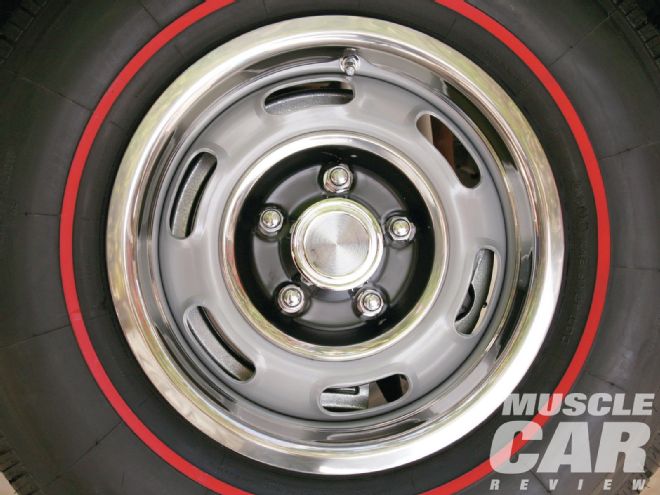 Hiding behind the GTO’s stock 14-inch Rally I wheel is a disc brake. While we’re used to seeing front disc brake conversions on muscle cars, this is the rear wheel. Thanks to SSBC, a vintage muscle car can have the safety of four-wheel disc brakes while retaining its original wheels.
Rear Brakes
Removing the rear brake assembly and backing plate required us to slide out the axleshaft. In addition to disconnecting the brake line, we had to remove the parking brake cable from the actuator. We removed the bearing retainer studs by tapping them out so we could clean the mounting face for the caliper bracket.
SSBC's rear caliper bracket is also CNC-machined and black powdercoated. It mounts to the rear axle using the four existing bearing attaching holes. To that bracket, the two smaller hockey stick–shaped caliper mounting straps are attached, shorter on the bottom and longer on the top, with the ends of both pointing toward each other. This allows the caliper to sit at the 3-4 o'clock position on the axle, providing plenty of clearance between the caliper and frame at full jounce. The four bolts that retain these two straps also secure the splash shield and parking brake L-bracket.
When reinstalling the axleshaft, two split shims were added to the outer side of the bearing to make up for the extra thickness of the mounting bracket, thereby maintaining the correct axle endplay. With those components in place, we added the rotor and held it in place temporarily with one lug nut. The SSBC rear calipers are mounted with the bleeder fitting pointing down and the parking brake lever up. The bleeder fitting in the flex hose banjo bolt will be used to bleed the rear brake caliper. SSBC includes new steel lines for the rear axle that are designed to connect to the short flex hoses. The last procedure is to connect the parking brake cable to the caliper's parking brake lever.
Master Cylinder and Booster
Removing the original master cylinder consisted of removing the brake line, unbolting the master cylinder from the firewall, and disconnecting the pedal clevis. We cleaned the threads on the mounting studs and added the booster mounting brackets. To those brackets, we added the booster and the master cylinder (following bench bleeding; see sidebar). We connected a hose to the vacuum attachment on the booster to a port that provides manifold vacuum.
Proportioning Valve, Brake Lines, and Bleeding
Because this is a dual system, we had to make a few new brake lines. Due to the extremely high pressures created in hydraulic brake systems (as high as 1,400 psi), a double flare must be used. It's also a good idea to add generous loops to the lines when possible to absorb any vibration. SSBC's instructions suggested adding a proportioning valve to the rear brake system (rear reservoir on our master cylinder) to reduce the pressure to the rear brakes so they won't lock up prior to the front brakes. We mounted ours adjacent to the master cylinder for easy access.
Then we gravity-bled the brakes by topping off the master cylinder and cracking open a bleeder fitting to allow a slow flow of brake fluid. After about 15 minutes, sufficient fluid should have flowed through to remove any air from that line. Close that bleeder fitting and move onto each other line until all the lines have been bled. If the pedal is hard, the bleeding has been successful. If not, they can always be bled the standard way with one person in the car and the other opening and closing the bleeder fittings.
Roll Out and Break In
With our GTO down on all fours, we rolled it a few feet and applied the brakes. We also applied the parking brake to see that it would hold the car. We gave a quick check for leaks, and with none found we went for a slow drive around the block. We made another check for leaks and also turned the wheels lock-to-lock to ensure that we didn't have any binding of the flexible brake lines or other interference.
When changing rotors and/or pads as we did with the SSBC kits, it's best to give the new components 200-250 miles of slow-speed driving and gentle braking to seat them. A hard stop from 65 mph will glaze new pads and rotors. After this break-in period, the rear brake bias can be set with the proportioning valve. This needs to be done in a deserted area with no traffic.
With the installation complete and system fully dialed-in, Wortman can confidently drive his '65 GTO knowing he has the stopping ability of 21st century disc brakes in his vintage muscle car.
 SSBC provided us with this simple kit that makes it easy to bench-bleed the master cylinder. The clear plastic tubing allows you to see even the smallest amount of air passing through.
Master Cylinder Bench Bleeding
Bench bleeding is one of the most important yet often overlooked steps when one is changing a master cylinder. It removes all the air from the master cylinder and should be done off of the vehicle on a bench. We used SSBC's Master Cylinder Bleeding Kit, PN 0460, which came with our new master cylinder.
We clamped the master cylinder securely in a level position by one of its ears (not the body) in a vise. We pressed the tapered plastic fittings into the master cylinder's ports, attached the clear plastic hoses, and then routed them up, with one in each reservoir, retained by a small plastic clip attached to the bridge between the reservoirs. We filled the reservoirs about three-quarters with new brake fluid. It's important that the clear plastic hoses remain submerged in the brake fluid during this process. Using a blunt tool, we stroked the piston to pump fluid through the system, bleeding all of the air. It's important to use full, slow strokes to prevent the fluid from foaming. After a few minutes, the fluid flowing through the plastic lines is free of bubbles, and the master cylinder is ready for installation.
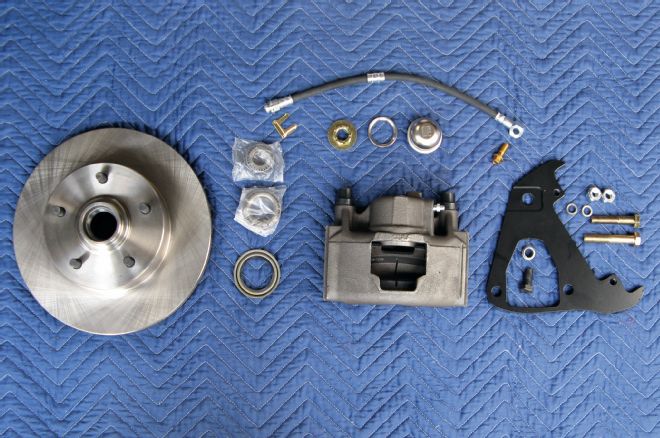
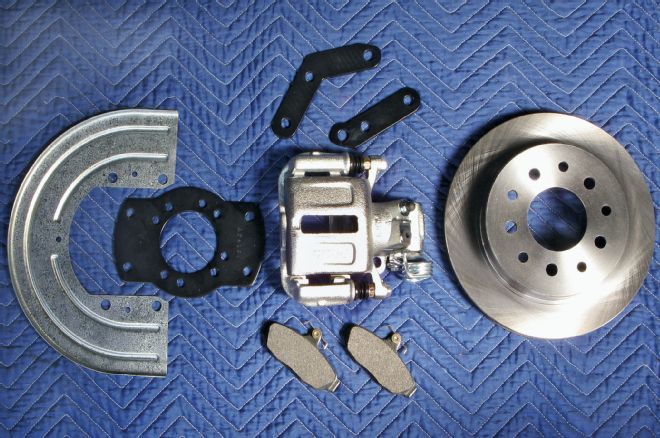
1 These components are included with SSBC's front brake conversion kit for a '65 GTO. The new rotors are vented, and the caliper is a reliable, single-piston slider type. The bearings, seal, and new brake line are included.
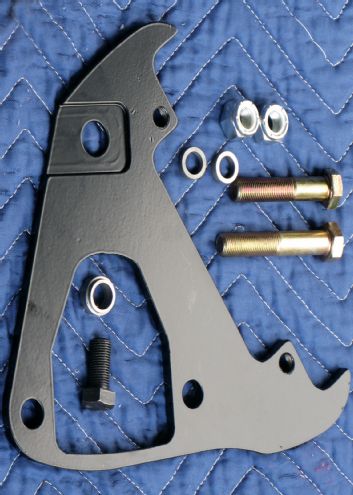
2 SSBC includes this nicely CNC-machined and black powdercoated caliper mounting bracket and attachment hardware in its front brake kit. The upper mounting bolt sits in a small recess to clear the rear face of the rotor.
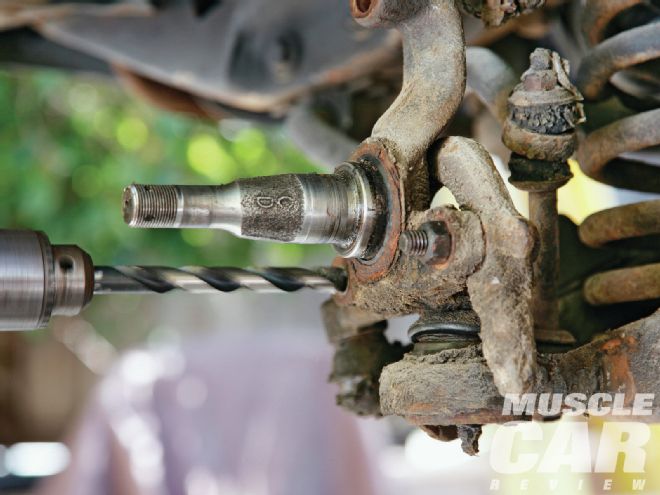
3 The only modification required to any original component was to enlarge the two steering arm attaching holes from 7/16 to ½ inch. This was done on the car with a hand drill.
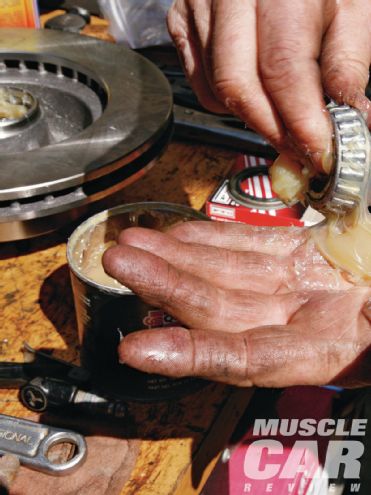
4 Packing wheel bearings is messy, but it's one of those jobs in which the person doing the work can feel the smallest amount of dirt or grit in the bearing. SSBC includes the bearings and seal for the front rotors.
5 With the caliper bracket in place and prior to sliding on the front rotor, a small spacer is added to the spindle with its beveled side facing in.
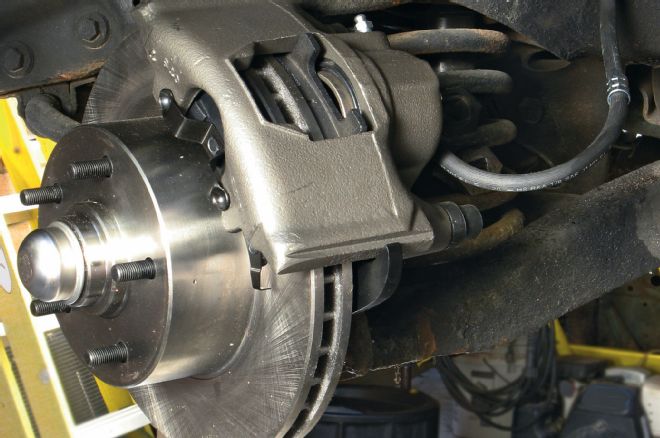
6 Once the caliper is in place, the flexible brake line is added. It's important to ensure that the line does not bind by turning the wheel lock-to-lock.
7 SSBC's rear brake conversion includes a CNC-machined and powdercoated bracket, vented rotor, splash shield, and new SSBC calipers.
8 This is the backside of SSBC's rear caliper, a dependable, single-piston slider style. The spring and lever attach to the existing parking brake cable, providing the reliability of the original parking brake with a simple attachment.
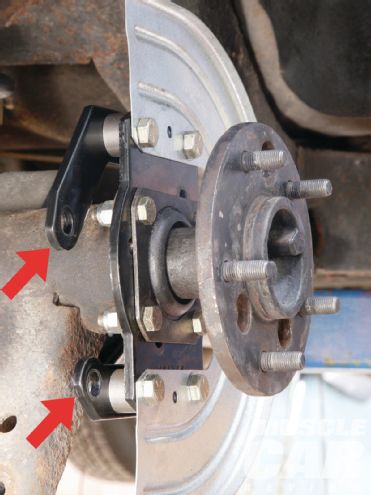
9 The rear axle bracket attaches to the four existing bearing retainer holes. The splash shield and two hockey stick–shaped caliper straps attach to the axle bracket. The red arrows point to the caliper attachment holes on these straps.
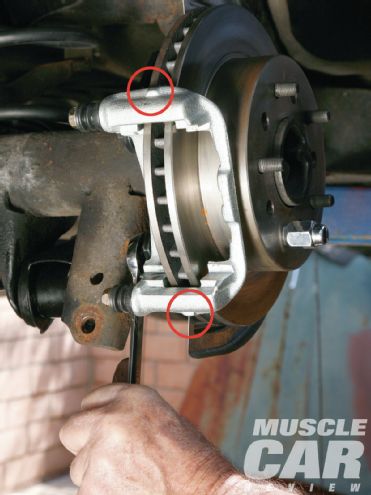
10 With the rear rotor held in place with one lug nut, we slide on the caliper bracket and bolt it in place. SSBC provides shims for the attaching bolts that allow the installer to fine-tune this bracket so that it's centered on the rotor. The lugs on the bracket (in the red circles) help the installer find a visual centerline between the bracket and rotor.
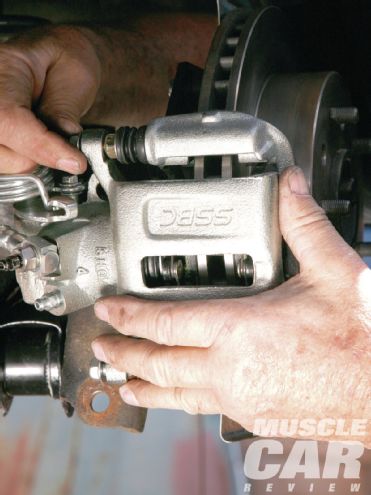
11 Once the caliper bracket is in place, the caliper—with shoes—slides over the rotor and is bolted in place. The banjo fitting attaching the flex line is pointed up in the direction of the hard line to which it will connect. Flex lines are necessary because of the sliding caliper design.
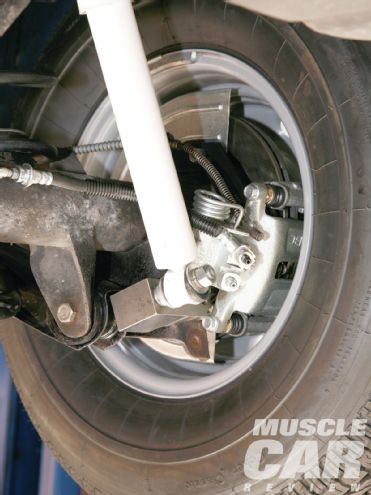
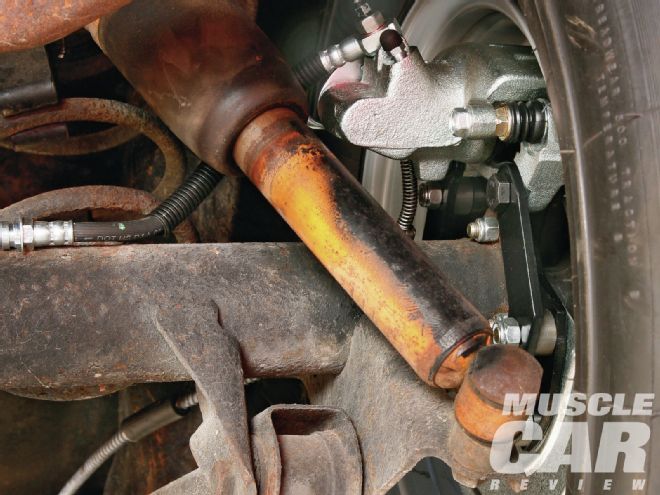
12 SSBC's compact rear brake assembly provides modern stopping power and an integral parking brake that all fits within an original 14-inch wheel. SSBC provides a new lower shock mount, that uses an original attaching bolt, to relocate the shock inboard for caliper clearance.
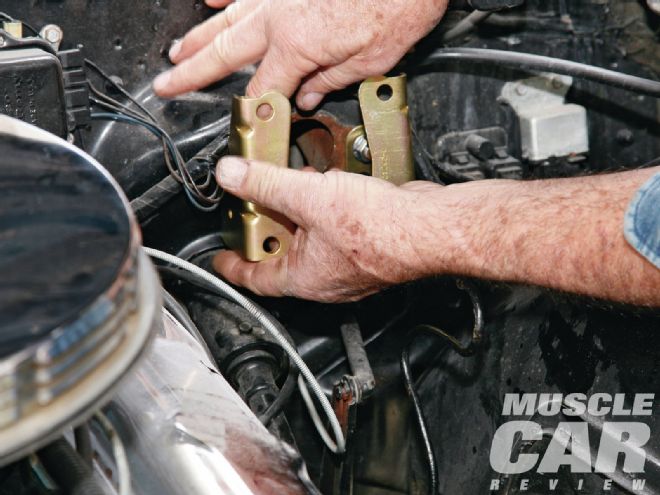
13 After removing the original single-piston, manual-brake master cylinder, we attach the brackets that will hold the new SSBC power-brake booster to the firewall.
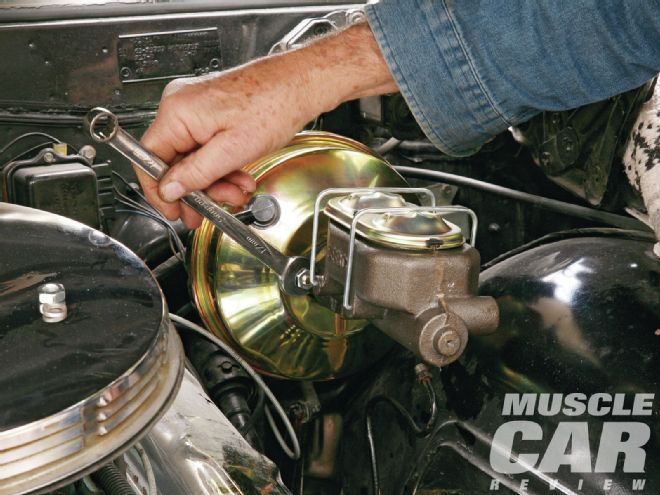
14 With the booster in place, we attach the master cylinder after it had been bench-bled. Not yet attached is a hose from the engine that will provide manifold vacuum to the booster.
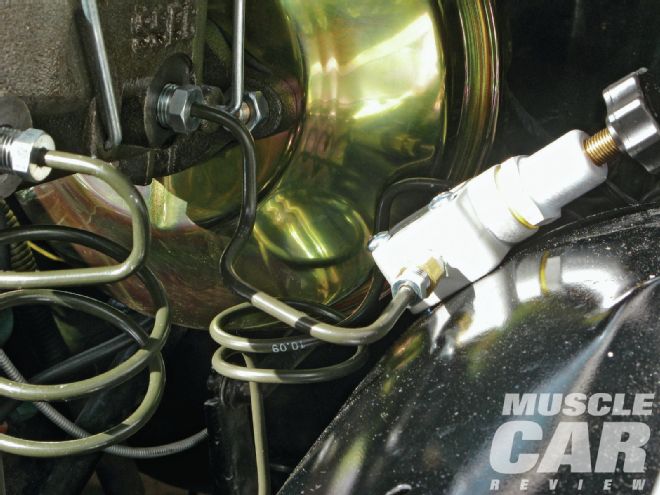
15 A proportioning valve was added to the rear brake line at the master cylinder. It allows us to fine-tune the brake system to prevent rear-wheel lockup upon hard braking. Loops are added to the brake lines to absorb vibration.
16 SSBC's rear calipers are compact and highly functional, retaining the original parking brake cables. Included with the kit are the flex lines required because of the sliding caliper.