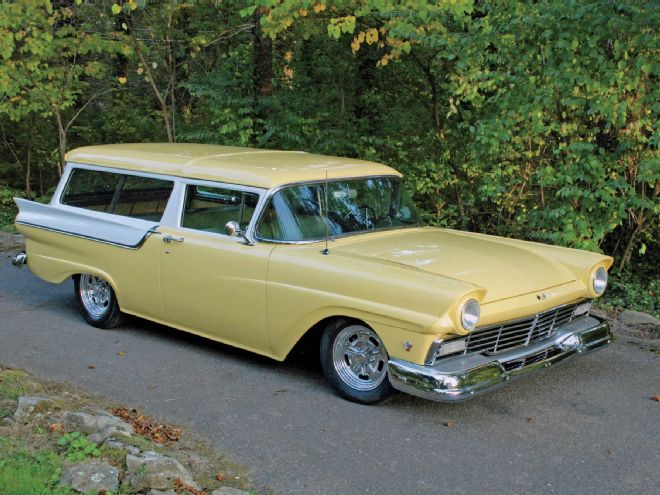
It all began with a simple check of my 1957 Ford Ranch Wagon. The car had been seeing very little use for the last year or two as I found myself behind the wheel of my recently completed '40 pickup. Recognizing the fact that the wagon had seen limited road use it seemed appropriate to give the car a good going over prior to pressing it back into service. Actually, regardless of use, any old car should be given a complete annual "physical exam."
With that thought in mind I set about what should have been a weekend of maintenance, you know, change all the fluids, oil, gear lube, trans, and brake fluid. Before it was over the car would have all new brakes and be resting almost 3 inches closer to the ground, but we're getting ahead of ourselves.
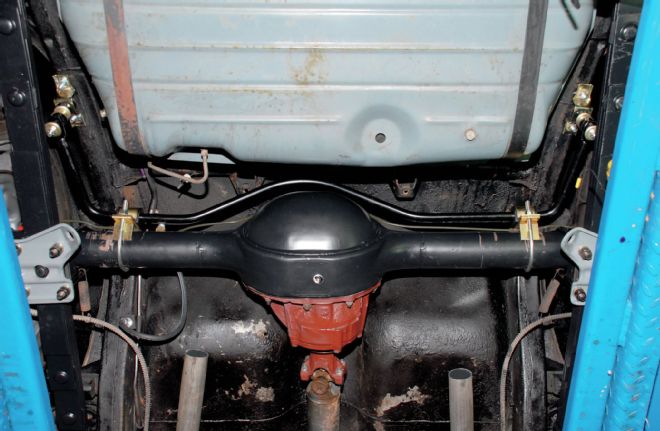
It was that small trickle of grease running down the right rear backing plate that first caught my eye. Hmm, I don't remember that being there before and of course the first reaction is to minimize the problem. Ah, probably just an axle seal, no big deal. Removal of the wheel and brake drum exposed a thoroughly greased down set of brakes, so it was time to dig in deeper.
As it turns out it was a bad axle seal, that's the good news. The bad news is the axle seal went bad because there was metal in the gear lube from a bearing going bad in the third member. Adding to the fun, the driver side axle bearing was bad, producing a mild growl. Hmm, so much for light maintenance.
We ordered up new axle bearings and seals from Dennis Carpenter Ford Restoration Parts, along with new wheel cylinders and brake shoes for the rear. As for the centersection here was our thought: Sure it was probably a pinion bearing, but the whole unit is 55 years old so we just ordered a new centersection, 4:11 gear from John's Industries, aka The 9-inch Factory. Then the oh-so-common, "while we're at it" syndrome kicked in; after all we may as well remove the housing and give it a proper cleaning.
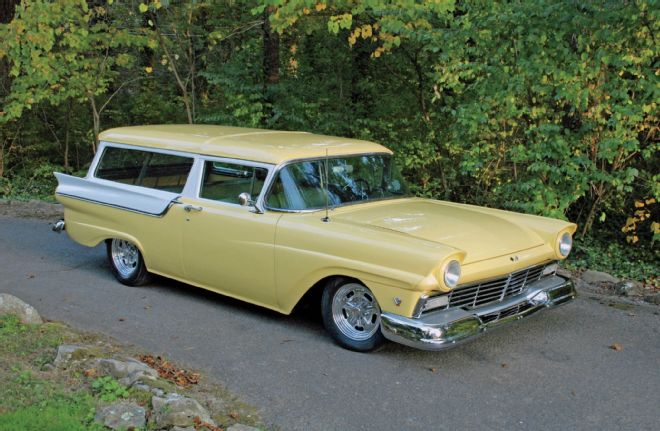
Dropping the stance on our '57 Ranch Wagon brought it from Brady Bunch to hot rod in about a week of spare time.
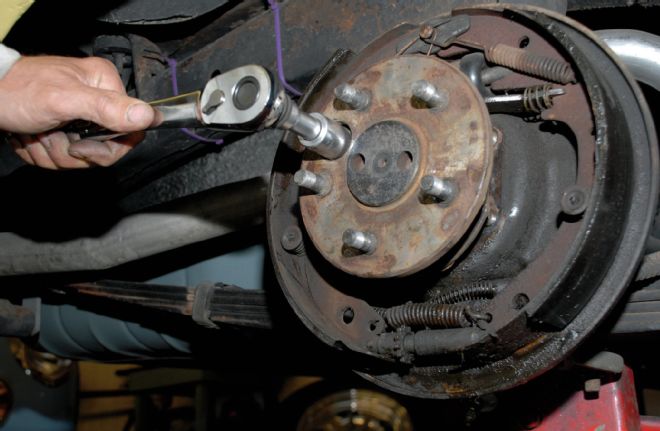
1. After discovering a troubling streak of gear lube trickling down the backing plate it was time to investigate further. We were hoping for a simple axle bearing and seal replacement. To that end we removed the four retainer nuts with a socket through the hole in the axle flange.
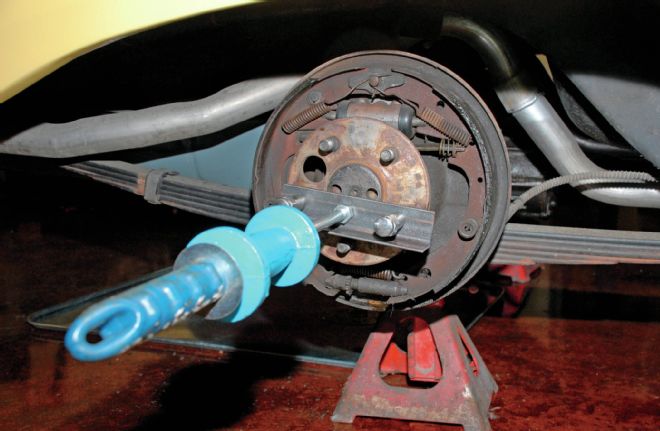
2. While a slide-style axle puller is heavier, we adapted a dent puller slide hammer to help remove the axle, it worked just fine. A simple piece of angle iron was cut and drilled to fit.
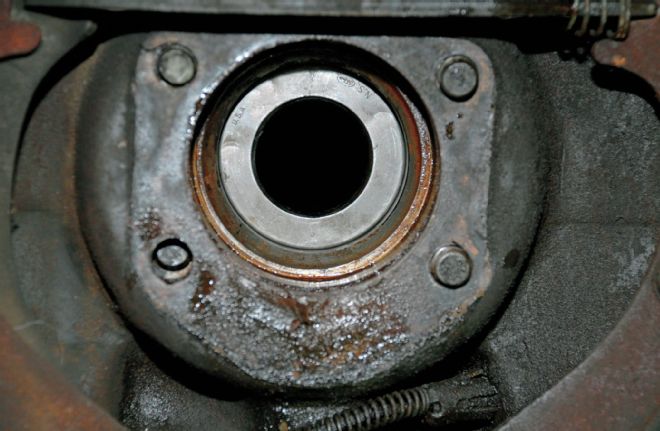
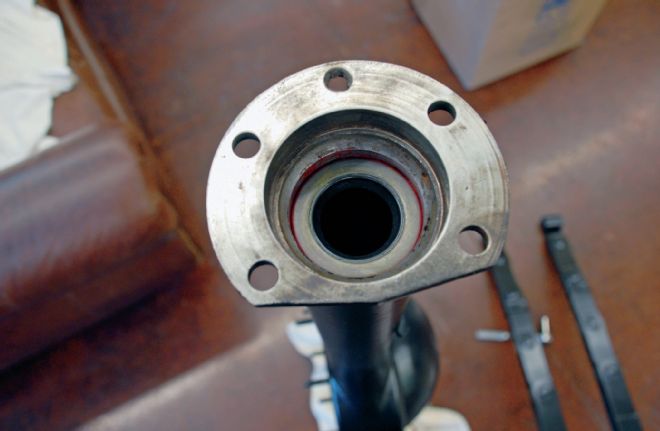
3. After removing the axle you will find the axle seal inside the housing. This seal was leaking but the big question was why?
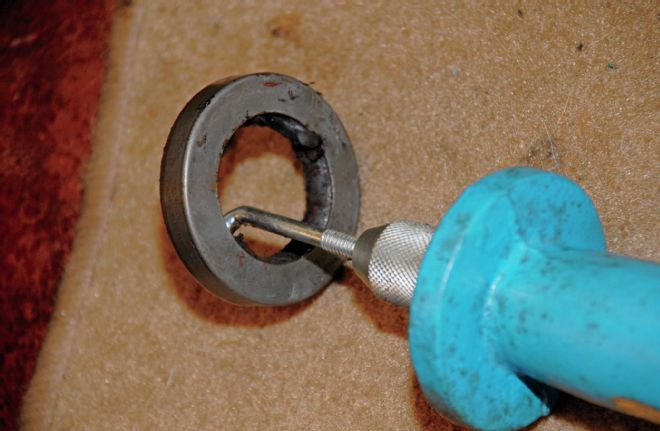
4. We employed the same dent puller to remove the seal. Simply hook the seal and give it a couple of whacks with the slide hammer and out it comes. 5. With both axles out of the housing we removed the driveshaft and spun the centersection by hand, a slight growl came from the gear set. After draining the gear lube it had a distinctive metallic look, time to dig deeper. An impact wrench, eight nuts, and four U-bolts later and the housing was freed from the parallel leaf springs.
5. With both axles out of the housing we removed the driveshaft and spun the centersection by hand, a slight growl came from the gear set. After draining the gear lube it had a distinctive metallic look, time to dig deeper. An impact wrench, eight nuts, and four U-bolts later and the housing was freed from the parallel leaf springs.
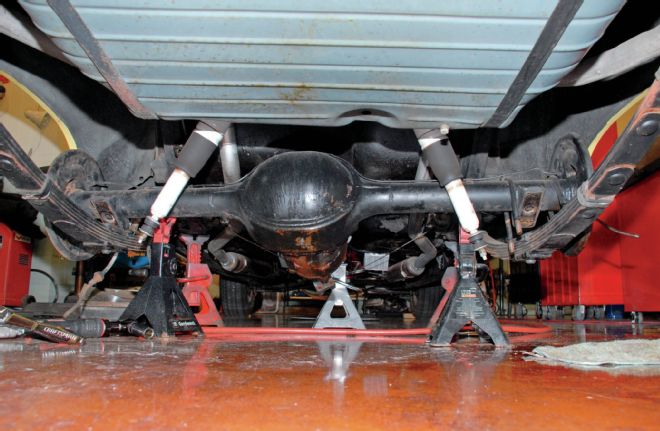
6. We used three jackstands to support the rear housing, one under the front of the third-member to prevent the housing from rotating downward. Of course the car was also safely supported by jackstands.
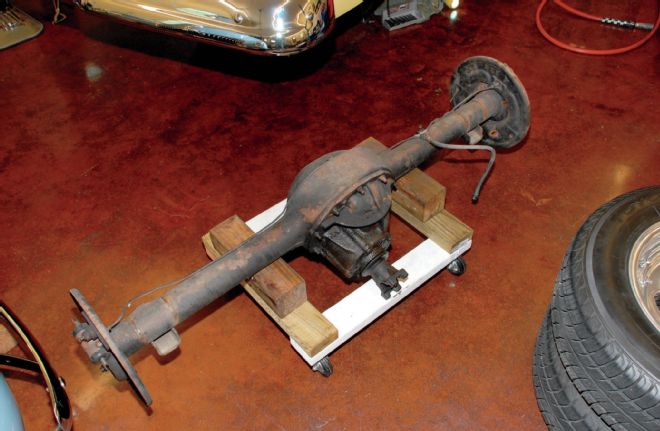
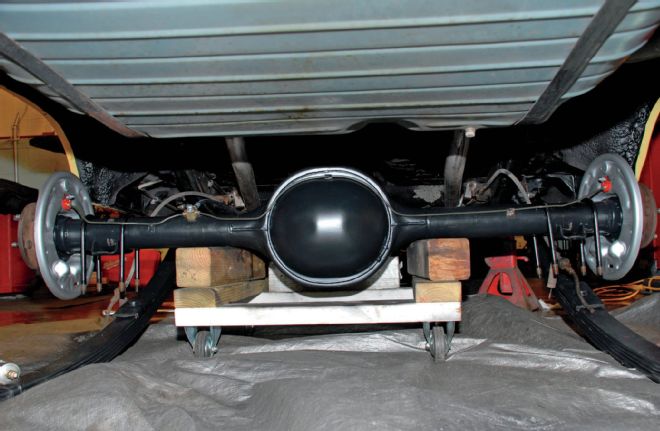
7. We built this handy little dolly a while back and we use it often. Some 4x4 blocks on top of the dolly made it the perfect platform for the '57 Ford 9-inch rear.
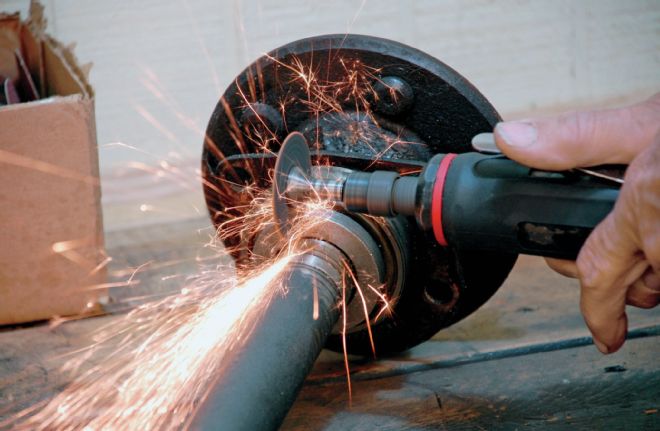
8. Next we turned our attention to removing the old bearings. A die grinder was used to put a deep slot in the collar. A hammer and chisel split the lock ring for easy removal.
9. The same method was used to remove the bearings, chisel in the slot, a couple of good whacks with a hammer and the outer bearing race split. The same procedure removed the inner race with special care taken not to allow the cut-off wheel to contact the axle.
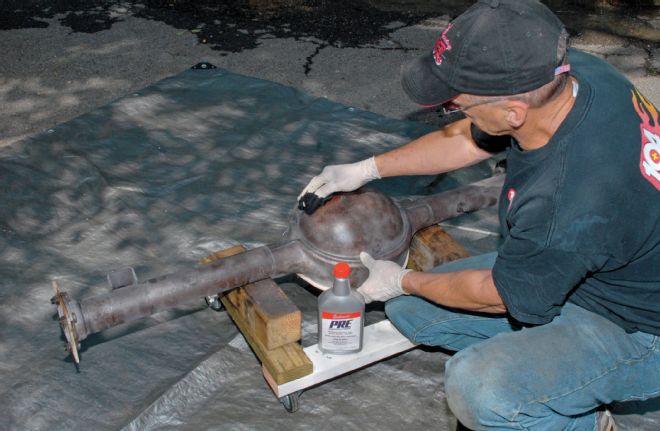
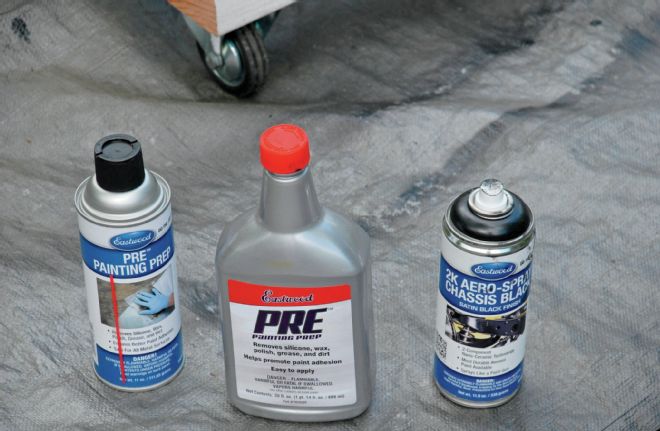
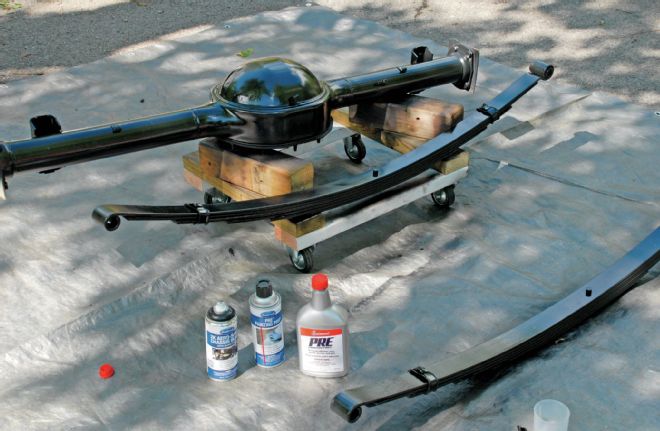
10. We sent the axle housing and backing plates off to Flintstone Media Blasting. When we brought the housing home we cleaned it with Eastwood PRE paint prep.
11. After cleaning with the PRE we applied three coats of Eastwood 2K Aero-Spray chassis black. This provided a nice semi-flat black finish. The two-part epoxy paint is very tough.
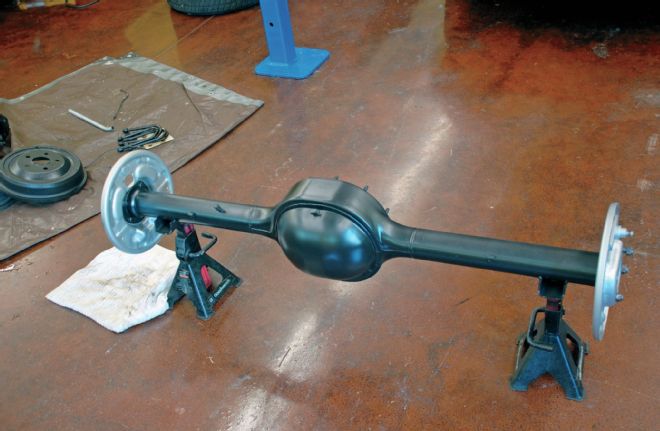
An impact wrench, eight nuts, and four U-bolts later and the housing was on the shop floor. A trip to Flintstone Media Blasting took care of the outside of the housing and we gave the inside of the housing a thorough cleaning to be certain all traces of metal were gone. Satisfied with the cleanliness of the housing we applied a coat of primer and a couple of coats of Eastwood 2K Aero-Spray Chassis Black paint. The two-part paint mixes right in the spray can and provides an extremely durable finish in the perfect semi-gloss black.
By this time the parts had arrived from Dennis Carpenter Ford Restoration Parts and the big brown truck had delivered the new 9-inch centersection. Assembly of the third member is all pretty straight forward stuff, with the only technical thing being removing the old axle bearings and pressing on the new ones. This was handled in-house with a press but can also be handled by most local repair shops, if you don't have access to a press.
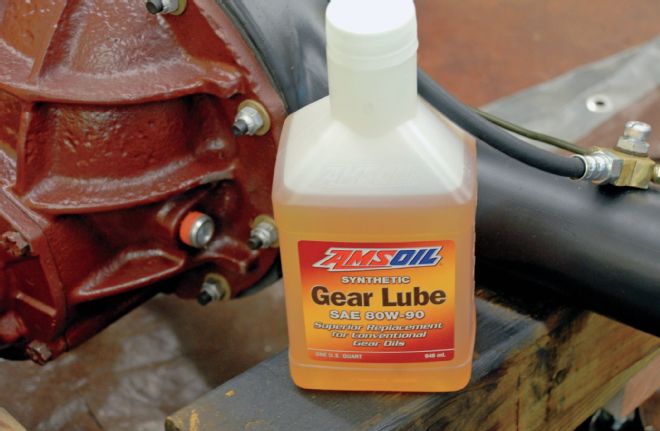
With the rearend housing assembled and filled with AMSOIL INC. gear lube, we couldn't help but think about how to improve the suspension on the car, stock mid-1950s cars are not exactly state-of-the-art handling cars. To that end we did some research and found that an Addco sway bar was available for the 1957 Ford and of course the good folks at QA1 can make a shock absorber for virtually any car. We opted for a set of QA1 adjustable shocks to complete our rear suspension upgrade. A sway bar and shocks would help, but we figured those 55-year-old springs should go too and so a call was placed to Posies for a set of their Super Slide parallel leaf springs designed to lower the car 3 inches from stock. By combining these parts we will have a completely new and improved rear suspension, brakes, and gears. That's a long way from changing the gear lube.
12. By now we had gone beyond a simple repair and decided it was time to lower the car and to that end a pair of Posies Super Slide leaf springs were purchased. The springs lower the car 3 inches, and we treated them to Eastwood paint prior to installation.
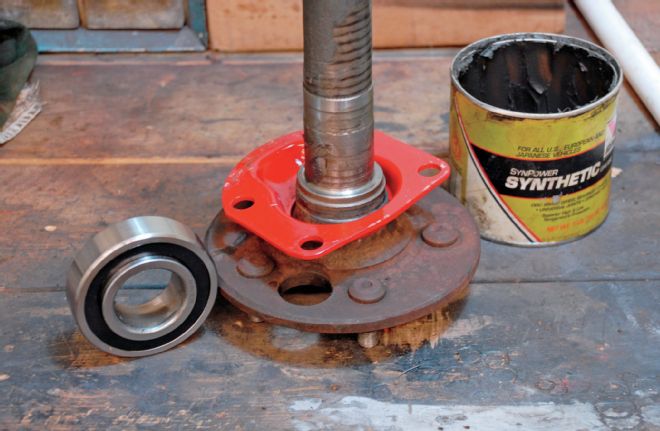
13. We purchased new axle bearings from Dennis Carpenter Ford Restoration Parts and after cleaning and lightly greasing the axle we slipped the retainer plate on the axle.
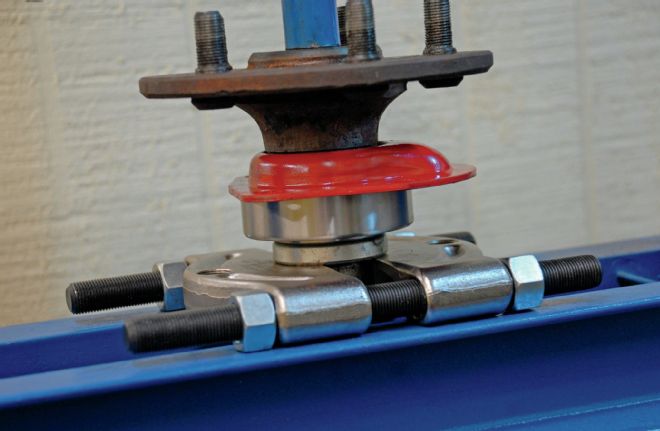
14. We pressed the new axle bearing in place with our home shop press and an OTC bearing splitter sourced through Summit Racing.
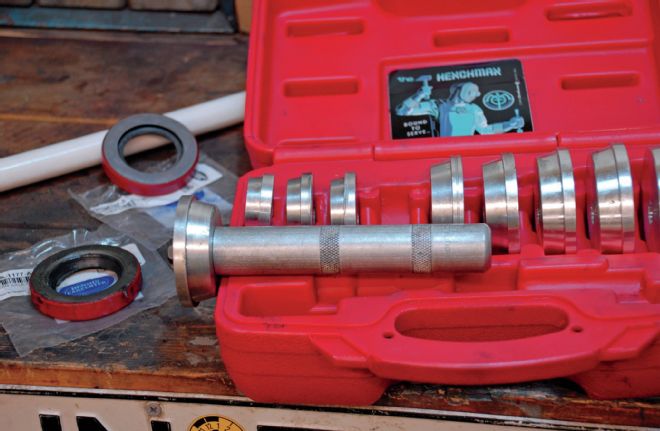
15. You'll need a quality seal installation tool to install the inner axle seals. This complete set is from Graham Tools, while we sourced the seals from Dennis Carpenter Ford Restoration Parts.
16. Seal installation is simple, carefully square the seal in the tube, then use the appropriate seal installation tool and a hammer to tap it in place, as seen here. We wiped the lip of the inner seal with a bit of grease prior to installation.
17. With the seals installed and the backing plates bolted on we put the housing on jackstands for installation of the centersection.
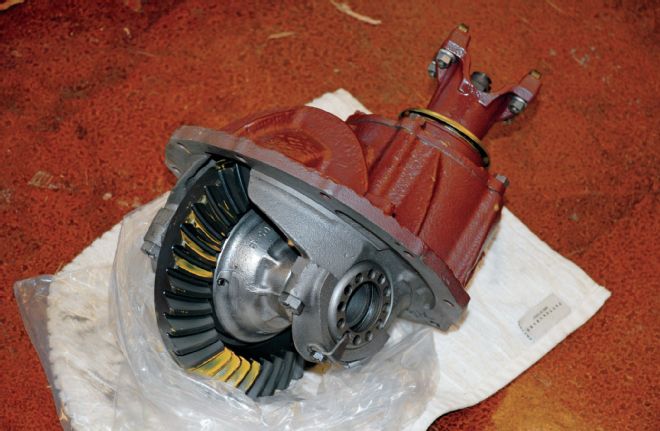
18. This is our brand-new centersection from the John's Industries (The 9-Inch Factory); it comes complete with the gasket. A light smear of silicone gasket sealer was applied to either side of the gasket.
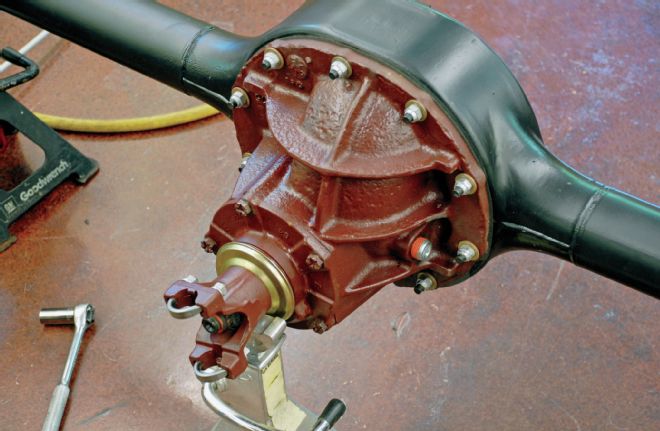
19. Drop the centersection in place over the studs in the housing and use the proper locking nuts to secure the centersection to the housing. Tighten the bolts in a cross pattern to help torque it down evenly.
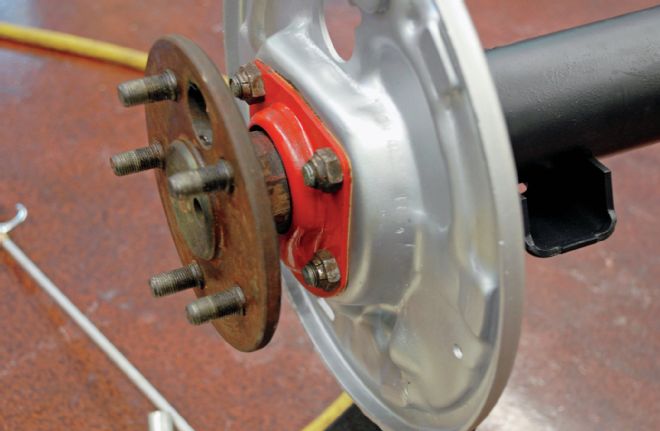
20. Next the axles are slipped into the tube and the retainer is bolted in place to hold the axle in the housing. There is a paper gasket between the retainer and the backing plate.
21. Next up was installing the Posies Super Slide springs. We hung the front of the spring from the single bolt and let the spring hang down so we could roll the rearend housing over the springs.
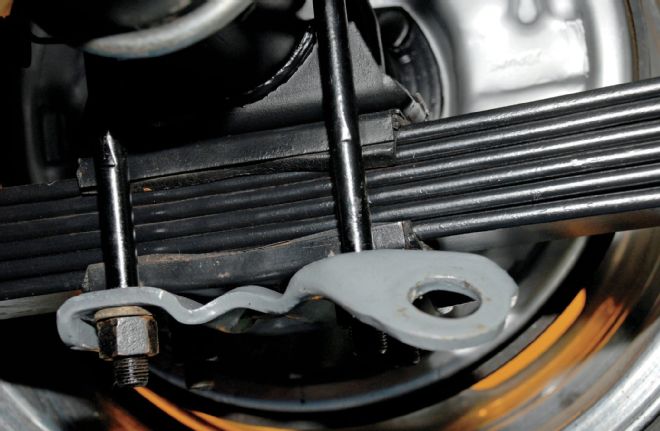
22. After attaching the springs to the rear shackles the U-bolts hold the Posies springs to the housing. We used the original rubber insulators on either side of the Super Slide springs.
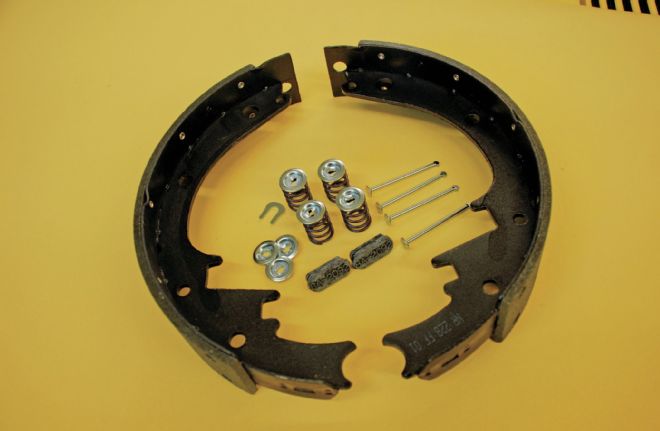
23. Since the leaking seals completely greased down our brake shoes we ordered all-new brake parts from Dennis Carpenter Reproductions and installed them the original backing plates.
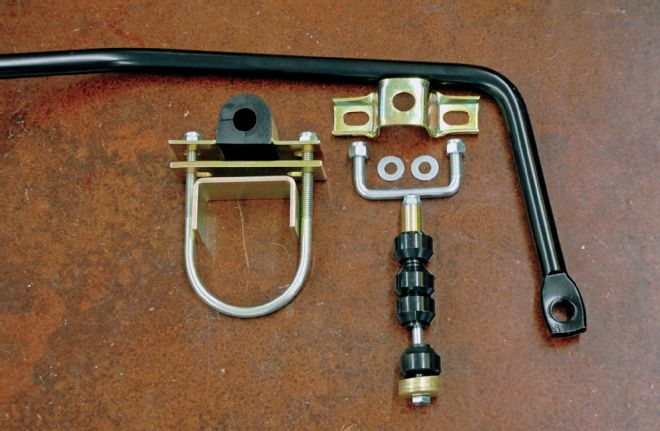
24. Before lowering the car when the wagon went into a turn we had a slight body rub on the rear tires. Since the '57 Ford had no rear sway bar we ordered up an Addco sway bar for our car. It completely cured the body roll problem.
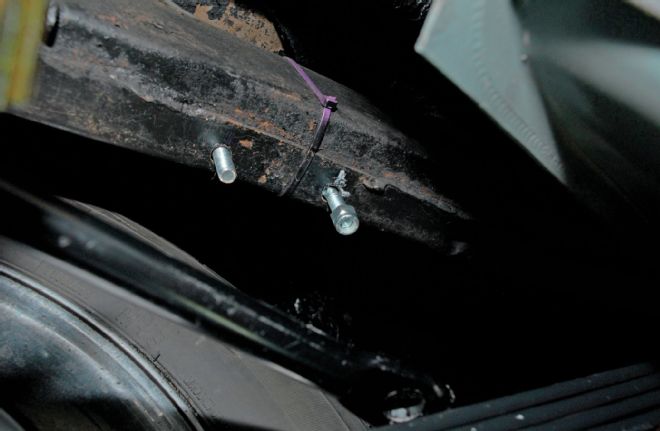
25. Two holes must be drilled in the bottom of the framerail for the sway bar droplink; everything else is strictly a bolt-on operation. On the station wagon frame the two holes for the associated internal U-bolt are drilled very close to the outside edge of the framerail.
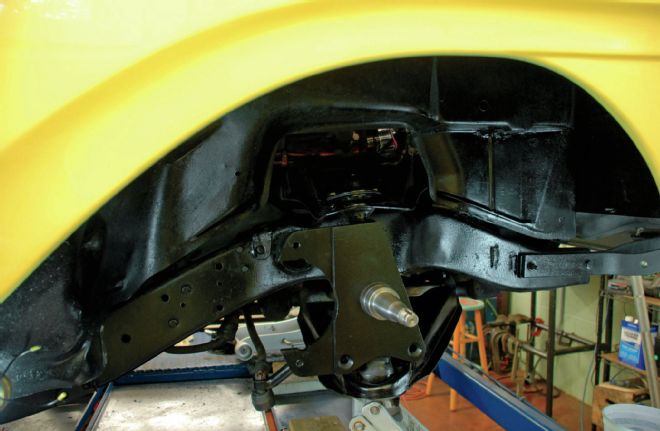
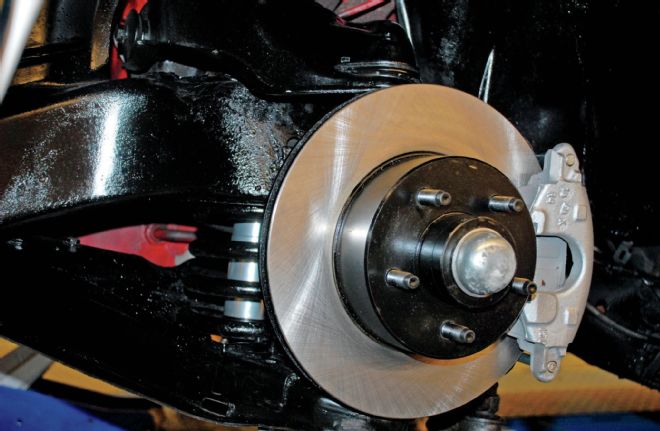
So now we had our wagon back on the ground, 3 inches lower than stock height, sitting like a tail-dragger, not a particularly good look for a Ranch Wagon. It was obvious the front end would have to come down for the proper look. To that end a call was made to Fatman Fabrications and sure enough, right there on the shelf was a set of 2-1/2-inch dropped spindles for the 1957-59 Ford. We added new 1970-77 Camaro calipers and 1975-80 Granada rotors to the package and we had all-new brakes, bearings, hoses, and a lower stance.
Another set of adjustable aluminum QA1 shocks up front would allow us to dial in the perfect ride. The stock front sway bar on the station wagon is quite beefy so we simply installed new Dennis Carpenter Ford Restoration Parts rubber bushings on the stock bar and the front suspension was complete. Subsequent test drives and QA1 shock adjustments would show that we had totally transformed the ride and handling of our 1957 Ford Ranch Wagon. It was an amazing improvement; we could hardly recognize this as the same car.
Bleeding the brakes got us back to the intended fluid changes and while we were under the car we drained the oil and added 5 fresh quarts of AMSOIL INC.'s finest to the engine. It was then we noticed the trickle of green in the front of the engine. Jeez, a Dennis Carpenter Ford Restoration Parts rebuilt water pump was ordered, we installed a new stainless steel Flex-a-lite mechanical flex fan sourced through Summit Racing. Then we had the original radiator professionally flushed and checked. Adding the new coolant to the radiator finally completed what we set about doing in the first place, complete fluid changes and basic maintenance, but now we have a much-improved car. Welcome to the wonderful world of hot rodding.
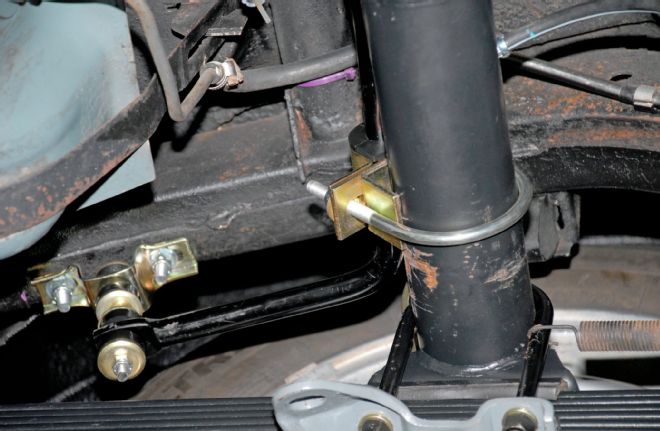
26. The sway bar brackets on the housing are held in place with a U-bolt and the droplink connects to the sway bar ends. By carefully test-fitting everything first when we drilled the holes in the frame everything fit perfectly.
27. We were really impressed with the compact fit of the rear Addco sway bar and pleased to see it mounted above the housing. And yes it did the job, we have no body rub in turns after installing the Addco bar.
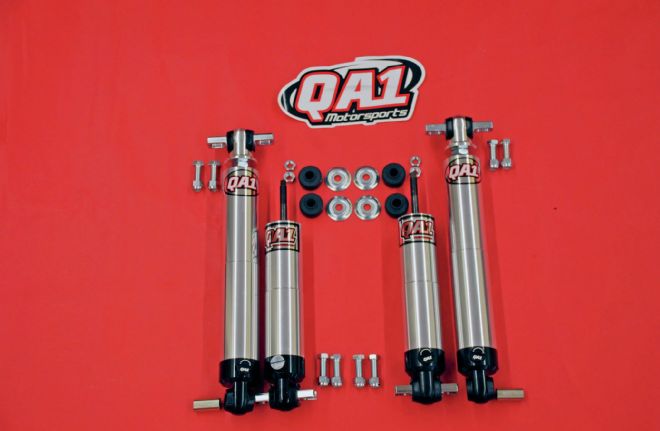
28. The QA1 adjustable shock absorbers completely transformed the car, making it ride like a modern car. We spent some time adjusting the shocks and with the simple click of the adjuster wheel you can dial your suspension into the perfect ride.
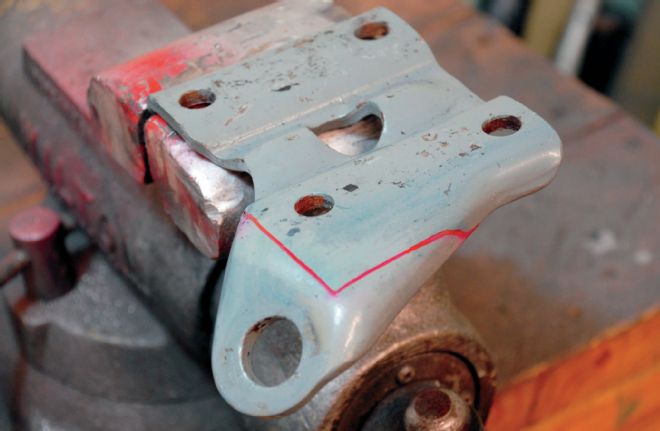
29. The stock rear shocks are an unusual crossbar top and stud bottom design. QA1 does not offer a stud bottom body so we had to modify the lower spring plate to accept and eye-type mount. We marked the area to be removed.

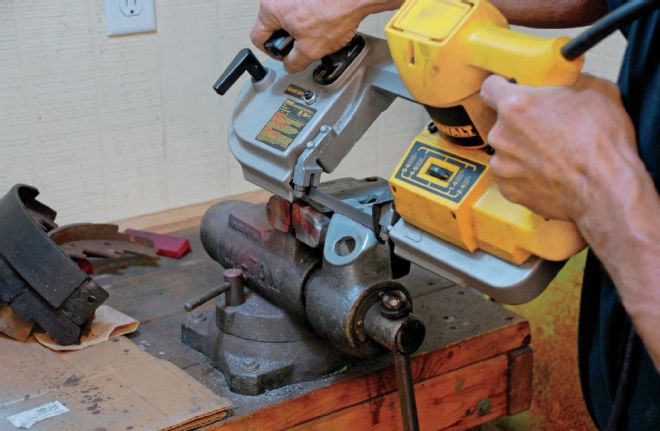
30. Our trusty port-a-band made quick work on removing the unwanted portion of the lower spring plate.
31. We fabricated these two pieces from 1/4-inch stock and tack welded them in place for a test-fit. Once satisfied with the design we TIG welded the new pieces to the lower spring plate.
32. The modified lower spring plates were then bolted in place, once again clamping our Posies springs while providing a mounting surface for our aluminum-bodied QA1 shocks.

33. The top crossbar mounts fit to the stock crossmember while we installed two shock absorber studs in our custom spring plates to allow the QA1 shocks to bolt in place. Here is the completed rear suspension.
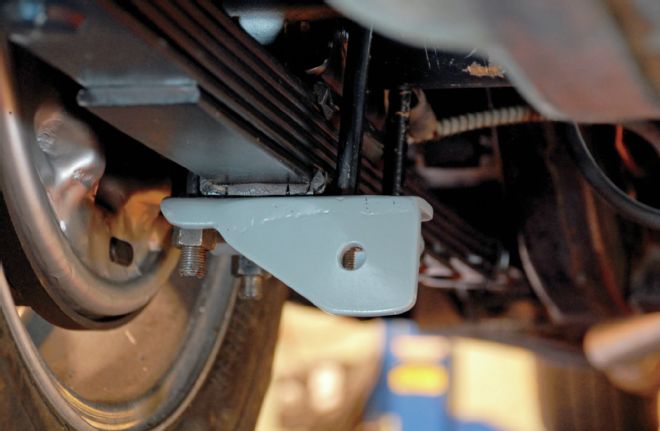
34. Since the Posies springs lowered the rear 3 inches lower than stock we wanted to drop the front the same amount. Happily Fatman Fabrications makes a 2-1/2-inch dropped spindle for mid-'50s Fords. After carefully removing the original spindle the new dropped spindle bolts in place.
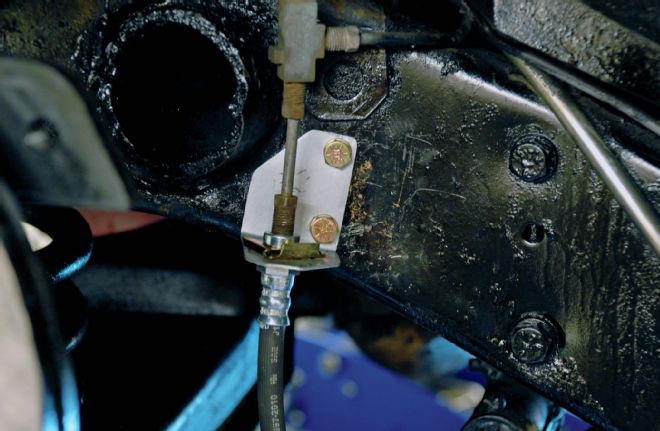
35. We made a new brake line bracket so the flex hose would be pointing in the proper direction and have ample length for a full turning radius.
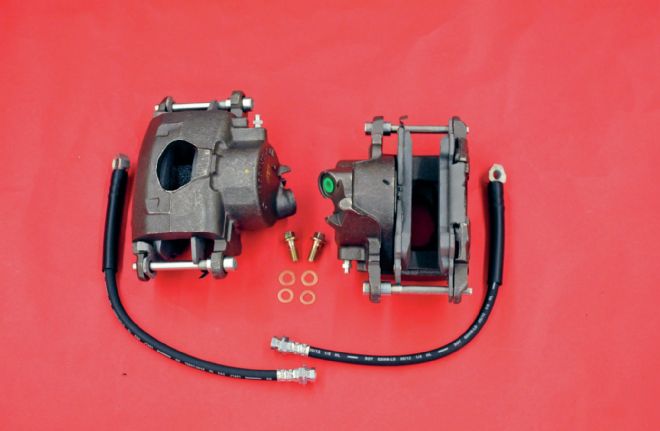
36. We sourced brand-new '70-77 Camaro calipers and '75-80 Granada rotors from out local parts store, giving us all-new components on the front brake system.
37. After the spindles were bolted in place the QA1 shocks were installed inside the coil springs. Face the adjuster knob toward the engine on the lower control arm for ease of adjustment.
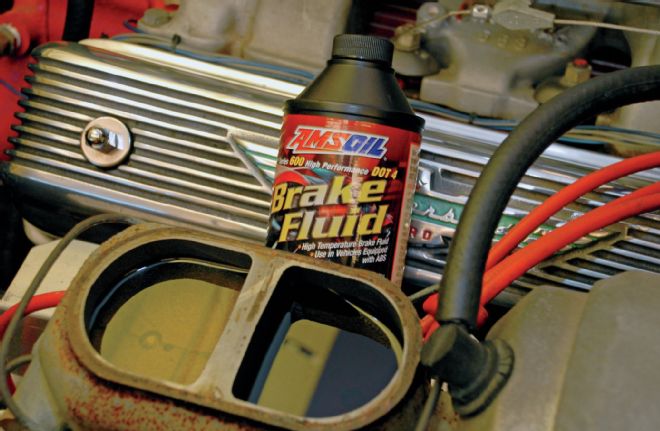
38. The final step was to bleed the brakes with some AMSOIL INC. high-performance DOT 4 brake fluid. Notice the front chamber has been bled and the fluid is clear, while the rear chamber looks like coffee, a sure sign it needs to be changed. Brake fluid should be changed at least every two years.

39. And here's the finished installation, neat, clean, and simple our '57 Ranch Wagon now has a proper hot rod stance, all-new brakes, and a completely refurbished suspension.