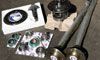
In many cases, an older truck's rear axle probably hasn't been serviced or serviced well. After 35 years of use and abuse, it was time to rebuild the leaky, whiny 12-bolt under my '72 C-10. Expecting the worst, plus opting for a ratio change from 3.73:1 to a more highway-friendly 3.42:1, I ordered a new Yukon Gear ring-and-pinion set, axles, the installation kit that comes with the new pinion and carrier bearings, races, seals, crush sleeve, ring gear bolts, gear marking compound, and the axle bearing and seal kit, all from Randy's Ring & Pinion. In lieu of rebuilding the old differential, I called Eaton Performance Products and ordered a posi unit for the GM 12-bolt truck rearend so I wouldn't be "that" guy with a one-tire-fryer.
My '72 is still and will be a work in progress for a while, but I've been aiming at getting it to at least the clean daily driver status. In the pursuit of this goal, I've been setting my sights on the mechanicals and trying to clean up the mess that went hand in hand with all the old neglected parts. So I decided to pull the rearend out of the truck for the rebuild, making it easier to clean it up. Knowing that I didn't have the right tools for setting up the new parts, like a magnetic base dial indicator, hydraulic press, bearing pullers, etc., I decided to take the axle over to Unitrax, which is a well-known differential and driveline shop here in Southern California. They will rebuild practically any rearend you can drop off, or you can drive your truck to the shop and they'll do it in the vehicle.
Once Unitrax got the 12-bolt torn down and all the old parts cleaned up, we could see what story the rearend was trying to tell. First off, I already knew the pinion seal and differential cover leaked, plus the ring-and-pinion was really whiny, which I initially attributed to years of previous neglect. Actually, that turned out to be an old improper pinion depth setup, but to top it off, there was already an old Eaton posi unit that didn't work and was worn out! The ring-and-pinion could have been re-used if I wanted to stay with the 3.73:1 ratio, but since I wanted the truck comfortable for the freeway and I had 225/70R15 tires, the 3.42:1 seemed like a good choice to go with the 4L60 Gear Star tranny I already installed. According to both Randy's Ring & Pinion and Unitrax's online gear calculators, the mph/rpm would be as follows: 60 mph @ 1,761 rpm, 70 mph @ 2,055 rpm and my favorite cruising speed, 80 mph @ 2,349 rpm.
If you choose to rebuild your own rearend, Randy's Ring & Pinion put together a comprehensive 378-page book on differentials that is a great resource from how and why, identification, and modification, which is nice to have in any library whether you're building a rearend or not. Also, the installation kit instructions from Yukon describe the rebuilding process fairly well, but even being a hands-on guy, I still left this one to the pros.
Once you get your differential good to go, it is important to follow either the manufacturer's or service center's break-in procedure to ensure that all the work and your hard-earned money isn't wasted. Randy's and Unitrax's break-in sheets basically mirror each other, which is comforting. Both outline the following:
* Only use a premium national brand 80W-90 or 85W-140 GL-5 gear oil, and make sure to add the proper friction modifier fluid if you have a limited-slip or posi unit and every time you change the gear oil. Make sure the drain plug is tight.
* Drive the vehicle for 15-20 miles and then stop and let it cool for 45 minutes. Avoid aggressive starts, hard stops, and driving long distances at a steady speed during break-in.
* Repeat the previous step once. Do not tow for the first 500 miles, and do so gradually afterward. Avoid wide-open throttle acceleration for the first 300 miles.
* Change the gear oil after the first 500-2,000 miles with the same type of fluids.
Again, check with the manufacturer or service center, but following their break-in procedure should give you years of trouble-free use of your fresh rearend. Next month, we'll show you some tips for putting the rearend back in your '67-72 Chevy truck.