The last generation did more for aftermarket wiring than any that preceded it. While even the most serious do-it-yourselfer once clutched at the prospect of installing something as simple as power windows a mere decade ago, just about all of us can wire an entire car nowadays due to well-designed kits, comprehensive instructions, and precious technical assistance.
While the way we install our wires has improved by leaps and bounds, the same can't be said of the way we end them. All too often an enthusiast will tediously route and bundle a whole harness and simply kludge the terminals with poor-quality tools or the wrong tools altogether. Making matters worse, a poorly installed terminal, much like many a poorly welded joint, doesn't necessarily look shabby.
That's a potentially fatal pitfall since most electrical problems start at wire tips well hidden by the terminal itself. Above and beyond connecting the terminal to the wire and conducting electricity, the terminal installation must effectively seal the end of the wire. If it doesn't, oxidizing elements like the air around us will wick along the wire strands inside the terminal and corrode the wire well under the insulation. In the best-case scenario, a poorly installed terminal will eventually work intermittently or stop working altogether. On the other hand, since corrosion increases electrical resistance, resistance increases heat, and heat induces more resistance, a damaged wire can slip into a destructive cycle and fail with catastrophic (and blazing) results.
Automotive manufacturers over the past 50-odd years have consistently created effective and airtight terminal installations by crimping or deforming terminals' barrels to capture the wire strands. If there's a detractor to this process, it's that OEM-grade tools are incredibly expensive and require frequent calibration. Furthermore, OEMs use a type of terminal variety that is often pretty hard to find. While non-OEM-grade tools and consumer-grade terminals have been available to enthusiasts for some time, a lot of them-particularly the cheap ones-don't do a very effective job. Crimping has earned a pretty bad reputation as a result of failures due to inadequate tooling, chintzy terminals, or poor education. Making matters worse, just about all poor-quality tools and terminals are still available at even reputable auto-parts stores, perennially leading would-be electricians to failure.
Luckily for us, more and more specialty tool manufacturers and vendors like Molex, Klein Tools, Wire 1, and Snap-On offer high-quality electrical tools that bridge the gap between expensive OEM-grade and dime store-quality tools. While these tools cannot be considered OEM-grade since they don't feature the approved calibration mechanisms for mass production, Molex's Bob Grenke assured us that such exacting controls are of little consequence since we enthusiasts and professionals can take the extra time to verify a crimp's quality. He adds that most of these tools are fully capable of creating thousands of effective crimps over their lifespan if cared for properly.
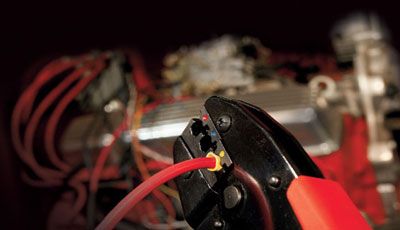
To find the proper way to use these tools, we asked a few wiring specialists to tell us their own definitive way to fasten a common closed-barrel terminal to the end of a wire. Since we have a collection of professional opinions, this is the point where things potentially get sketchy. Naturally there are multiple schools of thought, and each one has its merit; however, some philosophies seem to contradict others.
To keep things simple, we specified the two most popular styles of automotive solderless connectors in the automotive aftermarket: non-insulated and insulated closed-barrel terminals. While some technicians apply solder to the non-insulated variety as a sort of insurance policy, that's a subject beyond the scope of this article (see the soldering sidebar), and one that we may address in a future installment.
Instead of endorsing any one particular style, we present to you several for you to choose from. As you do, keep in mind the following: Those who create entire wiring harnesses on OEM-level machines for our industry use at least one of these methods and tools to successfully install wiring harnesses. If you follow their lead and invest the time and attention necessary to do any job correctly, you're likely to achieve similar success.
To Solder Or Not To Solder
If there's a single most contended subject in the crimping world, it's the solder debate. We'll let Wire 1's Ken Whitney land the first blow: "When using a quality tool and when done properly, a crimp is every bit as good as any soldered joint. The conductivity and strength are both great, and the crimped terminal is as strong as or stronger than the wire itself."
Then again, both American Autowire's Michael Manning and Haywire's Ken Logue endorse soldering the tip of a crimped terminal to ensure the integrity of the seal. While Painless Performance's Dennis Overholser agrees with that in theory, he noted that, in practice, the occasional electrician is more likely to overheat and damage the wire than create a good joint.
Affordable Street Rods' Rich Fox outright condemns the practice and offers examples of failed solder joints made by aftermarket vendors. In fact, governing bodies like the Federal Aviation Administration permit only crimped joints, for reasons such as Whitney noted: "They figure that you're more likely to create an effective crimped joint than a soldered joint."
Luckily, they all meet at middle ground, as summed up by Manning: "A mechanical bond, generally in the form of a crimp, is the basis of any effective terminal installation." For that reason we have concentrated specifically on how to affect a reliable crimp and left soldering for another day.