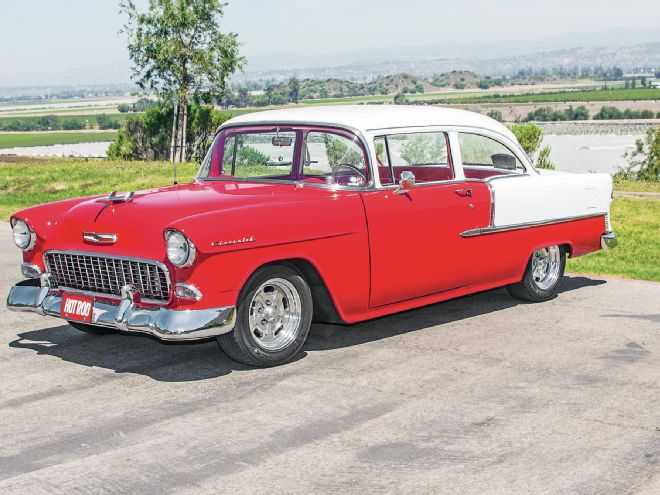
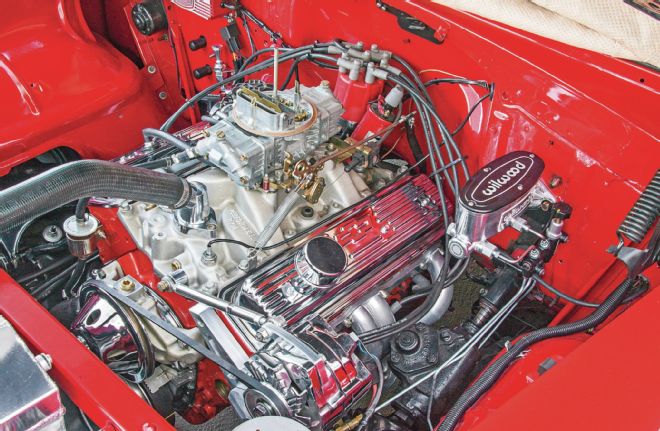
When Jim O’Connell bought his 1955 Chevrolet 210 Del Ray seven years ago, it already had a front disc brake conversion kit of unknown origin installed that used 11-inch rotors and stock GM S-10 single-piston calipers, along with a dual master cylinder and vacuum power booster. Jim proceeded to upgrade the powertrain with a warmed-over GM 350 HO crate engine, a 200-4R automatic overdrive trans, and a 3.50:1-geared 9-inch Ford rearend packed with heavy-duty parts, including 31-spline axles, a Truetrac limited-slip diff, Torino axle bearings, and 11-inch rear drum brakes.
 Ever since Jim O’Connell has owned his 1955 Chevy, it’s had severe front passenger-side brake vibration issues.
The front brakes never worked right. Jim says, “[The car] always pulled to the right, and the brakes felt real sloppy. They always sounded noisy, like they were loose. The noise and vibration kept getting worse; the brakes felt like they were hanging up. Eventually, the shake got so bad coming back from a car show I took off the wheels and inspected the pads. I was using pads riveted to the backing plates. A rivet had broken off, and the broken half of the pad was just hanging loose.” The cycle kept repeating itself. Bonded-type pads cracked as well. At some point, a caliper-mounting bolt broke in half. When Jim asked HOT ROD for help, he was just 300–400 miles into the latest set of brake pads, and they were already showing signs of abnormal wear.
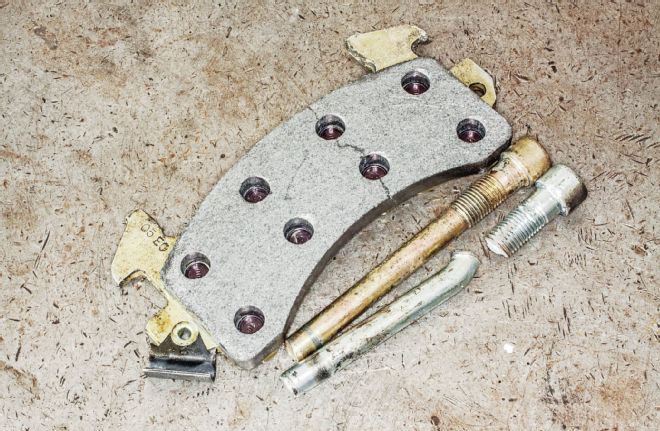 The vibration and shaking got so bad that Jim cracked several sets of brake pads and even broke a caliper mounting bolt in half.
We sent Jim over to Wilwood Engineering, a premier manufacturer of racing and hot rod brake systems. Its engineers closely analyzed the entire system, confirming the vibration during a testdrive. Although they can’t say for sure, Wilwood’s experts think the caliper-mounting bracket either was tweaked or incorrectly designed to properly support a sliding-style caliper. And the bad vibes were just the tip of the iceberg; Wilwood uncovered a bunch of additional brake problems:
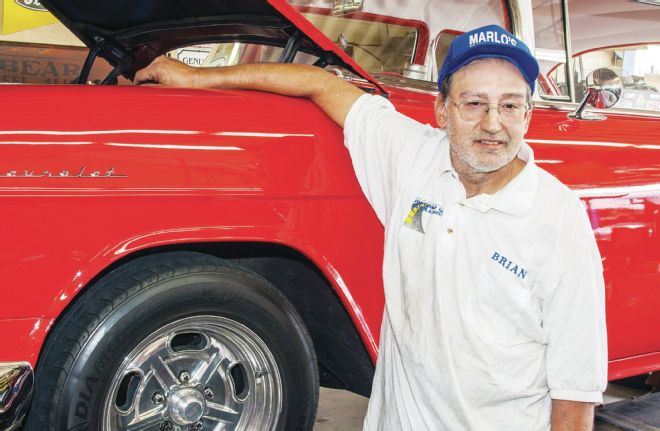
 Wilwood re-engineered the brakes with coordinated parts. Tech Tony Porto (right) turned the wrenches, assisted by Steve Richey (left).
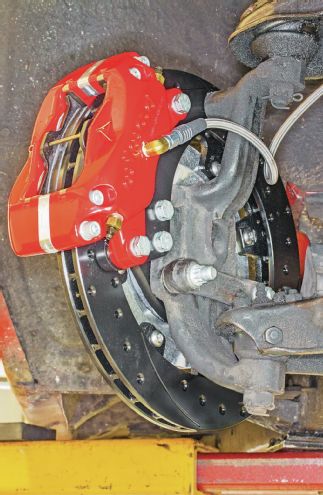
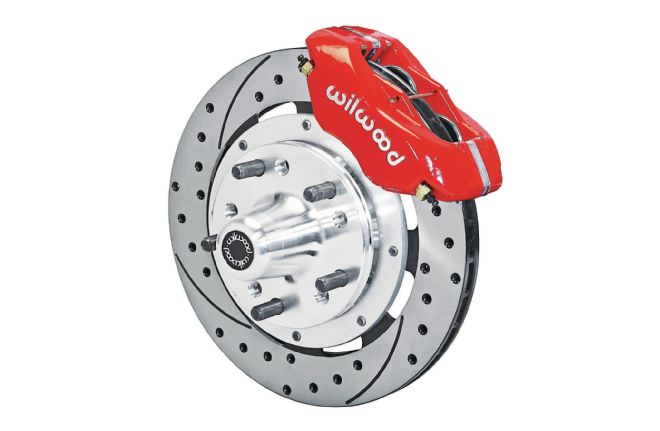 The upgrade is anchored by a bolt-on Wilwood FDL Pro-Series front hub kit that includes four-piston calipers and 11.75-inch rotors.
In sum, Jim’s existing brake components not only had individual problems in their own right, but collectively the overall system was marginal and uncoordinated. By contrast, Wilwood’s USA-made parts are engineered to work together—so rather than crutch some other manufacturer’s bad design, Wilwood upgraded the front brakes, the master cylinder, and the proportioning valve.
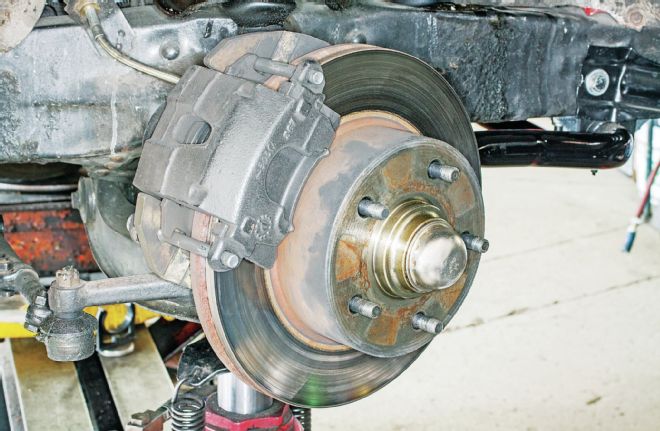 Jim’s troublesome Brand-X front disc brake conversion kit used custom brackets to mount OE GM S-10 truck single-piston floating calipers on 11-inch rotors.
 The 1955’s small, 7-inch-od vacuum booster and old-school iron master cylinder weren’t generating the pressure they should, and the generic, nonadjustable proportioning valve didn’t have the proper rear brake bias.
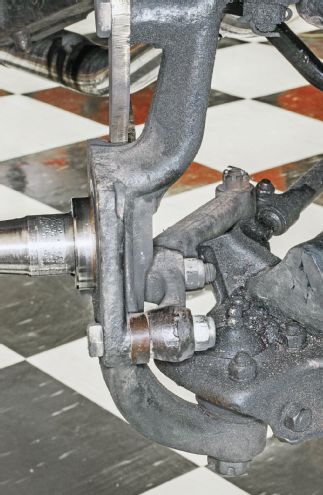
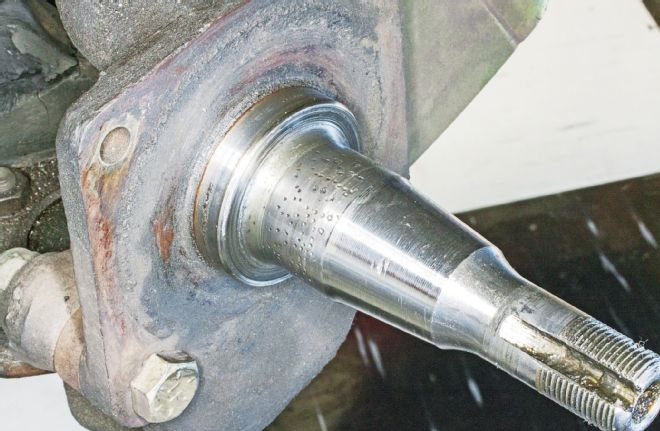 The original 1955 steering knuckles were still in use, but in the past the wheel bearings had spun; someone had staked the race to restore proper wheel-bearing clearance —shadetree, but livable in the short term.
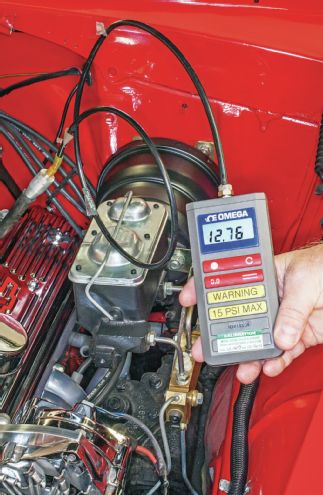 Wilwood says engine vacuum was marginal for reliable vacuum-assist brake operation.
In the past few years, Wilwood has brought to market a broad selection of complete bolt-on disc brake upgrade and conversion solutions for street rods, classic cars, American muscle cars, and heavyweight drag racers. Wilwood replaced Jim’s malfunctioning single-piston front brake kit with one of its forged Dynalite Pro-Series front hub kits that’s specifically designed to fit stock 1955–1957 Chevrolet steering knuckles. The kit includes all needed conversion parts, including red powdercoated four-piston calipers loaded with performance brake pads; larger 11.75-inch-od, directional, vented, drilled, and slotted iron rotors; aluminum hubs; aluminum rotor mounting hats; and mounting brackets.
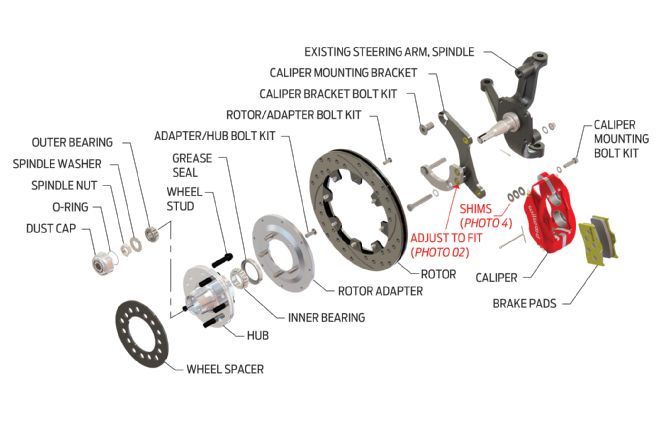 Based on its forged Dynalite caliper, bolt-on Wilwood FDL Pro-Series disc brake kits work with either manual or power-assisted brakes. Their modular configuration lets Wilwood offer many different kit options for many different models, plus future upgrades to larger calipers and rotors on existing installations are possible without buying a whole new kit. The rotor, hat, and hub must be field-assembled following the kit’s detailed instructions.
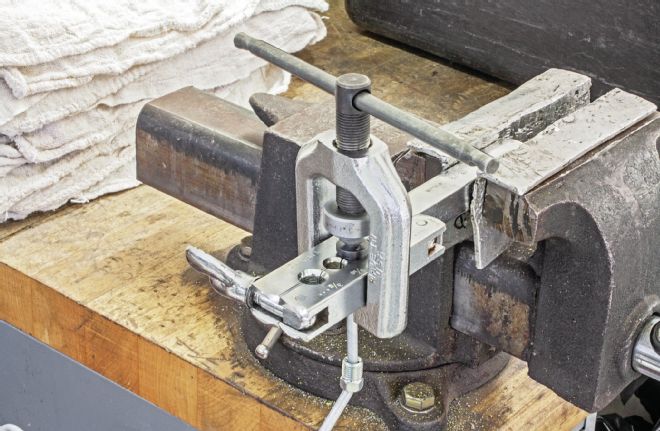
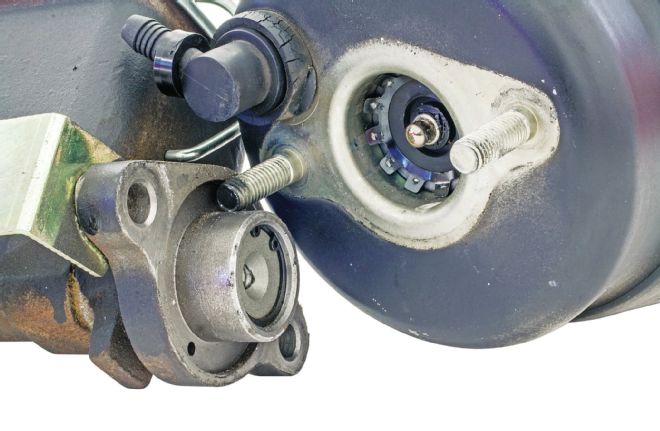
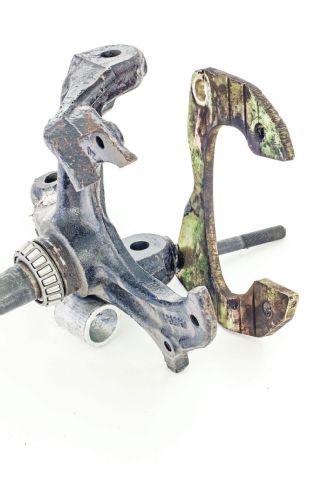 On GM steering knuckles designed for the single-piston floating caliper, the caliper mount has top mounting-bolt “guide-tangs” that prevent the floating caliper from twisting or binding on the slider. The cheap aftermarket bracket (right) lacks the tangs and may have been the cause of Jim’s problem.
To accommodate sloppy old-school steering-knuckle tolerances, Wilwood uses a two-piece caliper mounting bracket. For alignment purposes, the two halves come factory-assembled using the two center bolts. Back them off to hand-tight. Fit the bracket on the knuckle. Align, inspect, and tighten the other bolts, then retighten the two center bolts.
On GM steering knuckles designed for the single-piston floating caliper, the caliper mount has top mounting-bolt “guide-tangs” that prevent the floating caliper from twisting or binding on the slider. The cheap aftermarket bracket (right) lacks the tangs and may have been the cause of Jim’s problem.
To accommodate sloppy old-school steering-knuckle tolerances, Wilwood uses a two-piece caliper mounting bracket. For alignment purposes, the two halves come factory-assembled using the two center bolts. Back them off to hand-tight. Fit the bracket on the knuckle. Align, inspect, and tighten the other bolts, then retighten the two center bolts.
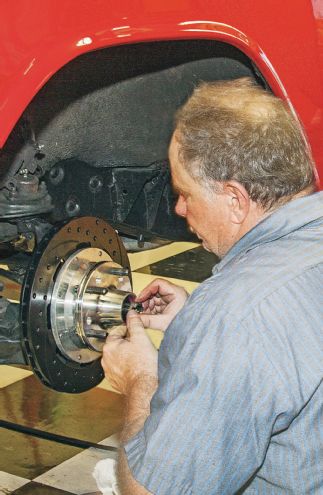 Properly preloading an adjustable wheel bearing affects both overall suspension performance as well as braking efficiency. Tighten the wheel-bearing castle nut to 60 lb-in while hand-turning the hub/rotor assembly, then back off the nut just enough so one of its slots aligns with the nearest spindle cotter-pin hole and install a new cotter pin.
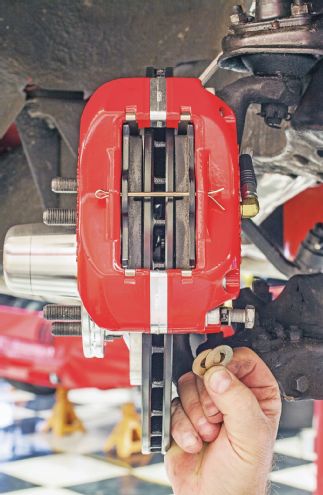 Center the caliper on the rotor within 0.015 inch. Measure the distances from the rotor’s outboard sides to the corresponding inboard pad mounting surfaces of the caliper. Equalize as needed by installing 0.035-inch-thick shims from the kit between the mounting bracket and the caliper’s mounting ears. Use the same amount of shims on each of the two caliper mounting bolts.
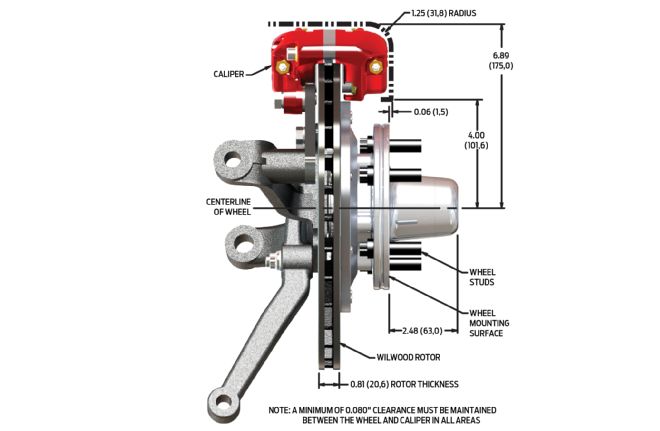
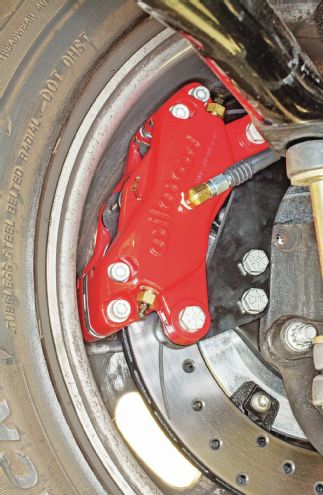 Clearance between the caliper and inside wheel rim should be at least 0.090 inch. This installation has more than adequate clearance.
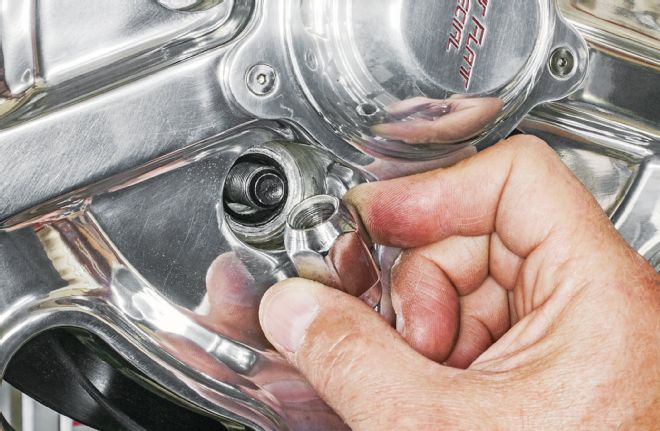 Wilwood’s hub is drilled with multiple wheel-bolt patterns. The kit’s ½-20x1.75-inch wheel studs were longer than those on the old rotor, requiring correspondingly longer conical Acorn nuts.
 The lower retention-bolt for the old kit’s rear-mounted caliper sandwiched between the knuckle and steering arm, in turn mandating a corresponding spacer with thickness equal to the bracket at the front arm-to-knuckle attachment. Collectively, this altered the steering geometry by moving the steering arm 3⁄8-inch inboard, causing undesirable toe-out.
 On rear-steer cars like Jim’s, Wilwood front-mounts the calipers for more steering-linkage clearance. Its caliper-mounting bracket bolts on the outboard side of the knuckle. No spacers are needed between the knuckle and steering arm, leaving steering-linkage geometry unaltered. However, overall front track width increases slightly by 0.30 inch.
Assuming equal effective disc piston area, compared to a single-piston floating caliper, the kit’s fixed four-piston calipers generate more even pad wear and better clamping power (although they may be less tolerant of sloppy OE production rotors with excessive runout). But in this case, the four-piston Wilwood caliper’s also have about 8 percent more piston area: 4.80 square inches compared to the single-piston’s 4.45 square inches. Larger rotors and more piston area translate into greater stopping power. On a heavy American rear-wheel-drive car, the front brakes provide the vast majority of braking power—never skimp on the front brakes.
Wilwood recommends manual brakes for cars making less than 16 in-Hg of vacuum. Although it’s possible to run vacuum-assisted brakes with less, it usually requires the added complexity of a remote vacuum reservoir and even an electric vacuum pump. With a properly sized manual master cylinder, a correctly adjusted pushrod, and the proper brake-pedal ratio, Wilwood maintains a manual system should outperform power brakes on typical hot rods with big cams and low vacuum.
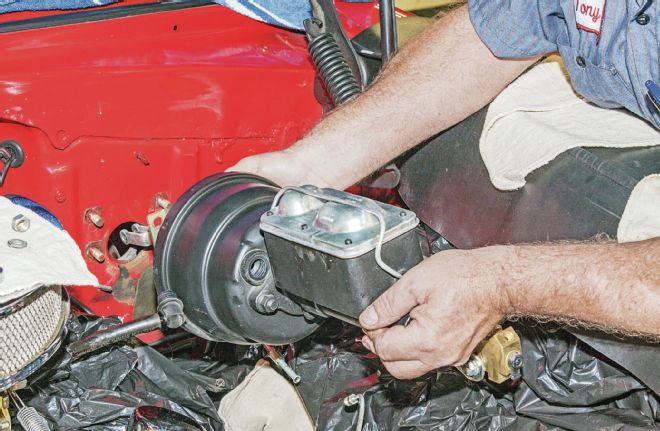
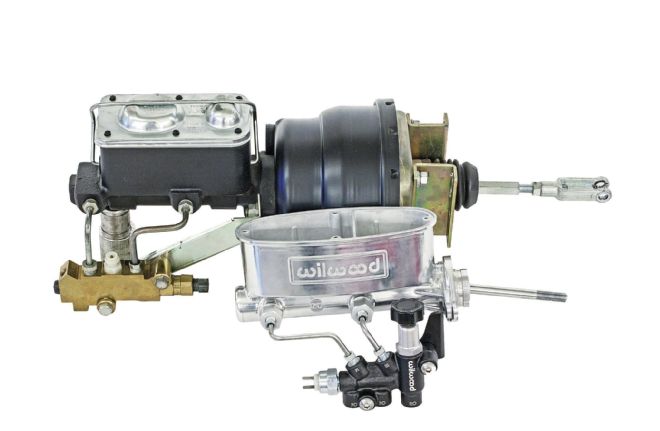 Due to low vacuum output from the tiny 7-inch-od vacuum booster, Wilwood decided to go full manual, replacing the old 15-pound booster, 11⁄8-inch bore master cylinder, and nonadjustable proportioning valve combo with its compact 3-pound, dual-tandem, 15⁄16-inch-bore aluminum master cylinder and knob-style valve.
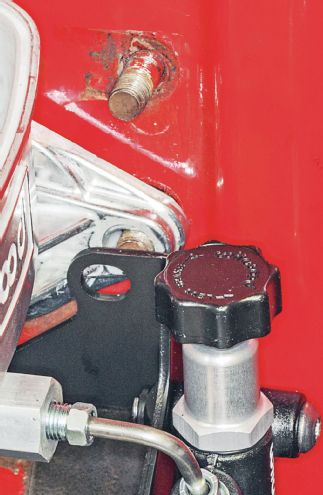 Wilwood’s master cylinder and prop-valve bracket bolts to the bottom two studs of the old booster’s four-bolt mounting pattern. Usually, a spacer fits between the prop-valve bracket and master to avoid interference with the latter’s braces, but on Jim’s car the permanently attached firewall mounting studs were too short.
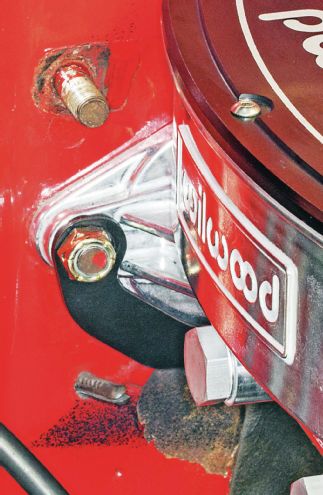 The solution was short nylon self-locking nuts installed without spacers or washers, plus subtlety profiling the bracket and gusset edges.
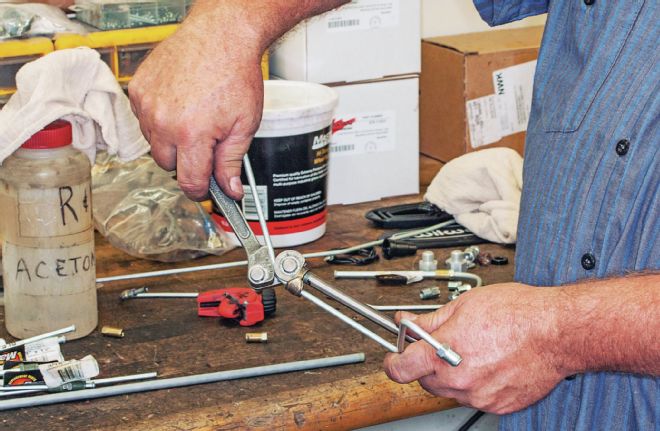 Major parts now mounted, Porto fabricated new 3⁄16-inch steel brake lines that connect the new prop valve’s outlet ports to preexisting downstream blocks and unions. Here, the new tubing is cut and bent to shape. It takes talent to master hardline—Tony’s the man!
 To prevent cracks, the seamed tubing was double-flared to the SAE 45-degree automotive flare pattern. Be sure to put the flare nuts on the tubing before making the final flare!
A key master cylinder selection criteria is the piston-bore diameter. There’s a trade-off between volume versus pressure needs: A smaller-diameter piston makes more pressure but displaces less volume. Wilwood offers dual tandem master cylinders with ⅞-, 15/16-, 1-, and 1⅛-inch piston diameters. According to Wilwood’s Dustin Burr, “Drum brakes run on volume, discs on pressure. Normally, with the particular calipers on this car, we’d go with one of our ⅞-inch cylinders when running manual brakes. On the other hand, we like about a 1-inch cylinder with typical 11-inch drum brakes. On Jim’s disc/drum car, we split the difference with a 15/16-inch unit: It develops adequate pressure for the front brakes and displaces more volume for the rear drum brakes.”
 Wilwood’s DOT-compliant, stainless-steel-braided, Teflon-cored hose connects the calipers to the existing hardline at the frame’s bulkhead connectors. This hose has a superior pedal feel than old-school rubber-based hose.
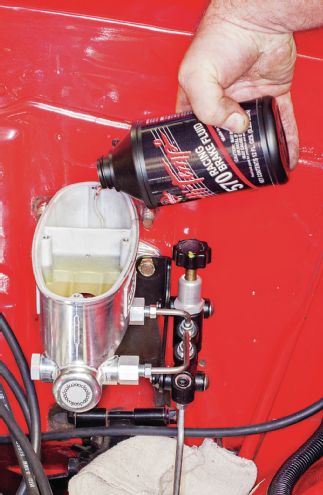 Specially formulated Wilwood Hi-Temp 570 Racing Brake Fluid has a minimum 570-degree Fahrenheit dry boiling point (compared to around 400 degrees for parts-store DOT 3 fluids). Hi-Temp 570’s low viscosity allows easy bleeding, eliminating brake-fluid aeration (aka foaming) caused by excessive pedal pumping.
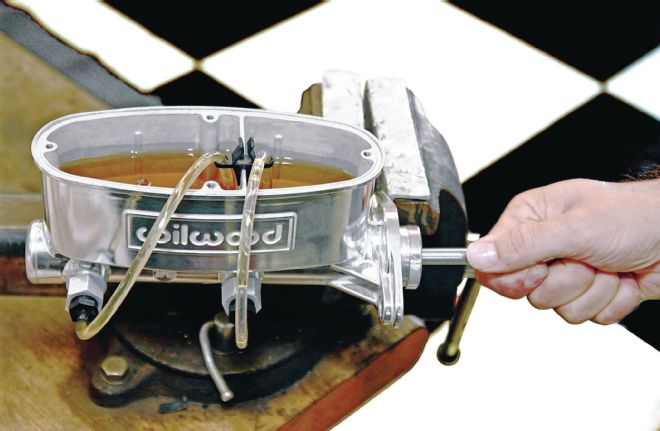 Bench-bleed the master cylinder prior to its on-car installation. Fluid lines that loop back to the reservoir are included in the master cylinder kit for this purpose. Stroke the pushrod several times, waiting 60 seconds between strokes—the fluid port between the reservoir and cylinder is only 0.125-inch-id, so it takes some time for the fluid to flow into the unit’s internals.
The Wilwood dual-tandem master-cylinder bolts in place of typical GM late muscle-car–era factory iron dual-cylinders (it even has the same fluid outlet-port spacing), but it’s been redone in slick (and lightweight) aluminum. As installed on Jim’s 1955, the cylinder is part of a kit that also contains Wilwood’s unique, knob-adjustable combination metering and proportioning valve; prebent brake lines connecting the cylinder to the valve; and a valve mounting bracket. The cylinder and valve are also sold separately.
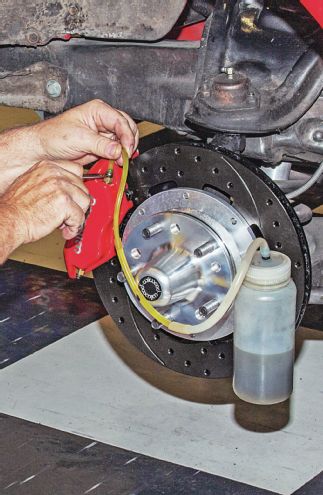 Begin bleeding on-car at the farthest point from the master (the rear passenger-side drum) and work forward. Wilwood calipers have both inboard and outboard bleed screws—do the top inboard side first, then the top outboard. Bleed the prop valve, then the master again one last time.
 The front brakes should lock up just ahead of the rear brakes. Fully backed out, the prop valve generates no brake bias. Screwing it in (clockwise) proportionally reduces pressure to the rear brakes. Testing revealed this car’s disc/drum combo liked a setting of half-turn in from the fully backed-out position—but every combo’s different.
The adjustable prop valve is a key ingredient for getting the front/rear brake balance right with this car’s nonstock front disc/rear drum brakes and custom wheels and tires. As it also serves as a combination block, maintaining full isolation between front and rear fluid circuits, we’d recommend it as the best replacement solution for worn-out, nonadjustable OE-type combo valves as well. According to Wilwood, today’s foreign-made, generic, nonadjustable parts-store valves are of uncertain quality and usually aren’t set up with the proper metering ratio for the stock application most claim to replace.
The goal here was to eliminate excess pedal free-play, plus develop a proper pedal-assist ratio. Jim’s preexisting 5.75:1 ratio was on the high side for power brakes, which Burr says “can be as low as 4:1.” On the other hand, it was close to Wilwood’s ideal 6:1 manual-brake ratio. On this street-driven car it wasn’t worth performing the extensive pedal mods needed to correct the ratio to “perfect.”
 Even with the slight track-width increase, Burr says, “There’s no need to realign the front suspension if it was previously stock. Everything is properly engineered.” Jim’s car needed a toe reset because the alignment had previously been crutched to deal with his old brakes.
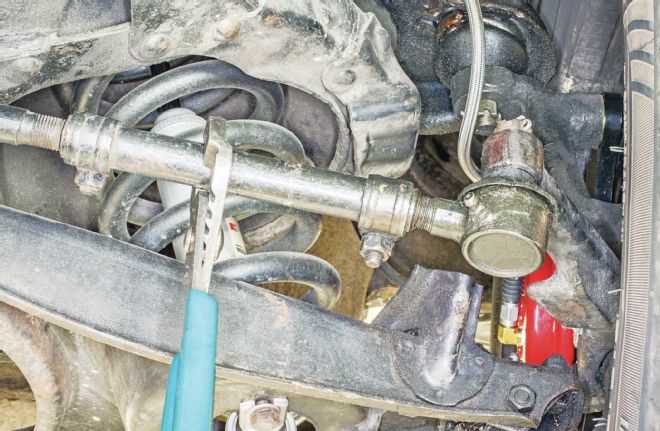 Wilwood set up the 1955 with 1⁄8 inch of toe-in. With its rear-steer linkage, lengthening the outer drag link increases toe-in.
AT-REST ">
Wilwood set up the 1955 with 1⁄8 inch of toe-in. With its rear-steer linkage, lengthening the outer drag link increases toe-in.
AT-REST ">
 <strong>AT-REST</strong>
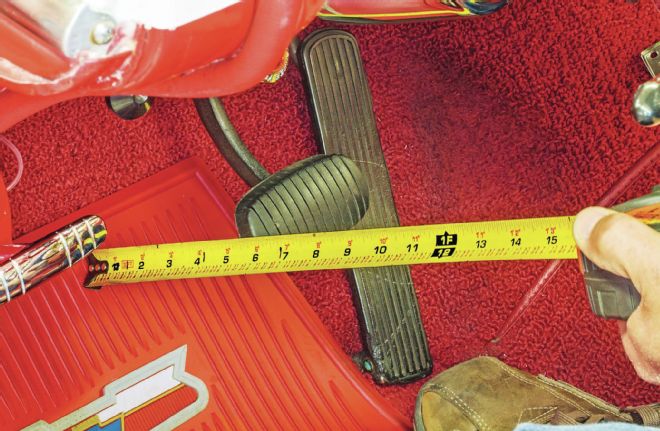
ENGAGED At 5.75:1, the existing brake pedal-ratio was about right for manual brakes (even though, in theory, it was excessive for the previous power-brake rig). The real problem at the pedal was the original installation had way too much brake-pedal free play: about 2 inches!">
<strong>AT-REST</strong>
ENGAGED At 5.75:1, the existing brake pedal-ratio was about right for manual brakes (even though, in theory, it was excessive for the previous power-brake rig). The real problem at the pedal was the original installation had way too much brake-pedal free play: about 2 inches!">
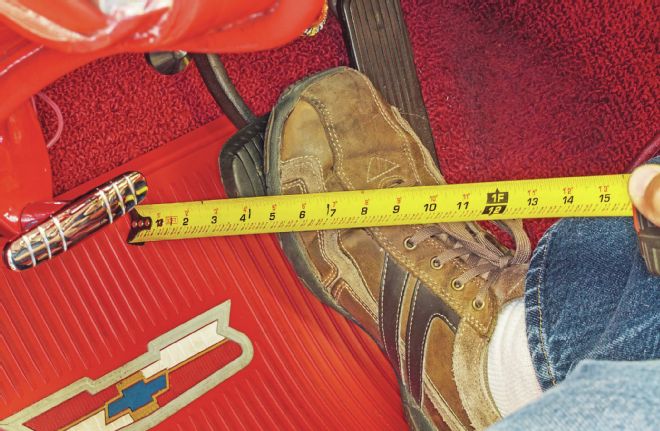 <strong>ENGAGED</strong> At 5.75:1, the existing brake pedal-ratio was about right for manual brakes (even though, in theory, it was excessive for the previous power-brake rig). The real problem at the pedal was the original installation had way too much brake-pedal free play: about 2 inches!
 Part of the free-play was because the original booster-to-cylinder pushrod was about 0.100-inch too short. With a 5.75:1 pedal-ratio, that by itself contributed about ½ inch to the observed free play. However, the vast majority of the free play was because the booster itself simply couldn’t develop sufficient vacuum for the application.
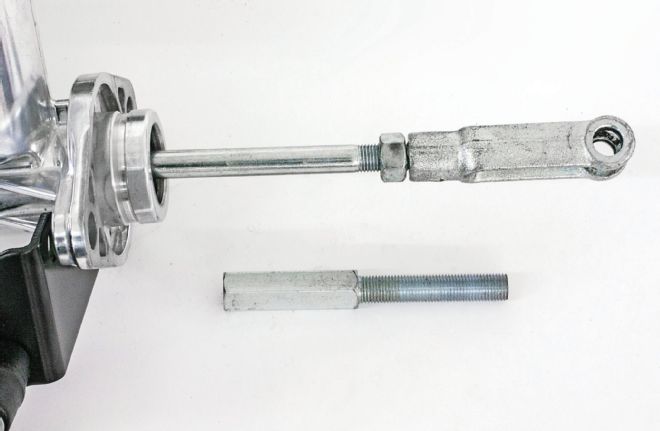 The brake pedal pushrod on Jim’s old universal booster was too short for his car and needed an extension (bottom) to reach the 1955’s pedal. Wilwood’s master comes with a longer rod that’s the right length for most classic muscle cars.
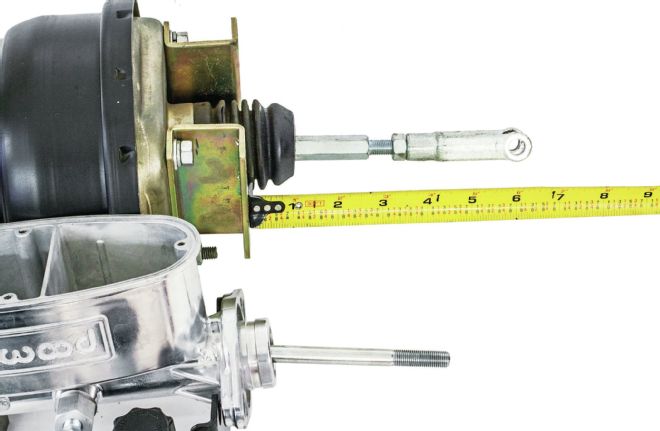 The distance from the old booster’s mounting flange to the rod’s clevis hole was 6¼ inches. Porto transferred the old clevis onto the new cylinder’s rod, baselining it to the same dimension. That was a hair too long for the new unit, slightly preloading the pedal—so he final-adjusted the clevis 1⁄8-inch shorter (61⁄8-inch overall length) to yield just a tad of free-play.
Burr says the pedal’s 2-inch free-play was primarily caused by “the small 7-inch-od booster not doing any work because there wasn’t enough vacuum—so the pedal had to be pushed all the way through the booster to engage the old master. You want minimal free-play without preloading the master.”
Major parts in place, Tony Porto fabbed up new brake hardlines as needed on the prop-valve’s outlet side, plumbed the calipers to the frame’s bulkhead mounts with Teflon brake-hose, and bled the system. The car was driven with increasingly severe stops to bed-in the brake pads and adjust the front/rear brake bias.
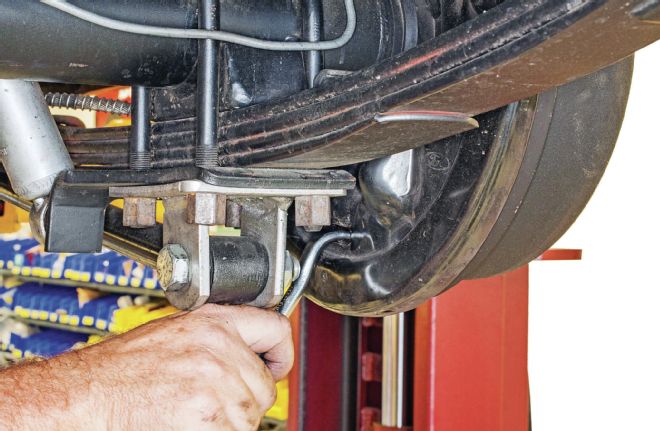 Jim’s rear brake drums were set up a little too loosely. Porto used a brake-spoon tool to rotate the drum’s star adjusting wheel to slightly increase the amount of at-rest shoe drag on the drum.
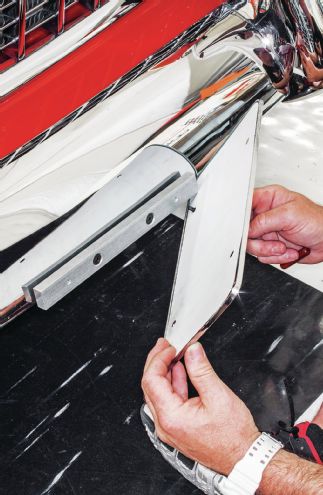 Wilwood’s crew couldn’t leave Jim’s hokey old front license-plate bracket alone. Mike Hamrick designed and fabricated this new billet-aluminum custom bracket.
“We had to fix nearly everything about this brake system,” Burr says. “People forget that the entire system has to work together as a team, and we go to a lot of work to accomplish that.” O’Connell now has more than three months of post-rescue driving under his belt, and he’s a happy camper: “The ‘shakes’ are gone. The car now stops perfectly straight with no early lockup. The pads have a normal wear pattern. The manual brakes do need a little more effort, but I quickly got used to them—and the brake pedal and firmness are right there, immediately. Overall, the system is quiet—everything I wanted.”
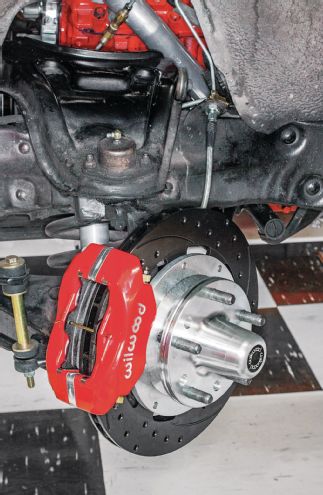 Here’s the completed front-brake installation. Doesn’t it look a heck of a lot nicer than that old generic kit? It stops lots better too. The rotors are black because they come factory-treated with E-coat anticorrosion paint. It quickly wears off.
 Wilwood’s ball-burnished aluminum master cylinder and adjustable prop valve better match Jim’s sanitary engine bay. Just 8 inches long, it’s 6¾ inches shorter than the old cylinder/booster’s 14¾-inch length. There’s plenty of clearance for tall valve covers should Jim ever decide to add them. Could rear discs be next?
Econo kits may not be fully engineered or tested. And even if they physically bolt on, due to all the possible variations, the parts may not be optimal for your specific combo. Master cylinders must be coordinated with the actual front and rear brakes used on the car. An adjustable prop valve is highly recommended, especially for nonstock installations.
Brake systems work by creating friction between the pads and rotor. Friction can be generated both by forcing the brake pads mechanically against the spinning rotor (abrasive friction) and by transferring a thin layer of brake-pad material to the rotor face as temperatures rise (adherent friction). Bedding-in new pads and rotors is a systematic process of repeatedly heating the brakes to the compound’s designed operating temperature range under controlled (and increasingly severe) stopping conditions to form a proper transfer layer. It can significantly increase braking performance. This is the bedding-in gospel, according to Wilwood for high-performance street cars. (Do this only where it’s safe and legal!)
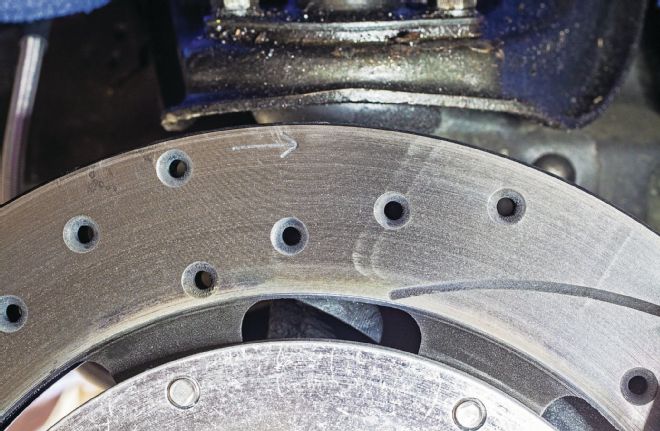 Here, the new rotors are undergoing the bedding process. The protective E-coat anticorrosion layer is quickly rubbing off and the transfer layer has begun to form. Also note the directional arrow: Wilwood uses different left and right rotors to optimize cooling fin angles.
1. Start with a series of light decelerations to gradually build some heat in the brakes. Use an on-and-off the pedal technique by applying the brakes for 3 to 5 seconds, then allow them to fully release for a period roughly twice as long as the deceleration cycle. For example, if you use a five-count during deceleration, use a 10-count after release to allow the heat to sink into the pads and rotors.
2. After several cycles of light stops to begin heating the brakes, proceed with a series of medium to firm deceleration stops to continue raising the temperature level in the brakes.
3. Finish bedding with a series of 8 to 10 hard decelerations from 55–65 mph down to 25 mph while allowing a proportionate release and heat-sinking interval between each stop. By now, the pads should provide a positive and consistent response.
4. If brake fade is observed during the bed-in cycle, immediately begin the cool-down cycle.
5. Drive at a moderate cruise speed, with the least brake contact amount possible, until most of the brake heat dissipates. Don’t hold the car in place at a full stop by depressing the brake pedal until this happens. Finally, park the vehicle and let the brakes cool to ambient air temperature.
Parts and Prices Includes the major parts required to fix the problem. Does not include miscellaneous small parts, labor, shipping, or sales taxes. Priced 8/31/14 and subject to change. Brand Part Description Part No. Price Source Cost Brake Rescue Parts Allstar Tubing, mild steel, 3⁄16"-od × 25' coil 48040 Amazon $15.99 Dorman Adapter, 7⁄16-24 IF ¼" tube–to–3⁄8-24 IF 3⁄16" tube 43303 Summit $3.97 Nut-and-Lock Set, road-wheel mounting, acorn-style, ½-20 thread × 1.407" OL, 13⁄16" hex, 60-degree cone-angle, chrome; includes 16 nuts and 4 locks (10 nuts and no locks used) 711-241 Summit $26.97 Wilwood Engineering Brake Kit, Dynalite Pro, front disc, 11.75"-od drilled and slotted rotors, 4-piston red calipers, 1955–1957 Chevrolet fullsize passenger-car 140-11010-DR Summit $914.99 Cylinder Kit, brake master, aluminum, ball-burnished, w/ adjustable proportioning valve and valve mounting bracket 261-13626-P Summit $335.78 Fluid, brake hydraulic, DOT 3, Hi-Temp, 570° F, 12 fluid-oz bottle (case of six) 290-2210 Summit $49.96 Hose Set, brake pressure, frame–to–front-disc caliper, Teflon w/stainless steel outer braid, 1955–1957 Chevrolet fullsize passenger car 220-7699 Summit $59.95 Total $1,407.61 Optional License-Plate Bracket Aircraft Spruce Plate, aluminum, 2024-T3/T4, ¼" thick × 1" high ×1' wide 03-43400-1 A/C Spruce $3.35 Grand Total $1,410.96
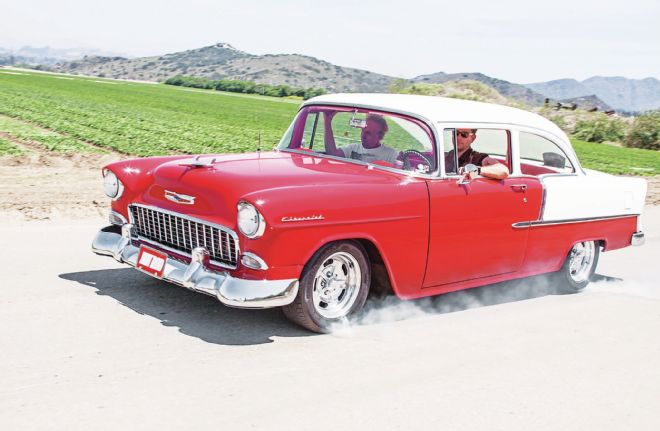 The car now stops straight, the front/rear brakes are properly balanced, and the noise and vibration are only bad memories.
If your car has a gremlin that just won’t quit, you could be chosen for Hot Rod to the Rescue. Email us at [email protected] and put “Rescue” in the subject line. Include a description of your problem, your location, and a daytime phone number.