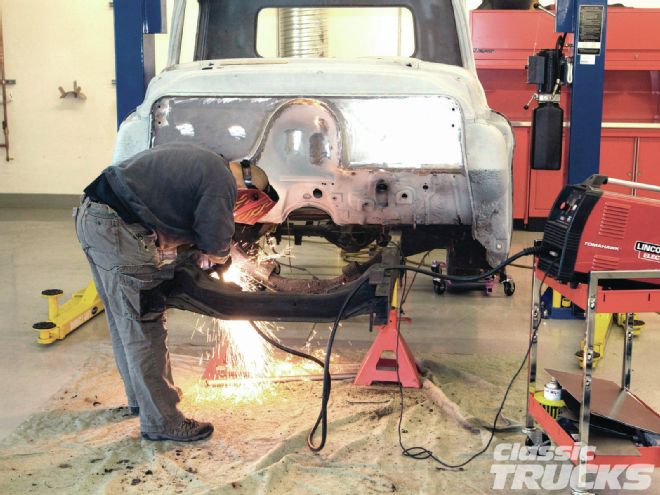
A week or so ago I heard that the guys from Total Cost Involved Engineering were going to be installing (and videotaping) one of their ’55 to ’59 Chevy coilover IFS systems right here in our Source Interlink Tech Center. It’s not often an opportunity for us to chronicle a complete install a mere 100 feet from the comfort of our offices presents itself, so pulling rank, I asked Wes to hang out in the Tech Center that day and photograph the installation from start to finish so we could show the process to you here in the pages of CT.
As most classic truckers are aware, TCI manufactures a variety of super-high-quality classic truck suspension and steering systems, and it’s always interesting and informative to see one installed in a start-to-finish scenario. The subject here is a ’55 Chevy and the system used is TCI’s 1955 to 1959 Chevy Truck Custom Coilover Independent Suspension System. You may recall that this is the very system I chose to use on my own ’57 chassis. I chose the TCI IFS setup because my years of using the company’s wares on nearly all of my street rod and classic pickup projects have been trouble-free and have offered easy installation and great handling after the fact. Aside from being designed and manufactured right here in the good ol’ U.S. of A., the Custom Coilover Independent Suspension system also offers superb craftsmanship, from the 1-inch-diameter TIG-welded upper tubular control arms to the 11⁄8-inch TIG-welded tubular lower control arms and engineered crossmember assemblies fitted with adjustable stainless steel concentrics for quick and easy caster/camber adjustments. The whole IFS package is a great example of the company’s focus on superior quality and workmanship.
 TCI’s Custom Independent Front Suspension systems are extremely complete, high-quality systems that are comprised of everything a classic truck hobbyist needs to convert his/her pickup to a great-riding, great-handling ride.
So, rather than blabbering on and on, let’s get to it and take a look at the step-by-step installation performed right here in our Tech Center. Oh, and by the way, you’ll be able to use the QR code found in this article to view a video version of this install as well. CT
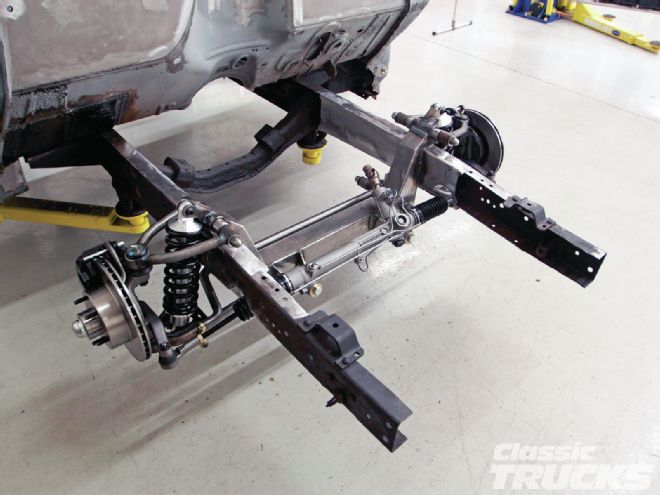
With the installation complete, all that was left was to set the truck’s ride height, camber, caster, and toe-in. The ride height is ideally set with the wheels and tires mounted and the engine and trans in place so the truck’s full weight is on the suspension. The lower control arms should be horizontal and the distance between the centers of the top and bottom coilover mounting bolts should be close to 12¼ inches. Camber is set by rotating the eccentrics by inserting the supplied tool into the hole on the side of the eccentrics, rotating them until camber is at 0 degrees at ride height. With the set screws in the eccentric housings still loose, caster is adjusted and set by sliding the eccentrics for or aft within the housings. The caster was set to between 1 and 1½ inches positive, making sure both left and right sides were set the same. If/when all is well, the set screws are tightened to lock in the caster and camber settings. Toe-in is then adjusted by adjusting the tie rod ends on the rack-and-pinion steering gear. Toe-in should be set at 1⁄16 inch. And that’s all there is to it. When I did the install on my ’57, the job, start to finish, took me the better part of a Saturday, and as I’ve said many times in the past, if I can do it, anyone can.