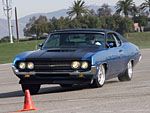
Buying an older musclecar is both a blessing and a curse. You get retro-cool styling, but the same "passage of time" that has made the car a classic has also been busy wearing stuff out. This is the case with our '70 Ford Fairlane. Our car was in great shape aesthetically, but the mechanics were 37 years old, and way past their prime. In particular, the suspension had more creaks and groans than a retirement home, and it was even starting to lean noticeably to the left. We didn't think it was unsafe yet, just worn enough to make cruising much less enjoyable. And after all, this hobby is all about fun.
The good news is that turning back the clock by installing new suspension parts is not rocket science, and Just Suspension makes it even easier by selling complete suspension rebuild kits for many classic musclecars, including our Fairlane. The company has been around for 20 years, and while many of their components look stock, they are actually made far better. In fact, according to Jayme Freitas, president of Just Suspension, they are substantially improved over most replacement parts on the market today. He tells PHR, "We've incorporated positive camber geometry, all spring steel construction, revised roll centers, less friction, and better lubrication in our ball joints and tie rod ends. We've also tuned bushing firmness to maintain alignment when cornering, without creating a harsh ride. These things allow the suspension to travel more smoothly, absorbing road imperfections and keeping the tire contact patch more square to the road. The result is immediately obvious compared to the 35-plus-year-old OEM replacement-style components you'll find at your local parts store."
After doing a survey under the Ford and talking with Just Suspension, we decided to replace all the wear-and-tear parts, since they were, well, worn and torn. We also replaced the coil and leaf springs with fresh units matched to our intended street/strip use. In our case, the rear leaves were custom-made to help minimize the axlewrap we'll have after we put some big power to the ground. In addition, Just Suspension was able to set up the front coils and rear leaves to help the Fairlane keep its killer stance.
Two weeks after our order was placed, a large, heavy box arrived. Follow along as we take the first steps towards rehabilitating the mechanics of our Fairlane 500.
Stuff you'll need:
* Jackstands and jack or lift
* Pole jack (if using a lift)
* Basic wrench and ratchet set
* Lug wrench
* C-clamps
* Large prybars
* Bearing grease
* Grease gun
* Penetrating oil (WD-40)
* Ball joint separator (pickle fork)
Getting the Old Stuff Off
Before the shiny new stuff can go on, the old parts need to take a hike. We used a lift and a pole jack, but this could be done with a jack and jackstands-it will just take you longer.
* Raise the car on a lift. You can use a jack and jackstands, but you need to make sure you have the car high enough to allow yourself room to work. You'll also need to make sure the car is secure, since you'll be yanking and prying on parts. Once you're done getting the car airborne, pull the wheels.
* Before removing parts, spray WD-40 onto the old bolts. Remove the two bolts that attach the bottom of the shock to the shock perch mounted on the upper control arm. Then move to the engine bay and unbolt the upper shock mount. Now remove the shock from the top of the shock tower.
* Disconnect the outer tie rod by snipping the cotter pin and removing the castle nut, then remove it from the spindle. If it's difficult to separate, persuade it with a hammer; if this doesn't work, try a pickle fork-but keep in mind that this will likely damage the old part. You can also disconnect the inner tie rod from the centerlink, and the idler arm from the end of the centerlink. Next, unbolt the old idler arm from the frame.
* Unbolt the brake caliper and hang it out of the way with a piece of wire or a coat hanger. Now you won't have to re-bleed your brakes.
* Remove the front sway bar by unbolting it from the frame and from each lower control arm.
* Now mark the position of your camber/caster adjustment bolts on the lower control arm. This will make it easier to keep your alignment in the ballpark for the drive to the shop.
* The coil spring is next to go. Do it right, since it's under tension and can really mess up your day if it shoots out at you. Of all the backyard methods out there, we prefer to use a rented spring compressor.
* Remove the spindle and brake-rotor assembly. First, cut away the cotter pins from the upper and lower ball joints. Then remove the castle nut from the lower ball joint and loosen the upper nut, but don't remove it. If you're lucky, you'll be able to pop the lower ball joint loose with a hammer; if not, use a pickle fork. Once the lower ball joint has been separated, move on to the upper. Since you left the upper nut on the ball joint, the spindle won't fall on your foot when the upper ball joint pops free. Hold the spindle, remove the upper nut the rest of the way, and set the spindle to the side.
* The rest is cake. Remove the two cotter pins that secure the strut rod to the lower control arm, and remove the nuts. Next, unbolt the other end of the strut rod where it attaches to the frame crossmember.
* Remove the lower control arm by unbolting the camber/caster adjustment bolt (the one you marked earlier).
* Unbolt the upper control arm from inside the engine bay. With the two bolts removed, it slides right out. Repeat on the driver-side, and start installing the new parts.
Custom Leaves for Launching
The easiest way to do the rear leaf springs is one side at a time. Support the weight of the differential with a pole jack, and unbolt the U-bolts attaching it to the axletube. Next, unbolt the rear of the leaf from the old shackle, remove the last bolt, and install the new spring. Our new leaves are designed specifically for our Fairlane, and have a 1-inch drop. We asked Jayme at Just Suspension how this helps with the launch: "Musclecars with leaf springs typically have very soft spring rates, making them susceptible to spring-wrap and wheelhop. Many people install traction bars to compensate, but they are ineffective in high-performance street cars because they create inconsistent launches and unsettled cornering. We have several techniques to modernize leaf springs and make them perform better. We use fewer leaves that are made out of steel alloys with higher spring rates and extra thickness-or leaves-in the front half of the spring. This reduces friction and wheelhop without creating a harsh ride."