Consistency in racing is what brings a driver and his team a championship.
However, if you think about it, this consistency does not just relate to a driver’s performance on a given Saturday night or Sunday afternoon. Not only does the driver have to drive a consis-tently good race lap after lap, weekend after weekend; the car itself has to be consistent as well. Of course, engine performance is a major factor in this equation, but another major factor is the chassis, and how good of shape it is in.
We have all seen, or even been through, this scenario—you have built the best car you have ever driven, and you already won three out of the first five races of the season with it. Minor adjustments need to be made here or there with each race driven, but that is a given. Then that fateful sixth race comes along. After leading the majority of the race, you and the rear end of your prized race car meet the wall of Turn 3—hard. What are you going to do now? The damage to the rear end is so bad that you have to work on the car just to get it in the trailer to take home. Why not just junk the whole thing?
Luckily, you don’t need to take this drastic and ultimately expensive step. The good thing to come out of this scenario is that the rest of the car is in fairly good shape. Those rubber donuts can always be rubbed out, your front end is still straight, and the motor seems to be running OK. So what do you do about your race car that now looks like a hatchback?
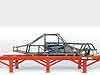
This is where the chassis jig comes into play. “A chassis jig is what is used to manufacture a frame in a manner where every frame is exactly the same from one to the next,” says Wayne Lensing of Lefthander Chassis in Roscoe, Illinois. “The jig keeps the chassis square and consistent.”
Lensing and Lefthander Chassis build frames for short-track oval racers. According to Lensing, there are a few key measurements when building or repairing a frame. “When you build a chassis, you want all your framerails to be parallel,” he says. “One key point to measure is your lower control arms. You always want them to be in the same spot so your trailing arms are consistent. Every Lefthander Chassis comes with these points of measurement.”
Wes Van Winkle of Maxx Racing Chassis in Enid, Oklahoma, measures several different points on the chassis to make sure it is consistent all around. “I measure the overall X on the frame, from one end to the other,” Van Winkle says. It is wise to note that the overall X on a frame can be determined differently with each chassis builder but is basically a set of crossmembers to make sure the frame is square. “Then I go back and measure from the center of the front spring pad to the center of the rear spring pad. And of course, I always measure the wheelbase.”
A good tip to remember is to ask your chassis manufacturer what they consider to be the overall X of the frame. In some cases, it could be from the right front to the left rear and the left front to the right rear. Others might measure just the rear in an X fashion. Van Winkle also suggests that you measure the steering linkage to make sure they are at the right angles.
When you have damaged either the front or rear clip of your car, there are a couple of options you can take. The first, and maybe easiest one, is to send your car back to the chassis builder. They will already have the jig and measurements of your car in its original condition. This option might take longer than you had hoped, especially if the builder takes care of many of the racers at your track and it was a particularly messy night. Many times you only have a span of a week, two at the most, to get your car repaired and ready to go back on the track.
There is always the option of getting your own jig. You can buy one, or your other option is to build one.
Maxx Racing Chassis specializes in building frames for I.M.C.A. as well as Limited Sportsman, Pro Stock, Street Stock, Factory Stock, and Mini Stock classes. Because of the variety of chassis that Maxx Racing Chassis puts out, Van Winkle built his own jig.
“I just used four-inch I-beam. You want to use something pretty rigid,” he says. “Though, a lot of guys will build their jigs out of 2x4 square tubing. With my own jig, I can set it so we can just bolt a frame to where everything will be level and square. I have built so many frames on it that I can now just lay a pattern on the jig and know where to cut the hole in the frame to weld a piece of pipe, or I can drill holes to relocate all the front steering linkage in order to get the steering geometry correct. If you are going to work on a variety of cars, you might be better off to design your own jig. With the jig I built, I can put a metric frame on it or I can put a full size GM frame. I can even use that same jig with a Ford frame.”
Lensing mentions that a few companies are selling jigs to the average racer. They are mainly used to repair a chassis rather than build them. “Some of the larger racing teams are starting to buy their own jigs to repair damaged stuff themselves,” he says. A jig such as this would run a race team about $5,000.
“We have sold a few jigs to some of our dealers,” explains Lensing. “Our dealers buy our chassis and then repair the cars later with their own jigs. That helps us sell cars to other parts of the country. It seems more guys are apt to buy our chassis if they know that the dealers will support them when it comes time to repair the car.”
DCS Performance Engineering out of Reedsburg, Wisconsin manufactures the Unijig (featured in the Oct. 2000 issue). The Unijig is a universal chassis jig that is designed to fit any type of racing chassis. An added feature for the average racer using this equipment from his backyard shop is that the Unijig also can be used as a welding and fabricating table. DCS uses CNC-machined ¾- x 3-inch bolt rails that are mounted to the 3/16-inch steel-tube framework when manufacturing the Unijig.
Another helpful feature included with this chassis fabrication equipment are the adjustable steel fixtures that attach to the bolt rails. They are made to fit a variety of chassis and are available through various chassis dealers or can be manufactured by the customer. Changing out a set of fixtures takes about 10 minutes to do. This allows the operator to work on several different chassis models with one piece, saving precious floor space in the shop.
If you decide to take your racer back to the chassis builder, or you want to do it yourself, Lensing explains the basic process to fixing the damaged areas: “We will put the damaged car back on the jig to start repairing the damaged area. Doing this will also tell us what kind of condition the rest of the frame is in. There are usually lineup points where the stub will fit in the jig.
These lineup points are off of the mounting points on the framerails. From here, all we do is cut off the damaged material and replace it with either a front or rear clip or center section—whatever needs to be done.
“A jig enables us to get the car back to the customer as quickly as possible without a lot of tape-measuring and squaring. Sometimes he can have it back by Monday, use the rest of the week to paint up the parts, and get it back together, so he can be back on the track on Saturday night.”
So, what should you do if you think a jig is what you need for your shop but have never used one? Lensing suggests you avoid the “trial-and-error” method.
“Hopefully, for the person who buys a jig for their home race shop, it will come with the fixtures for your specific chassis manufacturer,” he says. Like the Unijig from DCS, many jigs should come with fixtures that are interchangeable for all types of chassis manufac-turers. Along with the fixtures, you want to make sure you are getting a pam-phlet or instruction booklet that will tell you where to mount the fixtures that will clamp the car down.
“A lot of jigs, like mine from Chrysler, have centering marks,” says Lensing. “You just put your car on the surface plate, line it up, and measure off of the centerlines to get everything on your chassis back to its original condition.” Of course, the damage may be so severe that you are not able to fix it. However, with the jig, you will still get as close to your race-winning vehicle as possible. Here are some tips to remember when you need to repair or have a new chassis built:
• If you are taking your frame back to the original builder, make sure you have ample time. Sometimes, this can not be helped when you wreck one weekend and race the next. Just remember that you might need a backup frame.
• If you decide to do the repair work yourself, talk to the original chassis builder and get as much information as possible regarding the key measurement points discussed earlier. Being just a little bit off on your measurements may affect the car’s performance on the track.
• If you have bought a chassis jig for your own shop, make sure you have the correct fixtures specific to your frame’s manufacturer. Also make sure that the jig manufacturer from which you bought your equipment provides pamphlets and instruction booklets. You may even want to find out if it offers special training classes with delivery of your new jig.
• Remember that consistency wins championships.