Nowadays, we have an ample supply of aftermarket and restoration parts that at one time, we never imagined possible. Once in great while, a product comes along that's so simple and innovative, it's mind blowing. With Aeromotive's latest Phantom/Stealth fuel system, you can have a quiet, hidden (the fuel pump fits inside the stock tank) setup that can support up to 1,000 horsepower in a carbureted application, or 825 horsepower with EFI—naturally-aspirated for your Mopar monster.
There are a slew of advantages with having an in-tank fuel pump over a mechanical or externally mounted fuel pump (or both in tandem).With the pump inside the tank immersed in fuel, it keeps it quieter and cooler. External pumps are noisier, and create heat which makes fuel hotter. External pumps work hard to pull the fuel from the tank. The in-tank pump easily pushes the fuel that it is submerged in. Another problem with an external pump is that when the fuel level drops, fuel slosh during acceleration or cornering, can uncover the pickup, and the engine hesitates, bogs, or dies.
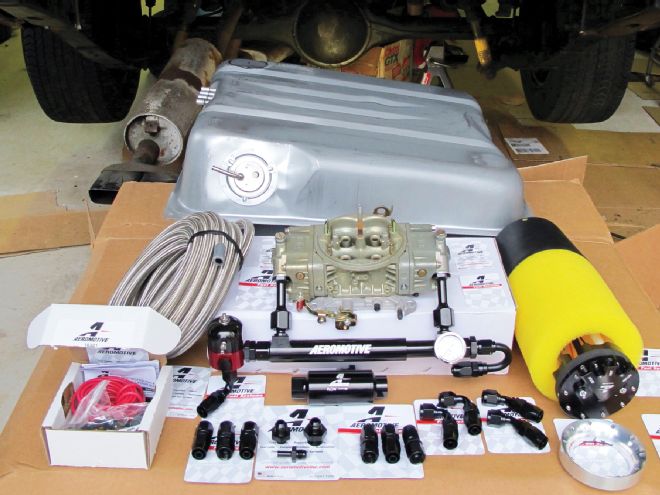
Aeromotive designed the Phantom/Stealth Fuel System with the in-tank Stealth 340 fuel pump (340 liter per hour), which contains its own unique baffling system, and fits inside most existing tanks. The unique baffling system (yellow fuel cell foam and black bucket) surrounds the pump, working as a reservoir to maintain a constant fuel source for the pump, even when the tank is almost empty.
The Phantom fuel system consists of everything needed to install the fuel pump and baffle/basket into almost any fuel tank. This system allows you to go carbureted or EFI, and should you decide to change down the road, the only change would be to a regulator swap. For now, we're going ol' school carbureted; if we go to EFI or drop-in a Gen 3 EFI Hemi later on, the Phantom/Stealth will support either and remain in the stock tank. Just think, there's no need for a fuel cell, expensive aftermarket EFI-ready tank, or having that unsightly tank sump with hoses hanging underneath out back.
While our 340/416 stroker engine for the Slick Challenger was at the machine shop, we decided it was the time to replace the leaky, cruddy, original gas tank. We went to Year One for a new tank, pickup, seals, and pad. Should we decide to bolt-on a supercharger, EFI (or both) to our 500-plus horsepower LA engine, the Phantom/Stealth system will provide a more than a sufficient supply of fuel.
PRICE TAG Part PN Cost Aeromotive Phantom Stealth Fuel System kit 18688 $537.97 Aeromotive Fuel Filter 12301 $89.97 Aeromotive Fuel Filter Billet Aluminum Bracket 12305 $71.97 Aeromotive Fuel Pressure Regulator 13204 $168.97 Aeromotive0-15 psi Fuel Pressure Gauge 15632 $26.97 Aeromotive Fuel Log for Holley Ultra HP Carburetors 14203 $299.97 AeromotiveAN-06 / ORB-08 Reverse Port Adapters (4) 15649 $67.88 AeromotiveORB-10 / AN-08 Male Flare Reducer Fittings (4) 15610 $63.88 Aeromotive Swivel ORB-10 / ORB-10 Fitting 15640 $33.97 AeromotiveORB-06 Port Plugs (2) 15626 $17.94 AeromotiveORB-08 / AN-08 Male Flare Fitting 15607 $13.97 Aeromotive Straight AN-08 Hose Ends (5) 15653 $84.85 Aeromotive 180 Degree AN-08 Hose End 15663 $36.97 Aeromotive 45 Degree AN-08 Hose Ends (2) 15654 $87.94 Aeromotive 90 Degree AN-08 Hose End 15655 $39.97 Aeromotive Fuel Pump Wiring Kit 16301 $81.97 Aeromotive AN-08 Stainless Steel Braided Hose 16-ft (2) 15711 $269.94 Year One 1972-74 Challenger Fuel Tank JR89 $265.99 Year One Fuel Tank Pad JH101 $29.99 Year One Fuel Tank Sending Unit BF658 $105.99 Year One Filler Neck Grommet FD4182 $17.99 Year One Filler Neck Trunk Floor Seal A0707 $29.95 Holley Ultra HP 850cfm Carburetor 80804HB $849.95
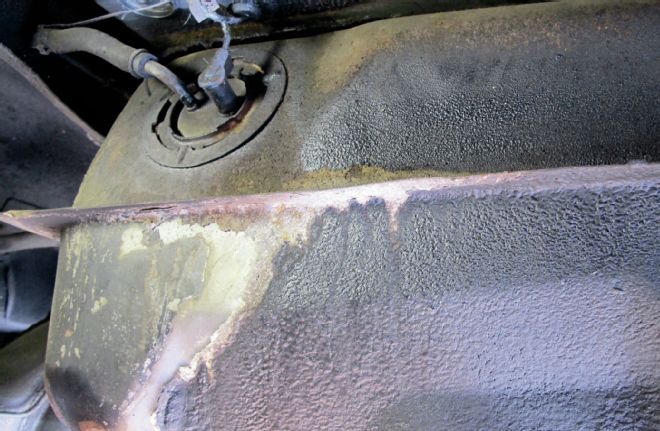
1. The original fuel tank in "The Slick Challenger" has been leaking at the seam and seals (pickup and filler neck) since 1988. The stock fuel system might have been sufficient for the bone-stock 340, but not for our incoming stroked 416 engine.
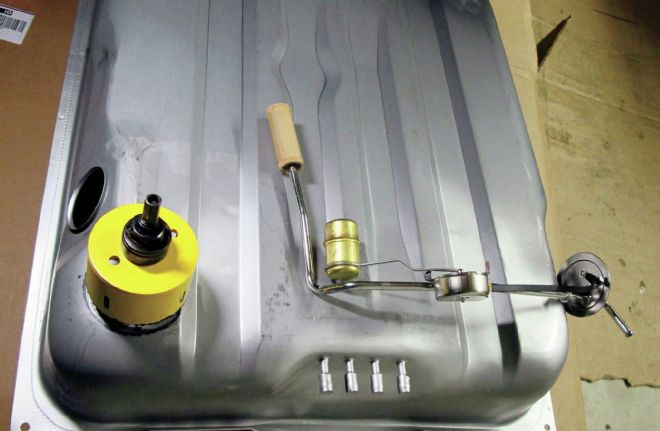
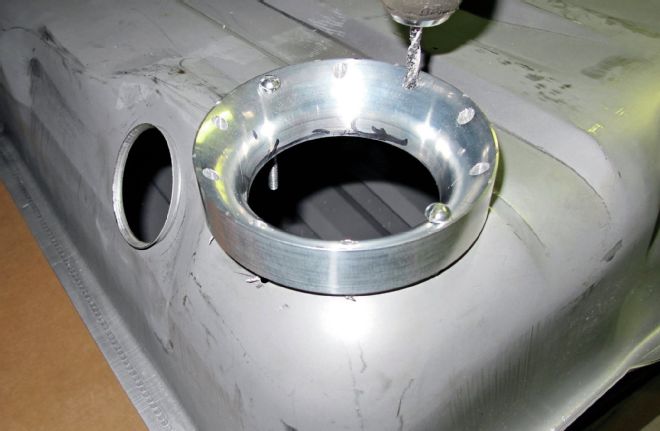
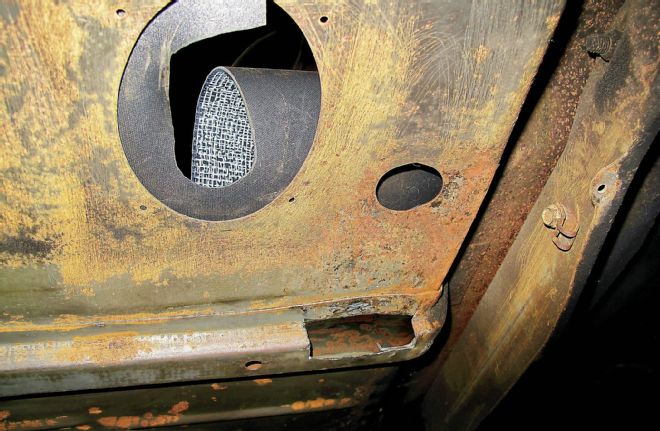
2. You will need to cut a hole in the fuel tank, so precautions should be taken to make sure that you don't hear a loud BOOM. Since out tank was shot we needed a replacement, so the BOOM wouldn't be an issue. Our new tank and pickup/sending unit was ordered from Year One. Notice where the yellow 31⁄4-inch hole saw is. It's marking the only place available for us to drill the hole to install the Phantom fuel pump. The pump must be installed at the deepest part of the tank away from the pickup/sending unit float and the filler neck tube.
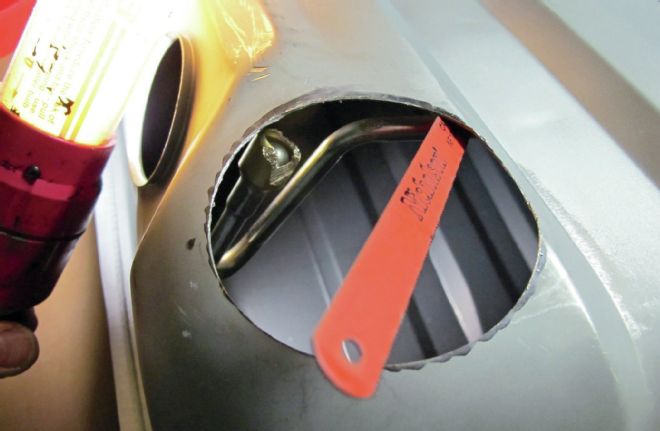
3. After drilling the hole with the 31⁄4-inch hole saw, we noticed a vent tube that would be in the way of the yellow foam baffle/basket assembly. The tube was cut with a hacksaw blade to provide clearance for the pump's unique baffling system. We should have ordered a 1970 Challenger fuel tank without the EEC vent tubes. The Phantom pump has its own vent, so there's no need to get a vented tank.
4. With the installation-ring template held in place, we used the included No. 2 drill bit and drilled one of the bolt pattern holes. We put one of the two supplied screws into the drilled hole while holding the ring template in place. Then we drilled the second hole 180-degrees across for the second screw to help hold the index ring template in place to drill the remaining eight holes.
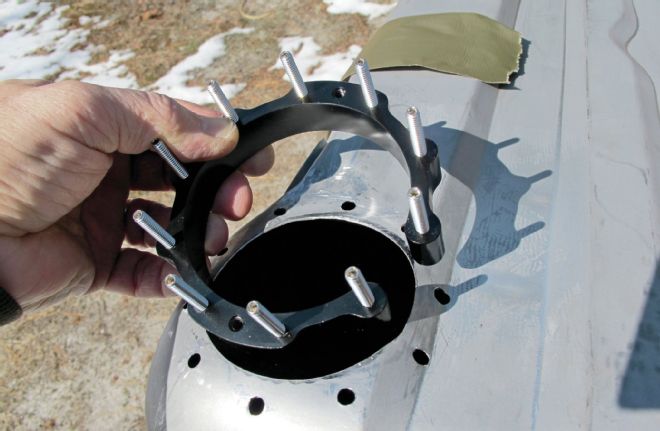
5. We removed the installation/index ring, and used a die grinder with a sanding roll to clean up and deburr all the sharp edges. The fuel pump mounting/retaining ring was inserted to be sure the studs aligned with the newly drilled holes for proper fit.

6. A thorough clean-out of the tank was done before we went any further. We measured the depth of the tank and used that distance to determine the installed height of the fuel pump and foam baffle/basket assembly. Our Challenger tank measured 11 inches.
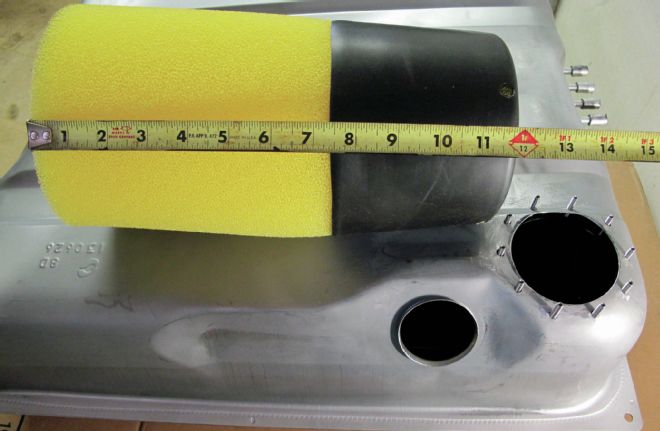
7. The yellow foam and black plastic baffle/basket assembly needs to be 1 inch longer than the tank depth to preload the foam both for density and positioning. Measuring at 12 inches, we didn't need to cut the foam.
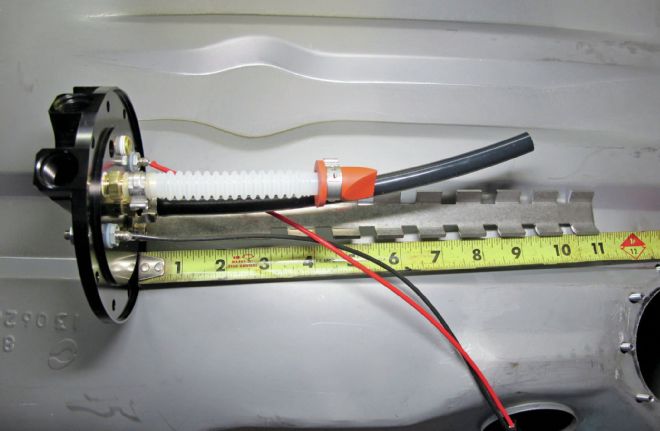
8. The pump hanger assembly bracket is measured and will need to be 1 inch shorter than the measured tank depth. This will provide clearance for the white fuel pump strainer (pre-filter).
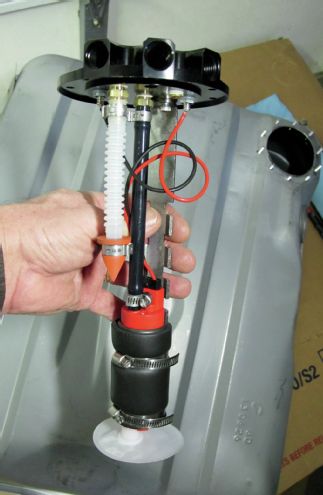
9. We unbolted the pump hanger and cut 11⁄4 inches from it. The fuel pump was thenpositioned on the hanger bracket so that the bottom of the white fuel-pump strainer (pre- filter) is equal to the tank depth (11 inches in our case). Be sure to tighten the clamps and attach the wiring connector to the pump. The white corrugated line is for the fuel return.
10. During trial fitting we noticed the pump housing wasn't sitting level. We flattened the raised area with a hammer and dolly. After that, the billet pump housing sat level on top of the tank. Notice the retainer studs are sticking out of the housing at the same length (roughly 1/4 inch).
11. Trial fitting the tank with the pump in place revealed the pump housing was interference fitting with the trunk floor-support. With a die grinder and cutting wheel we cut out a notch in sub frame rail. We also used our trusty hammer and dolly to raise that area of the trunk pan for additional pump housing clearance. Aeromotive suggests that the pump housing does not rest against the trunk pan.
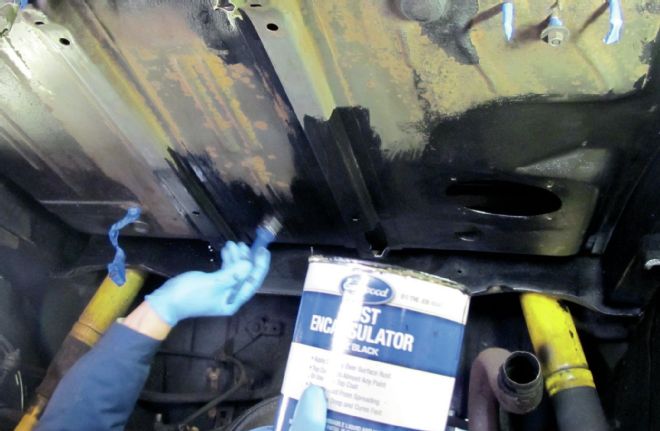
12. With the tank fitted, the trunk floor area was wire brushed and cleaned with Eastwood's Pre Paint cleaner. Eastwood's Rust Encapsulator will prevent rust from starting on the E-Body's original trunk pan for years to come. We followed up with Gator Guard (pickup truck bed liner) to add strength, protection and sound deadening to the trunk pan.
13. We placed the installation ring template over the retaining ring studs protruding through the tank top. The yellow foam black plastic baffle assembly was compressed then inserted through the installation ring into the tank. Once the baffle assembly was in the tank, we manipulated it until it was centered with the opening. Notice the yellow foam is on the outside parameter of the installation ring. The thick gasket up top will work with tanks with up to 1⁄4-inch deep ribs. Unfortunately our tank has deep 1⁄2-inch ribs.

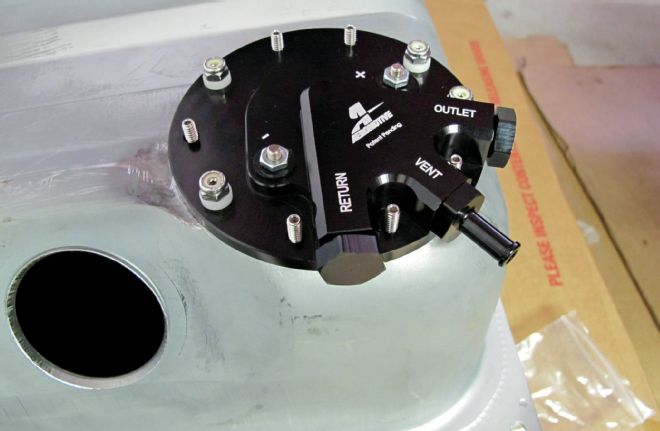
14. The assembled fuel pump assembly is eased into the tank. If your tank's area is flat or has ribs less than 1⁄4-inch, then you can install the pump. Rotate the billet fuel pump assembly as needed to orient the fuel (feed and return) and vent lines and electrical connections. Aeromotive says that in extreme cases like ours, when corrugated or oddly shaped areas of the tank do not allow a sufficient seal, fuel resistant sealant such as Dow Corning 730 RTV can be used to seal the gaps. Install and tighten the provided lock nuts and plastic washers in a crisscross pattern. We painted the tank with Eastwood's Tank Tone.
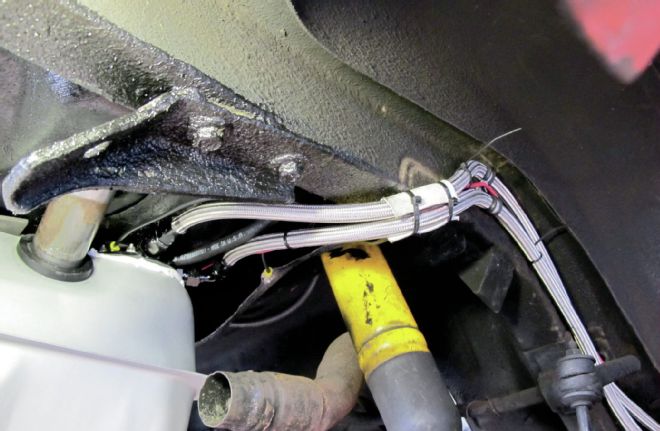
15. The tank was reinstalled with the electrical and fuel lines connected. We routed the feed and return fuel lines in the same location as the factory. The original fuel line bracket bolts were reused for the Adel clamps to hold the AN-08 braided stainless steel fuel lines securely in place. The vent hose (5⁄16-inch) routes to a roll-over valve (we purchased online) mounted above the tank and between the shocks. Not seen is the Aeromotive in-line fuel filter on the feed (pressure) side hiding behind the rocker panel.
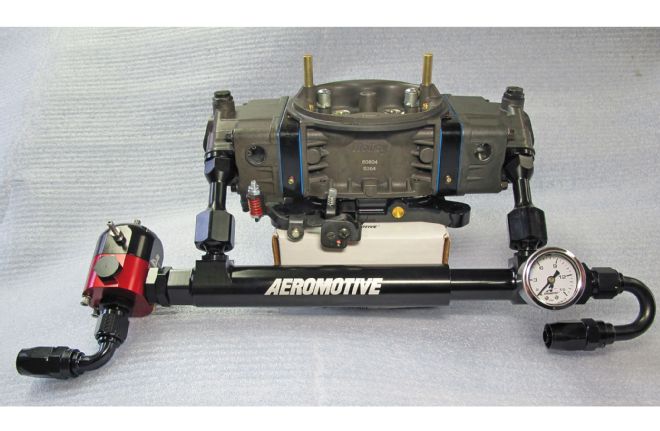
16. We're mounting the Aeromotive regulator on the fuel log at the carburetor, rather than on the fenderwell or firewall. The front 180-degree is the feed (pressure) line, while the 90-degree (bottom of the regulator) is the return line. When the engine eis ready, we'll be using Holley's Ultra HP 850 in Hard Core grey/black.