Testing
Excitement prevailed as we loaded up the Hemi for the trip to the dyno. We had to update the strain gauge on Mopar Engine West’s dyno, as it was limited to 1,000 lb-ft, and we predicted at least 1,200 lb-ft, from our engine. That wasn’t the hardest part of connecting our Hemi to the dyno. I also had to provide all the harnesses for the electronics, as this isn’t your typical Hemi. Once the engine is in the dragster, I will use an electric pump to prime fuel, because the engine has to be running before the mechanical fuel pump can produce pressure. But, on the dyno, we have to start the engine the old fashion way--spray raw fuel into the hat from a squeeze bottle. There’s something really nostalgic about doing it that way.
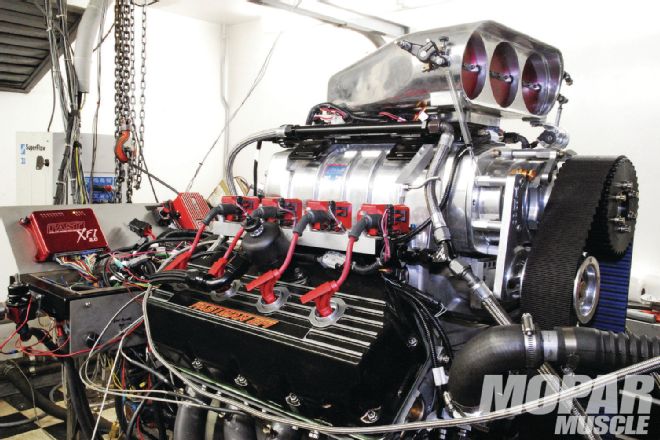
01 The Hemi fired right up, and we ended up changing pulleys until we ended up at the 1:1 drive ratio. The oil pressure looked good, and we had no leaks. We started the pull at 5,000 rpm, because the Dyno's absorber couldn't hold the torque at a lower rpm. It was a short pull, but out first pull was from 5,250 to 7,000 rpm.">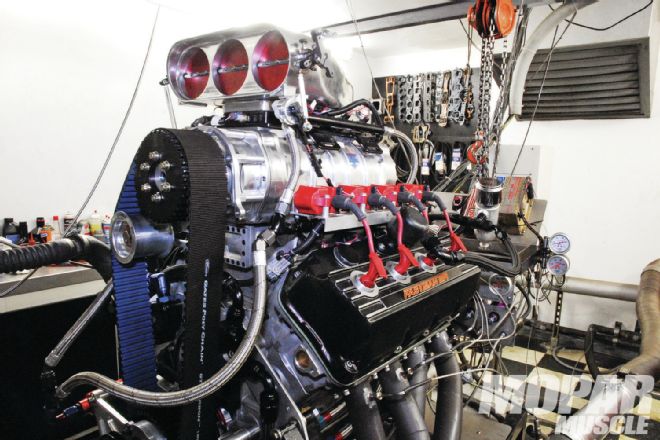 <strong>01</strong> The Hemi fired right up, and we ended up changing pulleys until we ended up at the 1:1 drive ratio. The oil pressure looked good, and we had no leaks. We started the pull at 5,000 rpm, because the Dyno's absorber couldn't hold the torque at a lower rpm. It was a short pull, but out first pull was from 5,250 to 7,000 rpm.
The Hemi fired right up, and while doing some manual loading to the engine so that we could build some heat and seat the rings, it became quickly obvious that we should not be using any blower over drive. We found that boost would scoot off the scale quicker than you can say, “Oh crap”! So, we kept changing pulleys until we ended up at a 1:1 drive ratio. The oil pressure looked good, and we had no leaks--yet. Dyno operator Dave Timmons noted that we would probably have to start the pull at 5,000 rpm, because the Dyno’s absorber couldn’t hold the torque at a lower rpm. It was a short pull, but our first pull was from 5,250 to 7,000 rpm.
What we learned was, so much for our 1,300 to 1,400 horsepower target at 10 pounds of boost. With this short pull, we had 1,426 horsepower with only 8 pounds of boost. With a little more rpm, we’d definitely hit 1,500 horsepower pretty quick. And as you can tell from the screen shot who knows what the maximum torque could be. The computer estimated that 10 pounds of boost would yield 1,550 horsepower. Unfortunately, we developed a serious oil leak from the front of the engine, so we had to abort the session.
When this engine was in its normally aspirated state, I had been having oil-leak problems. The camshaft seal-retainer was popping out of the timing cover. This time, the crankshaft seal-retainer fell out of the cover. I was using the Jesel to make it easy to imbed the magnet for the cam sensor, since the cam gear is external to the cover. Dave and Angie at Mopar Engines West said, “Blown Hemis run a gear drive. Why don’t you?” So, we ordered a Keith Black gear drive set up for the dual drift key crankshaft.
02 It was a short pull, but look at that power and torque.">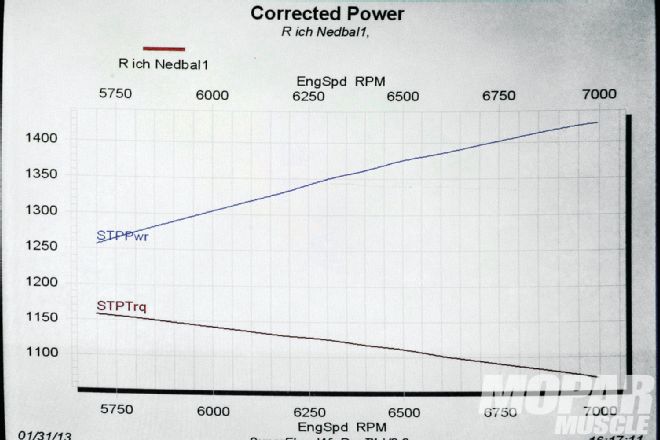 <strong>02</strong> It was a short pull, but look at that power and torque.
The Keith Black gear drive is hardened, and impossible to drill. But, I had to imbed the magnet for the cam sensor, so I replaced the seven 12-point screws that hold the cam gear on the hub with seven socket head screws. It turns out that the socket heads are almost a perfect receiver for the MSD magnet that is part of the MSD 2346 cam sensor kit. All we needed was a little JB Weld, space the gear cover slightly to clear the taller socket heads, drill and tap the cover for the sensor, and we have a cam sensor. Sure, the gear drive will make some noise, but I doubt anyone will hear it.
We didn’t have a chance to go back on the dyno, but the computer’s prediction about what the volumetric efficiency of the engine would be at wide open throttle was very close, so the fuel correction was within two percent. During the manual loading and ring seat period, I did notice that the cylinder to cylinder EGTs were inconsistent. Fortunately, the FAST software allowed me to add and remove fuel on an individual-cylinder basis until the EGTs matched. I was able to get all the EGTs within 50 degrees before that first pull.
03 The Keith Black gear drive is hardened, and impossible to drill, so I replaced the seven 12-point screws that hold the cam gear on the hub with seven socket head screws. The socket head is almost a perfect receiver for the MSD magnet that is part of the MSD 2346 cam sensor kit. ">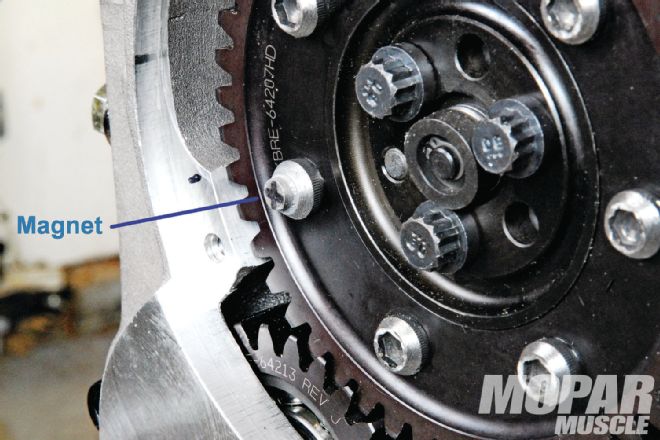 <strong>03</strong> The Keith Black gear drive is hardened, and impossible to drill, so I replaced the seven 12-point screws that hold the cam gear on the hub with seven socket head screws. The socket head is almost a perfect receiver for the MSD magnet that is part of the MSD 2346 cam sensor kit.
The Car
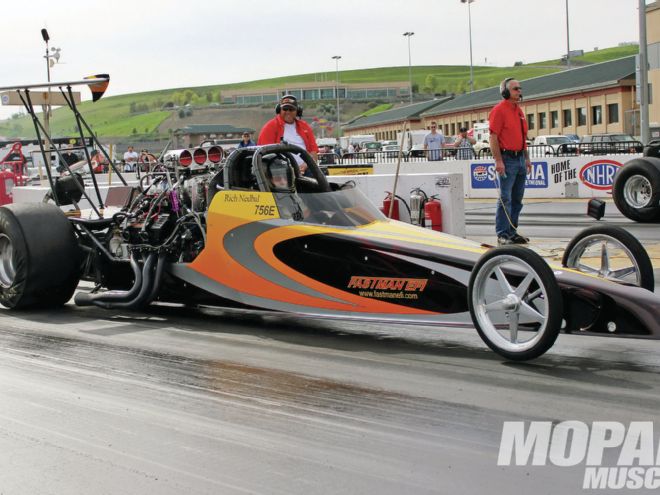
The chassis that we will be putting this Hemi into is a 185 inch Landshark dragster chassis. After all, we are competing in the Top Dragster class. Inside the transmission, we would need a seriously stout torque converter. The new Coan converter was much larger than what I normally used, but that’s what Coan said I needed for the higher horsepower level we were at. The decision was made to also change the rear gear. It’s rpm that kills engines, so I try to keep the trap rpm under 7,500. For this combination, I installed a 3.70 gear. I know that I’m giving up e.t. using this gear, but, since Top Dragster is basically a fast bracket class, as long as I can qualify, I’m willing to give up some e.t in return for some reliability.
First Pass
Race tracks are usually not prepped very well (or at all) for Test and Tune sessions, so I decided to play it safe. Cars with throttle stops usually launch at full power for about 1⁄10 second, and then go release the throttle quickly for a programmed period of time. After this programmed time, the throttle stop will slowly go to full power. This slow, increase in throttle is done so as to not hit the tires too hard while down track. For the first pass, I decided I would run the entire pass while on the throttle stop. The car ran a 7.27 at 182 mph. Vibration caused a small oil leak from the oil pressure sensor, and the solenoid wire fell off the starter, but other than that, all looked good. Water temperature was 200 at the end of the pass, and oil pressure was good.
Second Pass
For the second pass I made no changes other than programming the throttle stop to release at 5 seconds. This would not affect the e.t. very much, but it should bump up the trap mph. This pass was a 7.20 at 189 mph. After looking at the logged data, it was confirmed that the tires were spinning almost everywhere on the track. Since I now had data that showed some wide open throttle, I was able to review the tune, and check the air fuel ratios. My target A/F ratio was about 5.0. Remember, we’re running on Methanol, where stoichiometric is about 6.4, so an A/F ratio of 5.0 is very safe for maximum power. The actual A/F ratio at wide open throttle was within 2-percent of the target, so the tune looked pretty good. Also there was less than a tablespoon of oil in the puke tank, so we have great ring seal.
04 A little JB Weld, and space the gear cover slightly to clear the taller socket heads, drill and tap the cover for the sensor, and we have a cam sensor. Sure, the gear drive will make some noise but I doubt anyone will hear it.">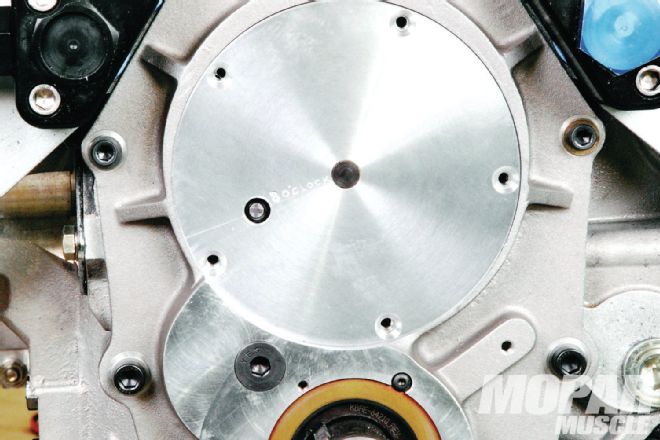 <strong>04</strong> A little JB Weld, and space the gear cover slightly to clear the taller socket heads, drill and tap the cover for the sensor, and we have a cam sensor. Sure, the gear drive will make some noise but I doubt anyone will hear it.
05 At the end of the third pass, I shut the car off to pick up the parachute, and then fired it up and drove back to the pits. During the drive, the engine never got over 190 degrees.">
<strong>04</strong> A little JB Weld, and space the gear cover slightly to clear the taller socket heads, drill and tap the cover for the sensor, and we have a cam sensor. Sure, the gear drive will make some noise but I doubt anyone will hear it.
05 At the end of the third pass, I shut the car off to pick up the parachute, and then fired it up and drove back to the pits. During the drive, the engine never got over 190 degrees.">
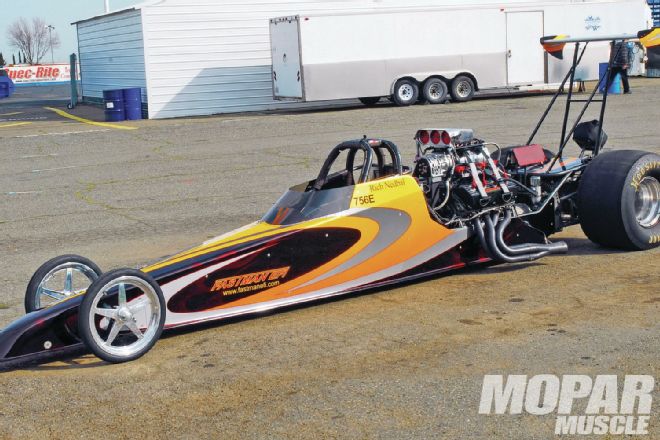 <strong>05</strong> At the end of the third pass, I shut the car off to pick up the parachute, and then fired it up and drove back to the pits. During the drive, the engine never got over 190 degrees.
06 So far, we accomplished out goal of building a high horse-power supercharged Hemi that is also reliable. There's more in it, we just need to decide how much of it we want to experience.">
<strong>05</strong> At the end of the third pass, I shut the car off to pick up the parachute, and then fired it up and drove back to the pits. During the drive, the engine never got over 190 degrees.
06 So far, we accomplished out goal of building a high horse-power supercharged Hemi that is also reliable. There's more in it, we just need to decide how much of it we want to experience.">
 <strong>06</strong> So far, we accomplished out goal of building a high horse-power supercharged Hemi that is also reliable. There's more in it, we just need to decide how much of it we want to experience.
I could definitely feel the car moving around when it went to full power, so I wasn’t in any hurry to test the limits of what the track would hold that day. The starter-motor wire falling off also kept me from finding out if I could drive the car back to the pits after a pass. I had to shut the engine down at the end of each pass to wrap up the chute, so I was towed back both times. We had to finally fix the starter wire for good!
Third Pass
The data showed that the transmission shifted at about 21⁄2 seconds into the pass, so it would be safe to go to wide open throttle at about 31⁄2 seconds. I didn’t want to go to wide open throttle while still in low gear, at least not until I got a little more seat time. The car ran a 7.13 at 192 mph, and the starter wire stayed this time. At the end of the pass, I shut the car off to pick up the parachute, and I fired it up and drove back to the pits. During the drive, the engine never got over 190 degrees. Time had run out for this test and tune session, but we were quite satisfied with the results. Computer extrapolations show e.t.’s in the mid 6-second range, on a prepped track and launching at full power, but that might put me over 200 mph. Backing off on the launch would net high 6 second e.t’s at just under 200 mph. Objectives achieved! mm
I also realized that the dragster might start doing wheel stands, so I’ll launch on the throttle stop during testing, until I feel comfortable.
Price tag Part Manufacturer Part Number Approx Cost Block World 088515-4500 $5,000 Heads Stage-V S-M2000H 4,200 Crankshaft Crower 95168 1,500 Rods Crower B93911B-8-UPG 1,600 Pistons Diamond Custom 1,600 Coated Main Bearings Fed Mogul 142M1 150 Coated Rod Bearings Calico/Clevite CB743HN 150 Cam Bearings Dura-Bond PDP-17T 50 Camshaft Comp 24-000-9 380 Cam Drive Keith Black 63107A + 1,000 Lifters Comp 829-16 470 Rocker Arms Stage-V IR-417N3/ER-cus 1,700 Rocker Shaft Supports Stage-V S-M2000ST 900 Rocker Shafts Dechellis Machine I45-HB/E45-HA 500 Pushrods Smith Brothers 8 NH314-CB 300 Adjuster studs and nuts Manton Stud# 823, Nut# 851 200 Oil Pump Titan 426 drag 800 Intermediate Shaft Milodon 21525 140 Oil Pump Internal Pickup Milodon 21330 130 Oil Pan Milodon 31160 375 Blower Mooneyham 10-71 2,500 Manifold INDY 426-BM 1,250 ECU FAST 30-1004 1,900 Harnesses FAST 30-1100/1200 600 Injectors Lucas 621061 880 XIM coil controller FAST 30-1311 600 Cam Sensor MSD 2346 80 Coils AEM 30-2853 640 Plug Wires MSD Custom 150 Plugs Champion N59YDR 40 Main Stud Kit ARP 145-5602 115 Rod Bolts Crower AMS5844 400 L19 Head Studs ARP Special 590 Valve Covers Keith Black 53097FHA-1 650 Water Pump Meziere WP337S 430 Crank Support Cradle RCD 202600-0004 800 Total $30,270