After doing high-performance automotive technical stories for more than 30 years, it's hard to get really excited about most new products. Many over-promise major gains only to succeed in under-delivering. But once in a great while, a product comes along that is well designed, fills a great need, is easy to install, and generally works exactly as promised. Such is the new Phantom fuel-delivery system from Aeromotive. The new generation of self-learning EFI fuel-injection systems has made EFI more popular than ever. As questions arise about which system is the best way to go, often the most important system—fuel delivery—is overlooked. The OEs have spent an enormous amount of time and money developing a fuel-delivery system that is totally functional.
The challenge for a fuel-system designer is to maintain a quantity of fuel around the fuel pump at all times—much like a dry sump system uses a separate oil tank to supply a constant source of fresh oil to the pump. Carbureted engines can accommodate fuel-pressure fluctuations because the float supplies the constant source of fuel, but EFI systems cannot. Budget fuel-system users quickly discover what happens when you attempt to use a stock carbureted fuel tank pickup with an external fuel pump—when the fuel level drops below half full, fuel slosh uncovers the pickup (generally under acceleration or cornering), which means the fuel pressure immediately drops to near zero because of air in the fuel line. When fuel pressure drops, the engine hesitates or dies. This will happen only about two or three times before you will be looking for a solution to the problem. Enter the Aeromotive fuel pump and Phantom system.
Aeromotive has been well aware of this problem for a few years and has created several different solutions to the problem, but most entailed either a custom fuel tank or major welding of a custom fuel pump sump to the rear of the tank. Neither of these ideas is inexpensive. The solution needed to be a small, in-tank pump that could be easily retrofitted to nearly any OEM muscle-car fuel tank. The key component for this approach was a small enough fuel pump that could be easily retrofitted yet strong enough to supply fuel for 700–1,000hp engines. When Aeromotive introduced the Stealth 340 fuel pump a couple of years ago, it quickly became the key component. The 340 name comes from its ability to pump 340 liters of fuel per hour, which equates to around 90 gallons per hour, equivalent to roughly 1,000 hp worth of fuel, carbureted, or 700 hp with EFI. At first, Aeromotive created specific tank packages with the Stealth pump, but eventually they came up with the universal Phantom system so you could adapt this excellent idea to almost any factory fuel tank.
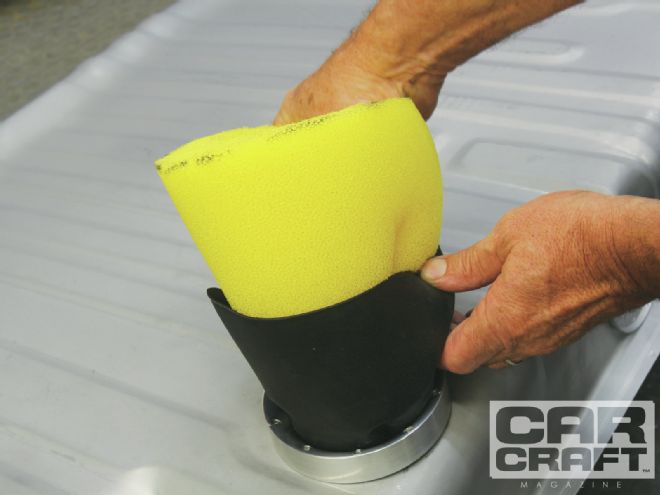
One fuel delivery approach to avoid fuel-pressure fluctuations is the small black bucket that is the base for the Aeromotive fuel pump. Combined with the yellow fuel cell foam surrounding the pump, the foam and bucket work as an excellent reservoir that will maintain a constant fuel source for the pump, even when the tank is nearly empty. After this pump installation, we tested it on our El Camino, pulling the fuel level down to where there was just a little more than a gallon of fuel in the tank. Even with this very low level, the car did not surge, which means the Aeromotive fuel pump Phantom system was still supplying a constant source of fuel. As an added bonus, the pump is so quiet you can only hear it if the engine is not running. This means no more growling pump to deal with on long drives. If you're considering converting to EFI in the future or just want a reliable electric pump for your machine, check out how easy it is to install the Aeromotive fuel pump in your car. We completed this entire installation in less than three hours, and that included a trip to the hardware store to buy the 31⁄4-inch hole saw.
Parts List
Description
PN
Source
Price
Aero. Phantom kit
18688
Summit Racing
$549.95
Aero. 10-micron filter
12321
Summit Racing
$94.95
Aero reg. 3-65 psi
13301
Summit Racing
$131.95
Aero ORB6 to male -6
15606
Summit Racing
$15.95
Aeromotive fuel pump wiring
16301
Summit Racing
$79.95
Aero F-car tank assm.
18657
Summit Racing
$754.95
OPGI fuel tank
AD0GM6C
Original Parts Group
$116.99
OPGI sending unit
PZ00732
Original Parts Group
$68.99
OPGI fuel inlet hose
CH28633
Original Parts Group
$17.99
FAST EZ-EFI kit
30226-KIT
Summit Racing
$1,783.95
Dow Corning RTV
09-00383
Aircraft Spruce
$96.60
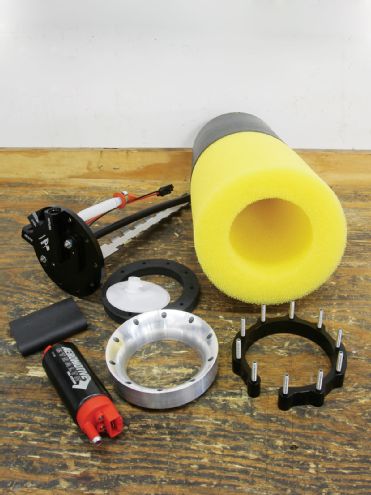 This is the basic Phantom kit, including the pump, the billet aluminum top, its attaching ring, the black pump base and yellow foam, the aluminum drill guide, and the stick that mounts the pump.
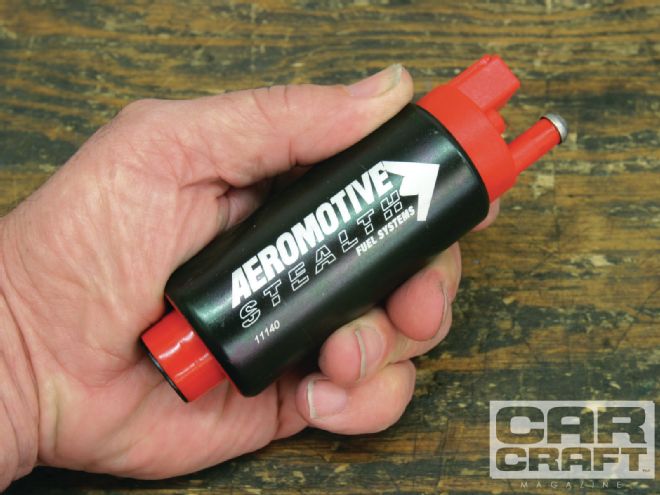 The Stealth pump is designed to be used as an in-tank pump only, using the fuel in the tank to help cool the pump. Its turbine design can be pulse-width modulated, should you desire to control the pump electronically.
 Aeromotive recommends starting with a brand-new fuel tank, so you don’t blow yourself up from a stray spark—good idea! Since our ’65 El Camino still had its original fuel tank, we opted for a new stamping from Original Parts Group, along with a new fuel-sending unit. We knew this was going to be a good swap when we noticed the two 5-inch-diameter flat areas near the front of the tank. This was a perfect place for the Phantom kit in the deepest part of the tank. We checked and Chevelle tanks offer these same flats.
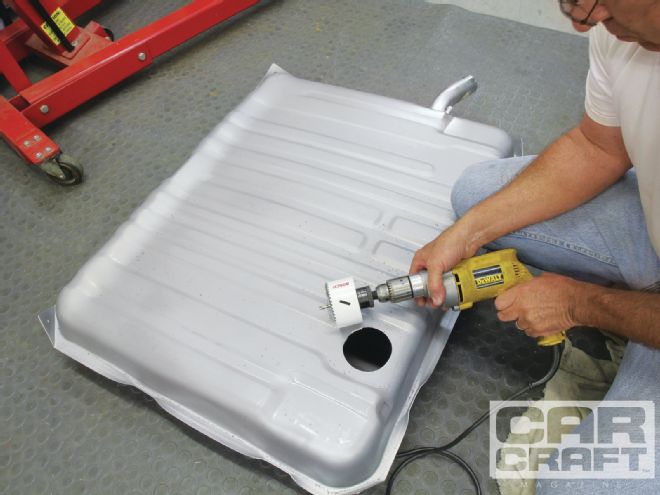 We bought a 31⁄4-inch hole saw at the hardware store, bolted it to our Milwaukee arbor, and quickly drilled the hole in the tank. We decided to wait to clean the tank until all the drilling was completed.
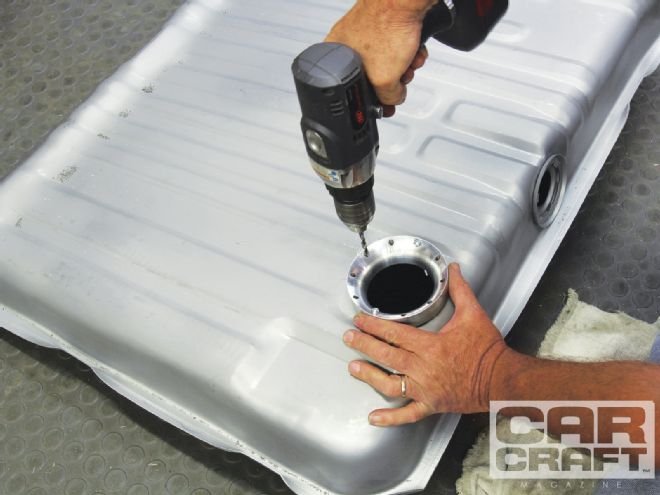 The Aeromotive aluminum drill guide has a step on the bottom that locates it over the hole, allowing us to drill all of the attaching holes. Aeromotive supplies two small screws to place in the first two holes (drilled 180 degrees apart) to help position the drill guide. We eventually used four screws to ensure accuracy.
 We used a die grinder and a sanding roll to clean up all of the sharp edges. We followed this up by completely cleaning the tank. In our case, the inside of the tank was a bit dusty, so we cleaned the tank with soap and hot water to remove all of the drill shavings and dirt.
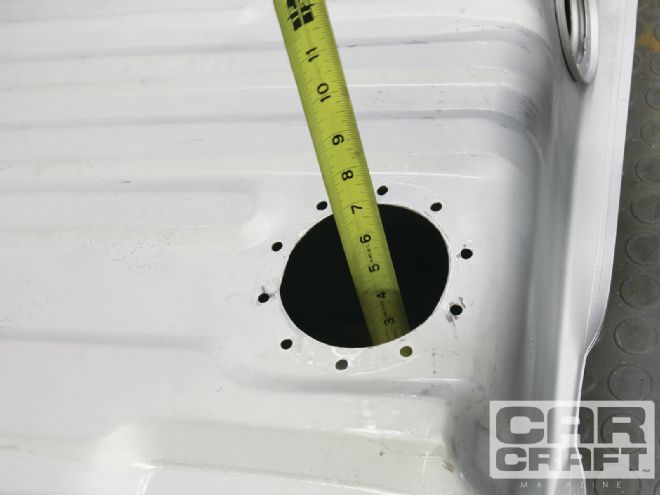 Then, we measured the depth of the tank and used that distance to establish the height of the pump assembly and the foam. Our tank measured 63⁄4 inches in depth.
 Aeromotive says to cut the foam height 1 inch longer than the tank depth to preload the foam both for added density and positioning. We cut the foam with a pair of sharp scissors.
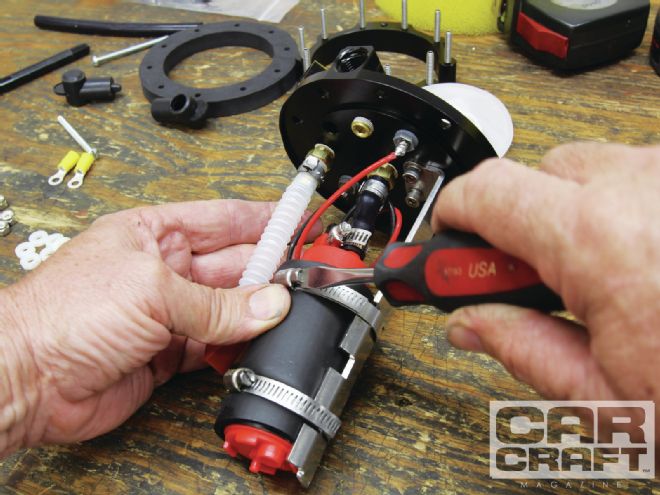
 If you plan to use a returnless system, where the pump will be controlled by a pulse width modulated (PWM) device, Aeromotive recommends drilling a 1⁄32-inch hole in this brass plug. Since we were using a standard return–style system, we left the plug alone.
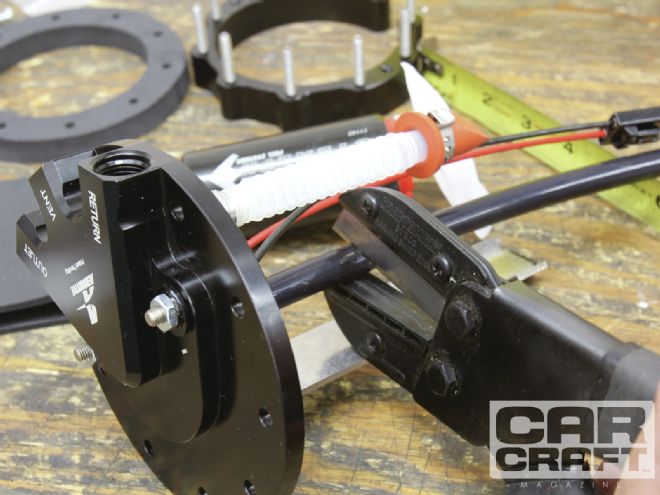 Next, we measured the overall depth of the pump with its pickup screen on the stick and marked the fuel line where to cut. Note that Aeromotive supplies an OE-quality plastic fuel line that is completely compatible with the different blended pump fuels. A cheap rubber line would eventually fail.
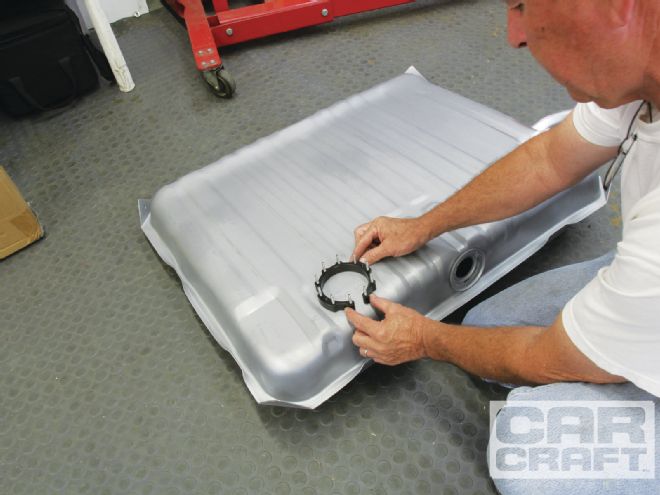
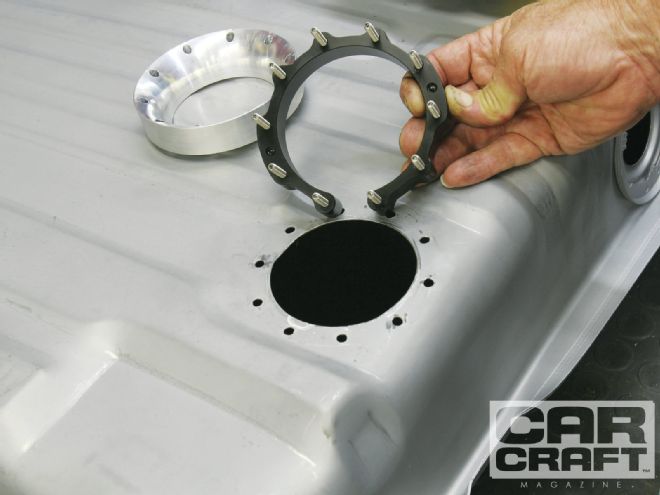 The C-shaped mounting ring goes into the tank first, pulling the studs up through the tank.
Then, we used the taper on the drill guide to feed the black plastic base and foam into the tank.
The C-shaped mounting ring goes into the tank first, pulling the studs up through the tank.
Then, we used the taper on the drill guide to feed the black plastic base and foam into the tank.
 We cut the metal support bracket so it would fit inside the tank and positioned the pump on the bracket with the included worm clamps. Double-check this pump placement to ensure the bottom of the strainer/pickup equal to the tank depth. This will allow the pump access to all the fuel in the tank.
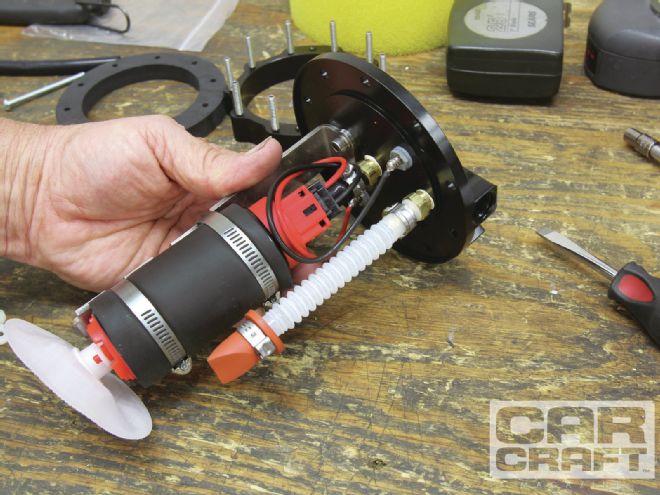 We attached the wiring connector to the pump and made sure the pump was secured to the bracket, and now our pump-on-a-stick was ready to be installed. The white corrugated line is the fuel return.
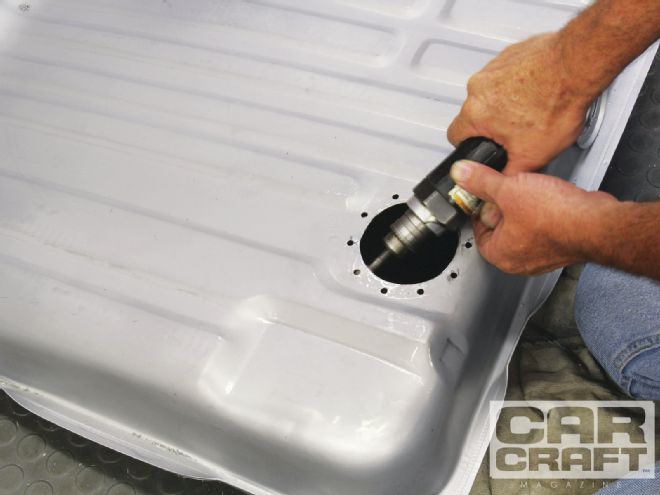
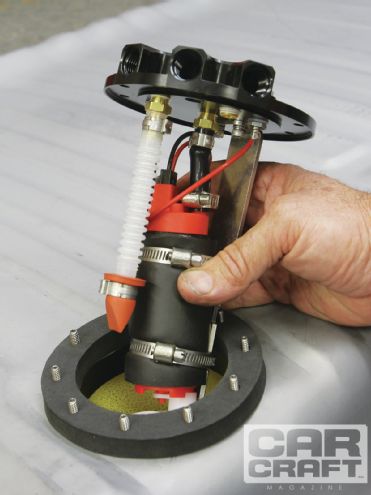 The pump then slipped in place—don’t forget the gasket between the billet top piece and the tank. Aeromotive says that if corrugated areas on the tank do not allow a sufficient seal, Dow Corning 730 RTV can be used to seal the gaps. Do not use regular RTV as it will dissolve in the presence of gasoline.
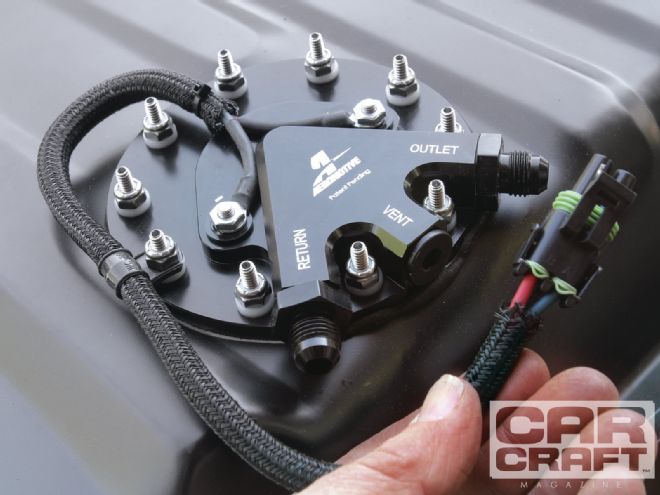 We removed the pump at this point, painted the tank, and installed the pump assembly for the final time along with a new OPG sending unit in its original location. We also wired up a nice Weatherpak two-pin connector for the electrical connector. Finally, we used Aeromotive O-ring (ORB) -6 male fittings to connect to the fuel lines running forward. We used a new hardline with an Aeromotive filter on the pressure side and retained the factory 3⁄8 line for the return.
 Aeromotive does offer new tanks with the Phantom system already installed, if you own a ’67–’69 Camaro, a ’55–’57 Chevy, or a ’64–’68 Mustang. It’s only slightly more expensive, and the system is ready for action. Aeromotive also offers all the necessary AN fittings.
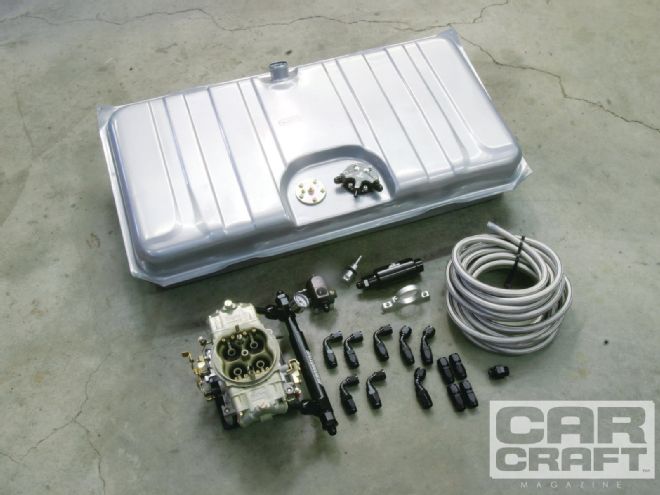
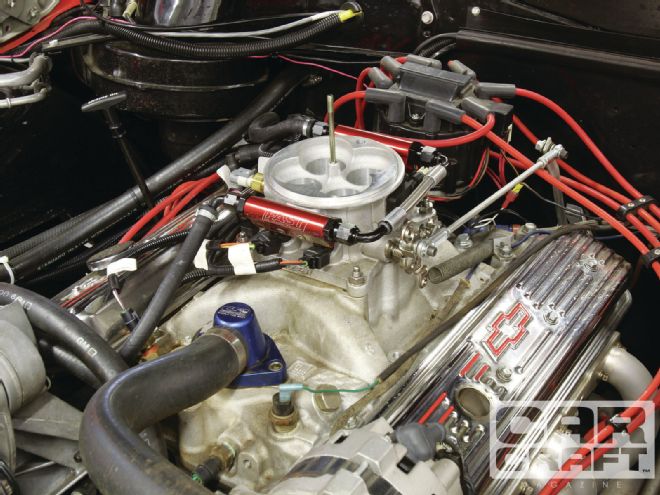 Here’s the main reason we installed the Phantom system. We also installed the FAST EZ-EFI self-learning system on our El Camino right before we left on Car Craft’s Anti Tour trip (see more on page 72) to northern California. The system worked great, we gained more than 3 mpg in town, nearly that on the freeway, and the part-throttle driveability dramatically improved.