The Plan
Last time we had Project 505 on the dyno was for the September 2007 issue of Mopar Muscle when we were testing the new Holley Ultra HP carbs. During that test session, we saw 738 horsepower from the combination of a big flat-tappet cam and a Holley 1050 Dominator carb. Encouraged by the results from that dyno test, we picked up the phone and ordered a pallet load of parts from Jesel, Comp, and Indy in a quest for 800 hp.
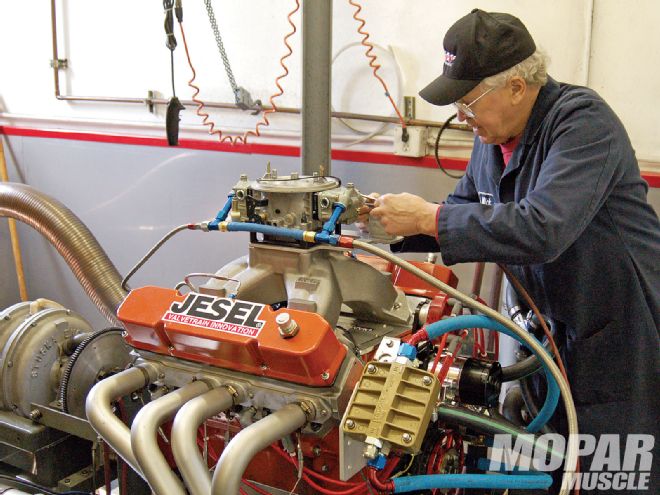
 Engine builder Mick Gray is putting the final touches on the tune-up before we fire it up. The gold housing is the screen type oil filter that lets us keep an eye on the bearings.
The Test Mule
Project 505 was originally built for the "Modern Max Wedge" article that ran in the August 2007 issue of Mopar Muscle. It's based on a thick-wall, 1977 production 440 block with a 4.250-inch stroke crankshaft, 6.800-inch long Chevy rods, and forged Diamond Racing pistons with 13.5:1 compression ratio. The cylinder heads are Indy EZ units that were CNC ported by Modern Cylinder Head. The heads flowed a little over 360 cfm at .700-inch lift when tested by our buddy Dwayne Porter at Porter Racing Heads. Interestingly enough, the heads also flowed 360 cfm when tested at .750-inch lift as well as .800-inch lift, so valve lift above .700 inches does not increase airflow on these heads.
In earlier dyno tests, this motor made 625 horsepower with a Mopar Performance cross-ram and 738 horsepower with the single Dominator carburetor installed, so we knew the raw potential was there to hit our 800 horsepower goal. Our plan was to change over to a roller cam and to install the larger 440-3X intake from Indy, as well as the Jesel rocker arms, Jesel belt drive, and a Jesel distributor. We filled the pan with 9 quarts of Joe Gibb's break-in oil since the motor is still fairly fresh, and we used our typical dyno combination of a remote screen type oil filter and a reverse flow Meziere electric water pump.
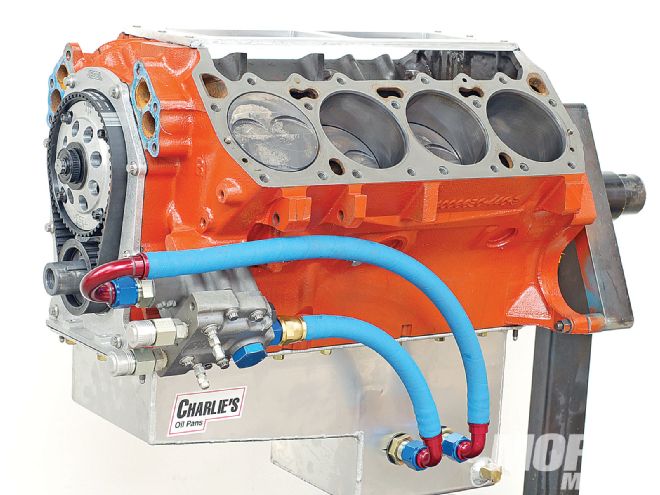 The 505 short-block has stayed the same since the last round of testing. The 4.250 stroke crank is from 440Source with SCAT rods and Diamond pistons. The oil pan is a Charlie's special for dyno testing. Also visible is the Milodon dual line setup and the Jesel beltdrive.
Cam and Valvetrain Parts
The cam that we used for the previous Holley Ultra dyno test was the MM 305S-10 camshaft from Comp Cams. The MM 305 camshaft is one of the largest flat tappet cams in the Comp catalog, but our dyno simulation program told us that we would need a roller cam with at least .800-inch of lift to reach the 800 horsepower mark. We didn't want to increase the duration too much since our short-block wasn't designed for high rpm operation, so we worked with an engineer at Comp to find a camshaft that had the same basic duration as the MM305, but with a lot more lift. What we ended up with was a custom cam with .275/.282-degrees of duration at .050-inch, and lift numbers of .830/.782-inch respectively. This cam is part number 1722B/1850B R110 for those who might want to duplicate this effort.
With a little over .800-inch valve lift to control, we knew we needed a fairly stout valvespring, so we took a look at the PSI line of springs. After discussing a few of the choices available, we settled on the PSI 1246 spring, which is a large diameter triple spring designed to be set up at 2.00 inches installed height. The specifications on this 1246 spring are 300 pounds of force on the seat and 890 pounds over the nose. We might have gotten by with a little less spring force, but on a motor like this we prefer to err on the conservative side so that we have some extra margin on hand in case we swap cams or decide to run more rpm.
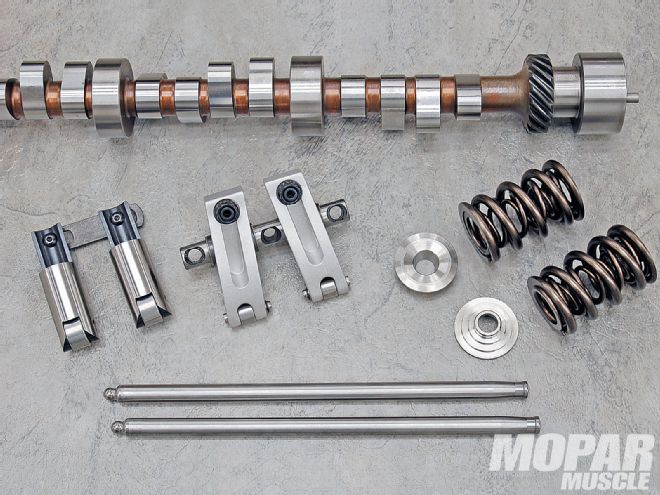 The new valvetrain components included a Comp roller cam and lifters, Jesel rocker arms, PSI 1246 springs, and 7/16 tapered pushrods from Smith Brothers.
Jesel Hardware
In order to achieve the .800-inch lift that we were looking for, the rocker arm ratio needed to be increased from the stock 1.5 to a much more aggressive 1.7. With a .488-inch-lobe lift cam, the higher-ratio rocker arm gave us a gross valve lift of .830-inch, where a 1.50 rocker arm would have only yielded .732-inch lift. It is possible to buy standard shaft-type rocker arms in a 1.70 ratio, but the valvespring load required for these super high lift cams is so high that the standard shaft rocker arms start to have durability issues. So after looking into several different solutions, we decided to take the plunge and purchased a set of Jesel rocker arms. This was just the beginning of the adventure, though, since Jesel didn't have a set of rocker arms designed for the Indy EZ head.
Jesel does have a rocker arm set for the Indy 440-1 head, which is a close cousin to the Indy EZ head, so we purchased the 440-1 kit and began our modifications. The existing rocker stands on the head have to be machined away in order to mount the Jesel shaft stand. This machining requires precision equipment like a milling machine since the hole centers need to be properly located. The Jesel kit didn't come with any machining instructions, but after a few phone calls to Jesel, an engineer faxed us the necessary information and we were off to the machine shop with our blueprints in hand.
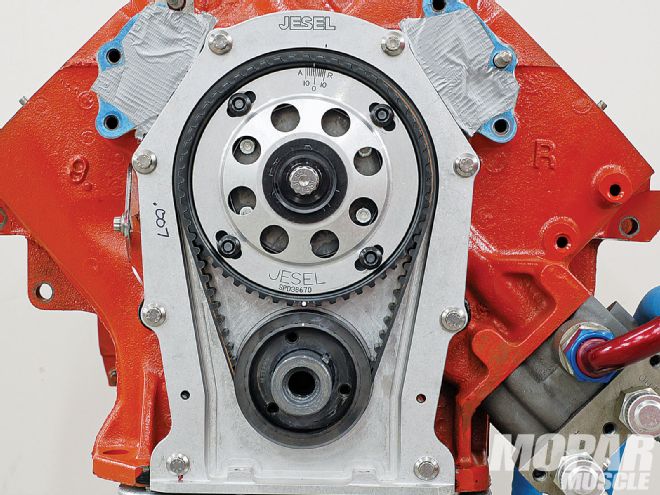 The Jesel beltdrive system has been around a long time and is used by a lot of professional engine builders. The exposed belt allows quick cam changes and easy adjustment of the cam timing.
Once we had the new rocker arms mounted on our heads, we quickly noticed that the high offset 440-1 intake rocker arm wasn't really a good match for our EZ head, since it moved the pushrod over too much. We could have re-machined the head for extra pushrod clearance, but we decided instead to work with Jesel on getting a set of standard-offset intake rocker arms. The standard-offset rocker arms eliminated our pushrod clearance issues but caused another problem, which we didn't discover until it cropped up during dyno testing.
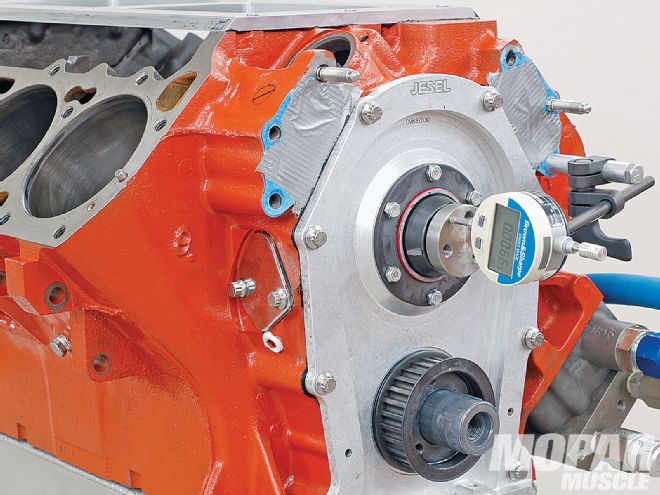
In addition to the Jesel rocker arms, we also installed a Jesel beltdrive for the camshaft. A beltdrive has a number of advantages over a chain drive, including lower harmonics, less friction, easy adjustments, and higher strength. We especially like the fact that the camshaft can be changed without scraping the timing chain cover gasket or disturbing the oil pan gasket. Also, the camshaft end thrust is quickly adjusted with shims rather than machining a cam button. The Jesel beltdrive system has been around a number of years, and is fairly well proven. Consequently, they tend to bolt on without much fuss or hassle. In our case, we just had to hone out the lower gear in order to get a better fit onto our crankshaft, and then everything slid right on.
BeltDrive Distributor and Ripple Effects
We decided to install a beltdriven distributor on this motor to free up some clearance around the valve cover, and that triggered a series of changes that required several weeks of machine shop time to resolve.
 Camshaft thrust is easily adjusted by changing shims behind the bearing retainer. We set up this motor with .007-inch of thrust clearance.
Typically, the location of the big-block Mopar distributor is an advantage since it is up front on the engine and angled over towards the passenger fender. But when you start to use taller aftermarket cylinder heads with large valve covers and a large distributor with big fat spark plug wires, everything starts to run into each other. We eventually got tired of wrestling with the Indy valve covers every time we had to pull the distributor, so we purchased a beltdriven distributor from Jesel. Since we were using a crank trigger ignition, we didn't need any type of advance mechanism, and the Jesel distributor is small, lightweight, and has a big cap to reduce spark scatter.
The first issue we ran into is that the mounting bracket that comes with the Jesel distributor didn't fit our motor at all. Once we fixed that situation, we discovered that the Jesel distributor occupied the same space as the thermostat housing on the water pump. We considered making some long spacers to move the water pump housing forward on the engine, but then someone showed us the new reverse flow water pump from Meziere. This water pump has an outlet on each side of the block that points forward rather than a central outlet pointed upwards. Without the central thermostat housing, we had plenty of space for the beltdriven distributor. The lack of a thermostat didn't bother us since one isn't required on the dyno anyway, but if a person was going to use this water pump in a car, they would need to fabricate some sort of thermostat setup.
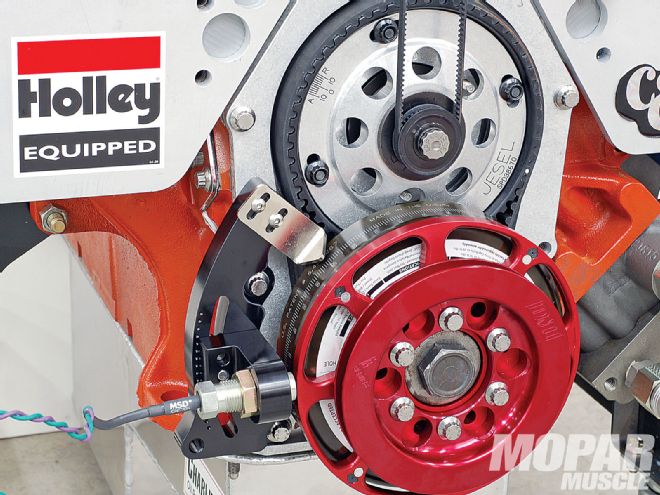 We used an MSD crank trigger for the ignition system since it provides rock-steady timing. The bracket that came with the MSD kit didn't fit with the Jesel beltdrive so we fabricated a custom bracket. While we were at it we included an adjustable TDC pointer.
Once we sorted out how to mount the Jesel distributor, we went to work on the crank-trigger bracket. The bracket kit that came with the MSD kit didn't align properly with our combination of ATI damper and Jesel beltdrive, so we headed back to the machine shop. Eventually, we developed a slick little bracket that mounted the crank trigger in the correct location and provided a mount for a TDC pointer.
On the Dyno
There were a few snow flakes blowing around the truck when we unloaded the motor at Gray's Automotive in Tigard, Oregon. With the temperature reading in the mid '30s, we knew that the motor would be capable of making plenty of raw power.
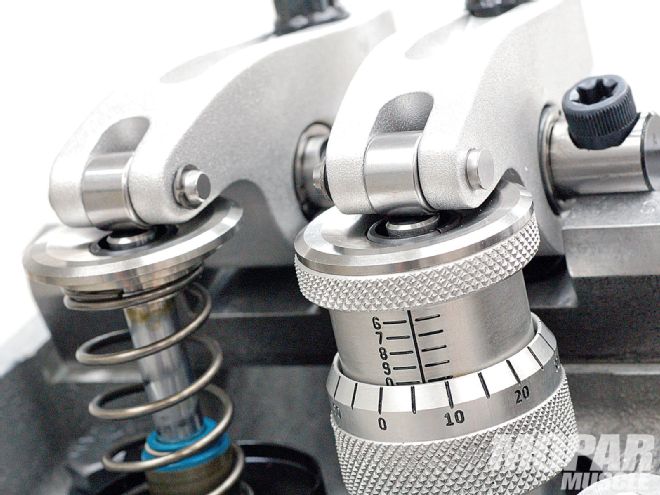 We needed 2 inches of installed height for the big PSI valvesprings. In order to get that much installed height and still clear the rocker arms, we had to use some Manley +.100-inch retainers and +.050-inch locks.
The big 1050 Dominator was very rich off idle the last time we ran it, so this time we decided to get serious with the jetting. The stock jet size in the intermediate circuit on this particular Dominator was a 46 jet, which we dropped down 26 jet sizes to a 20 jet. Changing the jet size by 26 steps is a very drastic move but it seemed to work since the A/F ratio stayed right around 12.5 throughout the entire dyno pull. We left the main jets at the stock 88 size to start with, but we eventually increased the main jets to 89s in all four corners in order to drop the EGT reading down a bit. We never had to change those intermediate jets, so our 26 jet-size change evidently worked.
Quite frankly, it bothered us to run a carburetor with the jetting so far removed from stock, so we called Holley engineering to discuss the issue with them. Our contact at Holley walked us through some other potential solutions to the off-idle rich condition that we had seen such as opening up the air bleeds, making sure the power valves weren't open, and dialing in the idle circuit properly. We'll put that information on carb tuning to work next time we have this Dominator back on the dyno, but for this test we made due with the leaned out intermediate circuit. Since the A/F ratio looked good on the wide band and since the spark plugs looked good, we went ahead and made some full throttle dyno pulls.
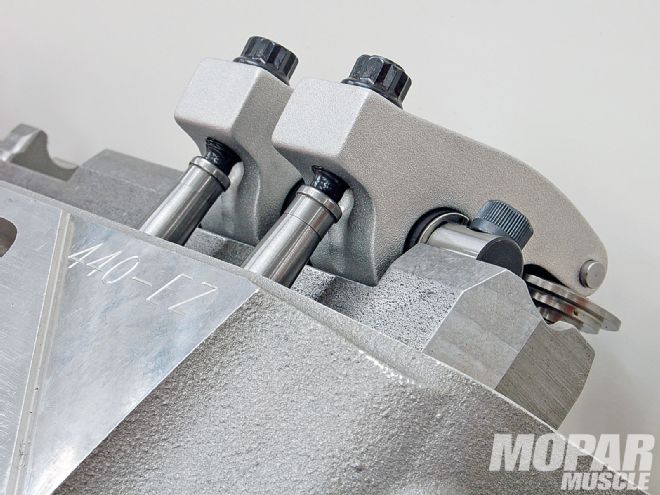 It is important to use a tapered pushrod end to clear the body of the rocker arm. We found that Smith Brothers had a special end for their pushrods that works with the Jesel rocker arms.
The best number we saw during the testing was 805 horsepower at 6,400 rpm, so we achieved our goal of hitting 800 horsepower with the EZ heads. Our theory on the cam timing seemed to be confirmed when we looked back at the previous test results. In earlier testing, we saw a peak horsepower reading of 625 at 6,300 rpm with the cross-ram, 705 at 6,100 rpm with the Indy ram intake, and 738 at 6,400 rpm with the Indy 440-3 intake. So this motor, with these heads and cam timing, makes the most power right around 6,400 rpm, regardless of the intake manifold or carburetor.
After the first round of dyno tests, we pulled the valve covers to run the lash and noticed that some of the pushrod ends were turning blue from heat, so we decided to call it a day. We knew that the motor had plenty of potential still left in it since we hadn't had any time to adjust ignition or cam timing. Typically, there is another 15 or 20 horsepower to be found during a dyno session by tweaking the timing and playing with the spark gap and carburetor spacers.
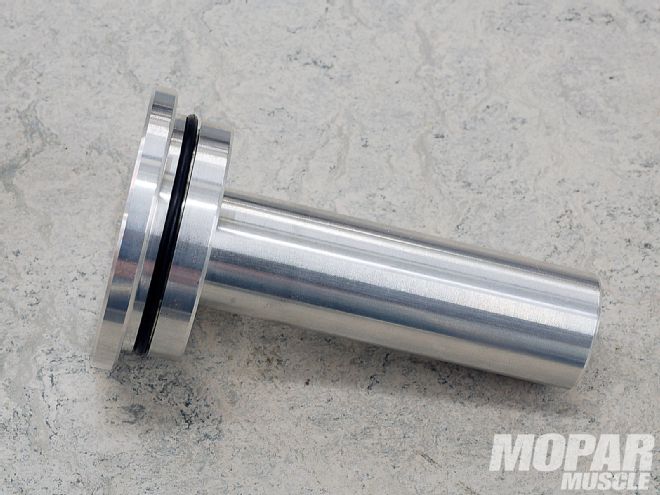 When you use a beltdriven distributor, there needs to be a plug installed in the stock distributor location. We couldn't find anyone who sold these plugs, so once again, we had the machine shop make us a custom part.
Wrap up
Watching a motor crank out 800 horsepower is a lot of fun, but that much power in a stock block with stock main caps is living right on the edge, so we chose to shut things down rather than push our luck. We had the feeling that if we kept making those 800 horsepower pulls that we would get stuck with mop duty before the day was finished and that didn't sound too attractive to us. But even without taking the time to fully flog this particular combination, we did learn some neat stuff. People had told us that the EZ heads weren't capable of making 800 horsepower and we busted that myth. We had also been told that there wasn't any point in running .800-inch lift in an EZ head since the head flow flattened out above .650-inch lift, but it appears that the motor actually can use that extra lift. Now it might be true that there are easier ways to make 800 horsepower from a 505 Mopar, but we used the parts that we had on hand and got it done our way. If you have an 800 horsepower combination that you think is better than this one, then drop us a line and let us know how you did it.