Model A Ford production automobiles through 1931 had an integral fuel tank/dashboard/cowl assembly. It was not until 1932 that Henry decided to put the fuel tank out back where a rearend collision could wreak havoc on the fuel tank. We assume that was safer than having the fuel tank sit next to the engine and over the cockpit. Heck, I had an old CJ5 Jeep that had the fuel tank directly under the driver seat-now that was certainly a great location for the fuel tank.
The Model A fuel tank/dashboard/cowl assembly was designed as an easily removable, one-piece unit. Once removed, the conventional street rod solution is to purchase a replacement cowl cover from Brookville Roadster or another manufacturer, weld it in, and move on. This approach requires a dashboard, and the most common solution to replacing the Model A dashboard is to use one of the '32 Ford-style variety made to fit the Model A dash rail, also available from Brookville Roadster and others.
 Here's a stock '30-31 Ford Model A fuel tank/dashboard/cowl. The part with the three holes is the dash rail and is part of the body. This rail supports the rear of the fuel tank/dashboard/cowl assembly.
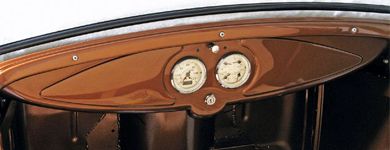
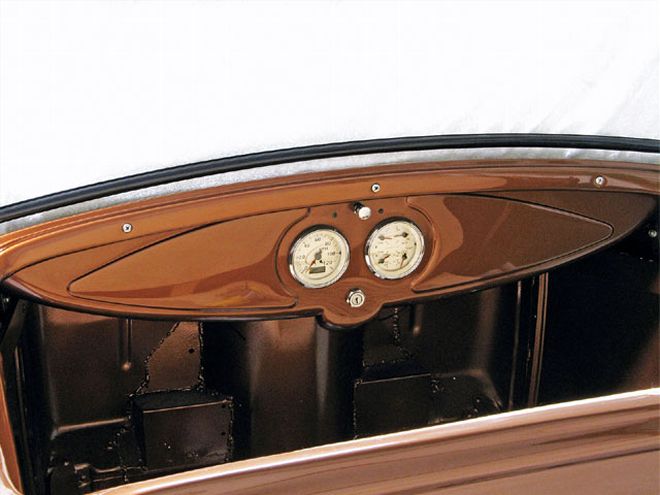
While that is certainly a viable solution, the theme for this Model A hot rod is an old-style look. We chose to modify the original fuel tank/dashboard/cowl since the conventional solutions do not present the old-style appearance, and we achieved the look we were after by maintaining the original cowl gas filler and the stock dashboard panel. New electronic instruments, as well as a modern ignition switch and headlight switch, were discreetly installed; for ease of instrument and electrical installation and safety, Henry's over-the-cowl fuel tank idea was ditched.
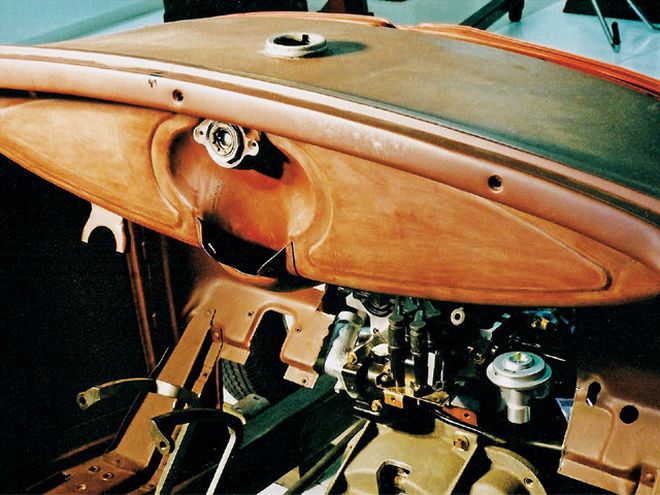
The first step after removing the fuel tank/dashboard/cowl assembly was to mark where the material would be removed from the fuel tank. The area that mounted the gauge panel and the integral fuel gauge was removed, along with the bottom of the fuel tank. The fuel tank was taken to Frank Bruno, at Beachside Fabrication in Bunnell, Florida. Frank is experienced with welding and cutting on fuel tanks, and cutting on a fuel tank, regardless of how old it is, does not sound like a good idea for those of us opposed to serious injury.
The forward panel, or bulkhead, of the fuel tank was kept for strength, and it can be used to mount underdash items such as relays, fuse blocks, and so on. This approach will eliminate bolting through the firewall, building underdash mounting plates, and the like. The lip around the lower dash area and the sides was also maintained for strength and to allow for utilization of the stock Ford clamps to mount the sides of the cowl to the body. A steel filler panel was welded into the dashboard's vacant gauge area, and it was time to get creative after grinding the welds.
A coat of Dykem Blue machinist dye was applied to the gauge-mounting area, allowing us to lay out the centers of the radii on the embossed left and right areas of the original dashboard. With the centers of the radii established, a hole saw was used to drill two 3.375-inch-diameter holes to mount the Haneline products, Elite Series speedometer, and quad-four gauges. Holes were also drilled for an ignition switch and a light switch, as well as two small holes for turn-signal indicator LEDs.
The cowl assembly was painted body color after working a little body filler, applying some primer, and doing a little block sanding. The modified cowl and dashboard offers the desired old-style look with the instruments and switches installed, and we believe the cream-faced Haneline instruments will work well with the planned cream interior. Simple, inexpensive, and efficient-an old-style solution with an old-style look.