After getting the freshly revitalized 235 back from Magnolia Center Machine, it was all on my shoulders to get the engine fully assembled. Didn't seem like a huge task at first, but you know how things go-you think you've got everything you need until you realize you don't...and that starts becoming a regular occurrence!
Fortunately, the nickel and dime stuff was just that-small items like miscellaneous hardware, fittings, etc. Thanks to Patrick's Antique Cars & Trucks, Egge, Mooneyes, and Powermaster, the big stuff was handled. And since I'll be using the ignition, fuel pump, and starter from the 235 currently powering my '53, I don't have to worry about that until I actually swap motors.
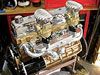
As you will see, I ordered a new Fenton 2x1 intake along with a set of cast-iron headers (all Jet-Hot coated) from Patrick's. In doing so, Patrick asked what I planned on using for carburetion, and when I told him a pair of Rochester BCs (auto chokes), he said, "Send 'em on out-we'll make those nice and pretty for you!" Another chore out of my hands. When the mailman came knockin' with a package from Casa Grande, Arizona, I found myself staring at a piece of art-Patrick completely went through the carbs, built and polished a stainless fuel rail, and fabbed up a nice linkage system. Plus, the induction unit was completely assembled, so all I really had to do was bolt it on! To complete the Fenton setup, I just needed to bend up some 1/4-inch stainless for the choke stoves and install the 3/8-inch pre-heat tube kit from the headers to the intake.
Since the block is of a later vintage ('59), I had to order the retro-fit water pump kit from Patrick's. With this, you don't have any fan-to-radiator interference as you would when using a stock pump. However, you do need to locate a later fan, which will have to be slightly tweaked to clear the harmonic balancer. Finally, the Wayne finned-aluminum set used on the older 235 will be reused on the fresh motor-of course, not before receiving a good polishing!
Finishing touches included installing a new PowerGen faux-generator alternator from Powermaster. Here's where one of the parts-chasing episodes occurred, as I neglected to retain the 235's generator brackets. A quick trip to a friend's shop to rob the needed parts off a core motor solved that. The GM-styled unit puts out 75 amps (60 at idle), which is more than sufficient for a simple system without too many accessories other than A/C and a radio. The PowerGen is available in a satin black or polished finish and "short" and "long" versions (shown is the long model), both with stock GM mounting provisions.
Before I fully wrapped the engine assembly, I decided to finish off the 235's "finned" theme with a couple of items from Mooneyes: a pair of aluminum two-barrel air cleaners and their new aluminum remote oil filter-all finned (and polished), of course. The air cleaners bolt right on, obviously, but the oil filter will have to wait to be mounted to the firewall, as unlike the stock steel units, the aluminum will absorb engine heat, thus the decision (which isn't mandatory) to mount it away from the intake/exhaust manifolds. Combined with the finned beehive coil from AstroCoil currently in use, I think I've got every possible area covered, don't you?
Hopefully, by the time you read this, the new 235 will be in service powering the '53; if not, it just means the old engine's still holding in or, better yet, I just haven't had the time!