 Abusing the rollers on Westech's chassis dyno, our bolt-on plan resulted in a 121hp gain at the wheels with a 440-so docile it could pass for stock. Does this look like a monster producing nearly 400 hp at the wheels? You wouldn't know by the sound of it.
Having a 440 car comes with a certain distinction. After all, the torquey 440 was one of the largest production engines offered in a factory musclecar, and there's no debating that the factory moved those heavy bruisers with ease. The "440 Magnum" emblems on the hood of our '71 Charger R/T gave ample warning to would-be contenders that there was a lot of engine under the hood. But in today's mean streets, the factory package isn't always enough to keep the more serious street rats at bay. Sure, it's unfair to compare a dead-stock musclecar to the hopped-up street warriors roaming the boulevard, but when the light turns green, there's no one hanging around to check the engine's date codes. Try as you might to keep a low profile, a Green-Go '71 R/T with full stripes and spoilers and those 440 emblems on the louvered hood just begs for a confrontation. Thus, we needed to ensure we were packing a serious punch.
The 440 in our Charger was something of an unknown quantity. The engine had already been rebuilt when the car was acquired, and we had little clue as to what was inside. Externally, the engine was stock, with the correct factory iron intake, carb, and exhaust manifolds. We investigated and found just over 0.450 inch of valve lift, so it would seem the cam was stock or near-stock in specs. The "factory" 440 combo gave us 252 hp at the rear wheels on Westech's chassis dyno, and with an upgrade in the exhaust system to headers and 211/42-inch duals, we had upped that to 280. We knew, however, that really busting out the big numbers would require getting inside and breaking out the serious hardware.
Planning Parameters
While turning a number in an unrestrained drag car is one thing, this Charger serves time strictly as a street car. We had power brakes, air conditioning, and day-to-day driveability considerations to contend with in choosing our package. We wanted to be able to pack up the car for the weekend, fill it with gas, and head out for a drive up the coast without scaring the kids. With those constraints, huge, lumpy cams and sky-high compression ratios were out, but we figured there was still plenty of room for improvement with conventional mods. Since the engine was fairly fresh, the short-block would remain untouched, but we would hit the key areas of heads, cam, and induction to really make this 440 come to life.
The 440's response with the absence of much cam duration indicates that an exceptional set of heads must be a big part of the buildup program. Back in our shop, collecting dust on the shelf, was a set of fully ported 452 iron heads, which delivered well over 300 cfm of airflow. We had used these several years ago as a pair of port-development heads. After extensive rework and testing, the port flow was outstanding. Having no further plans to use them in engine R and D, we figured why not put them to use on the Charger's 440? Would they be our first recommendation for a buildup today? In a word, no. If we hadn't already had them ready to run, we would have looked toward an aftermarket head.
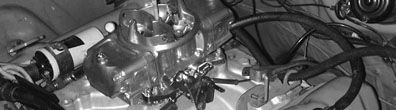
 Up front, all the accessories need to be cleared to make room for a cam change. Take note of the various bolt positions and bracket locations when tearing down, since a full accessory package such as the one on this Charger can be quite a puzzle to figure out later.
Frankly, with the variety of aftermarket offerings available today, the economics of reworking an old set of iron heads is upside down. Duplicating the port flow would require porting from the best cylinder head experts to the extent that the porting cost alone would likely exceed the price of a new set of aftermarket Edelbrock, Indy, or MP replacements. Besides porting, these 452s were machined for 2.14/1.81-inch valves, fitted with new bronze guides, machined for dual springs, machined for positive PC-type valve stem seals, flat-milled 0.060 inch on both the deck and intake face, cut with a custom Serdi valve job, and machined with a deshrouding cut to within 0.030 inch of the head-gasket line concentric with the valves. The valves were Speed-Pro units in the aforementioned sizes. They were modified with a back-cut on the intake valve and a radiused margin on the exhaust, as well as thermal barrier coating on the valves' heads, and an antirecession moly coating on the exhaust valves' face. We'd hate to calculate the hours of headwork wrapped up in these iron wonders.
Camshaft Considerations
We weren't exactly sure of the compression ratio of our subject, but a cranking compression of 165 psi with the current cam indicated that it wasn't likely high. For the sake of low maintenance and driveability, we wanted to go with a hydraulic grind and keep the duration fairly short, which would play well with a moderate-compression short-block. Although the duration would be conservative to meet our driveability goals, we wanted a significant amount of lift to tap into as much of our head's airflow as possible. This dictated that a dedicated, fast-rate 0.904-inch tappet grind would be the best choice. Mopar tappets, at a 0.904-inch diameter, are significantly larger in diameter than those found on most other engine families. With the larger tappet diameter, a faster rate of lift can be designed into a cam-shaft's lobes. We had tested some fast-rate Mopar grinds from Hughes Engines, and we were impressed with the results of maximizing the valve lift at a given level of duration.
When we had performed our initial testing of the Hughes cams, we were surprised by the outstanding output in a 440 with only the small 223/230 at 0.050 inch camshaft. We noticed that this camshaft exhibited good torque lower in the range and carried well into the upper revs despite its short duration. By the same token, the short duration provided the excellent idle quality and good vacuum we were after for our street 440. With a great balance of power output to road manners, the Hughes HL2330BL seemed to be the best choice for our street application. Specifications of this Hughes cam are 272/276 rated duration, 223/230 duration at 0.050 inch lift, 0.504/0.515 inch lift with the stock 1.5:1 rocker ratio, and a lobe separation angle of 110 degrees. When upping the ante to 1.6:1 aftermarket rockers, the valve lift increases to 0.538/0.549 inch.
Induction Inclinations
To top off our modification plans, we chose the old standby Holley Street Dominator single-plane intake. Though an older design, the Street Dominator has always proven to be an excellent intake on the 440, and it is well-finished right out of the box. The Street Dominator has good low-end response for a single-plane, yet dyno testing has shown it retains excellent output at higher rpm. For carburetion, an 850-cfm mechanical secondary Speed Demon carb was chosen to provide the required airflow for our large-displacement engine. Although many favor smaller carburetors for street applications, we have found that a well-set-up 440 consistently responds to the 850 configuration.
Turning Wrenches
With our plan in place and the parts on hand, the Charger was pulled into the shop and the wrench-turning began. Getting in for a camshaft change requires a full teardown of the front-end of the engine, including removal of the radiator and A/C condenser, if so-equipped, and all of the front accessories. Up top, the induction is easily removed; however, removing the heads is the most involved portion of the job. Getting to the outer row of head bolts requires unbolting the headers at the collectors and alternately jacking the engine at each side to provide the required clearance. There was quite a bit of anticipation when the first head was lifted from the block, which gave us our first chance to see with what pistons the engine had been built. We weren't surprised to find Speed-Pro PN 2266 flat-tops inside-a stock-replacement forged piston which, unfortunately, carries no valve notches and rests (by specification) at 0.089 inch down the hole at TDC. While we favor the Speed-Pro PN 2355 flat-tops set at zero-deck in a performance engine, the lower-compression 2266 seems to have been the favored piston of engine rebuilders over the years. The lower-than-ideal compression ratio reinforced our decision to use the relatively short-duration Hughes 2330 camshaft.
We had the engine down to a bare short-block in about half a day. The building process began with installing the Hughes camshaft and degreeing it in. We found that the intake centerline, when installed to the "0" timing marks, was at 109.5 degrees. We wanted to install the cam advanced to ensure both a clean idle and crisp throttle response. Oddly, in moving to the "A" position on the timing gear, which should have advanced the camshaft 4 degrees, we measured the centerline at 102.5, which was much more advance than we wanted to run.
To solve the problem, the camshaft gear was drilled at the indexing pin hole, and a 2-degree bushing was installed to provide a final centerline of 107.5. It shows the importance of degreeing in the cam so the installed centerline is actually measured, rather than depending on the timing marks. We lubed and installed a set of standard hydraulic lifters, PN 2011 from PAW.
Our cylinder heads were assembled with a set of Competition Cams' PN 911 single springs installed at 1.850 inches, which gives 141 pounds seat load and 346 pounds over the nose. Under the springs, Comp's PN 4700 spring locators were used to keep the spring from walking. Up top, we reused the Comp PN 732 titanium 10-degree retainers and SuperLocks-although overkill for our application, they had been on the heads before. The heads were torqued in place on top of standard Fel-Pro PermaTorque gaskets with the original head bolts, and the manifold was installed over a Fel-Pro PN 1215 intake gasket, which blocks the exhaust crossover.
Installing the Demon carb required some clearancing of the intake manifold at the choke well to clear the secondary linkage. Additionally, since Demon does not offer a Mopar throttle linkage arm, we had to do some minor adapting in this area. We found that an AFB universal Mopar linkage arm is close, so we installed it onto the Demon carb with a slight elongation of the mounting holes and a 0.250-inch spacer at the upper mounting bolt. The factory throttle linkage and kickdown arm accepted the new induction system without modification. With our hot rod parts in place, it was just a matter of bolting the headers back up and reinstalling the front accessories and peripherals. Then we were ready to run.
Spinning The Dyno
We fired up the 440 and found the idle quality comparable to the stock 440 we had disassembled only a short time before; however, when hitting the open road, there was no resemblance to what we had started with. The difference was astounding: The 440 pulled much more strongly up through the gears, with remarkable torque and a fantastic pull of power up top where the old setup would run flat. This combo really hauled, and we knew we'd come back with a healthy report from the dyno.
Before long we were back at Westech, and the Charger was again strapped to the SuperFlow's rollers. We had set the timing to a conservative 35 degrees total, and the Demon carb was still equipped with the stock 83/93 jetting. Right out of the chute, the Charger banged out a stout 362.2 hp at 5,040 rpm and 413.4 lb-ft of torque at 3,817 rpm. Our seat-of-the-pants reckoning hadn't deceived us; this thing had some oats. We made a quick change of the ignition timing to 39 degrees total and were immediately rewarded with 370.2 hp at 5,050 rpm and 413.9 lb-ft at 4,355 rpm. This was serious territory at the rear wheels for such a docile-running 440.
Next, we cracked open the Demon carb for a jet change. We installed a pair of 81s in the front and 90s in the rear, leaning the mixture a touch from the factory calibration. Lean was mean, and a turn of the rollers showed that output was up again, posting 377.2 hp at 5,156 rpm and 416 lb-ft at 4,488 rpm.
One of the key mods we wanted to make on the dyno was an upgrade from the stock 1.5:1 rockers and valvetrain to a set of Crane 1.6:1 roller rockers. Our ported heads could take all the lift the cam could dish out and translate it to more airflow and breathing, which should equate to more power. In fact, testing the heads showed they would keep gaining in airflow to well over 0.800 inch of lift, so we concluded that the more lift we could dial in the better. With the 1.5 rockers, the intake valves were seeing just over 0.5 inch of lift, while the 1.6s would bring it up to 0.538 inch-still a fraction of the head's capabilities, but a significant improvement in a street combination.
The stock rockers and pushrods were removed, and in their place we bolted in the Crane 1.6s with PAW chrome-moly pushrods. The lifter preload was set to a one-half turn past zero lash, and we were once again ready to test the results. As predicted, the higher ratio rockers had a favorable effect on the output, which now edged up to 387.1 hp at 5,290 rpm and 420 lb-ft at 4,483 rpm. Even more significant was the way the engine held on past peak power rpm. At 5,600 rpm, the 1.6 rockers added 35 rear-wheel horsepower
Our final test was to add a four-hole spacer under the carb. The four-hole will sometimes help smooth the small dips from the power curve, and it often adds to the torque output. We had enough clearance under the power-bulge hood of the Charger to run a 1-inch spacer with a 1-inch drop-base, open-element air cleaner leaving room to spare. The spacer did result in a slight improvement to the power curve, adding a couple of lb-ft of torque down low and boosting peak-output-to-horsepower at 5,214 rpm. Oddly, the spacer dropped a couple of lb-ft of torque at peak to 417.2 at 4,539 rpm.
With that, the Charger was unhooked from the rollers, and we packed up, satisfied that the old R/T was more than armed enough to handle all but the most threatening street confrontation. We had seen plenty of big-cammed, exotic big-block street engines on Westech's chassis dyno struggle to make 300 rear-wheel horsepower. Our 440 idled and drove almost as smoothly as a stocker, but with nearly 400 hp at the wheels, it packed an unbelievable whallop.
Superflow Chassis Dyno Dyno Results Tested At WestechRear-Wheel TorqueRPMBaseModsTimingJetRockSpacer3,000388.8393.0393.0388.3386.4389.83,500382.9406.8407.5406.9402.6{{{405}}}.84,000359.4408.8410.6412.8407.1407.54,500{{{323}}}.4408.1409.8416.0420.0417.15,000279.7378.4388.1389.2404.0404.75,{{{200}}}251.5360.4368.7381.0390.7393.95,500220318.0333.6336.3362.0362.5Rear-Wheel HorsepowerRPMBaseModsTimingJetRockSpacer3,000223.0223.7223.8221.4220.2223.73,500250.2270.8270.7271.7267.2271.24,000273.5310.9312.5315.8311.2310.74,500277.5348.8351.1355.5358.5357.65,000266.2361.1370.2370.4384.8384.25,200253.6357.7364.5376.3386.8391.05,500231.5333.5349.0352.4379.0380.2