Okay, we'll cut to the chase on this one: Everyone knows that tube headers, whether they're full-length, 3/4-length, shorty, or whatever, offer more power than stock, cast-iron exhaust manifolds. As all Mopar fans also know, putting headers on a Mopar, small block or big block, is a pain. Until now, there have pretty much been two styles of headers for Mopars: "fenderwell" headers and the equal-length, non-fenderwell type. Both had miserable fit designs. Fenderwell headers got their name because you had to hack a hole in the inner fenderwells of your car to route the rear primary tubes. These pipes then wrapped around the front frame rail and hooked up to the collector. This was the only way header companies could keep the collectors tucked up close to the floor pans of the car.
So why not just go with the regular style headers and bypass hacking the fenderwells? Back when the cars were new, there were no compromises in the hot rod community--you ran equal-length headers for the most power, or you didn't bother. As a result, the equal-length headers' design hung real low under the cars, sacrificing ground clearance to spare the sheetmetal. The first speed bump you hit usually smacked the collectors and hung up the flange, resulting in mangled headers. But people seemed to live with it. We're not sure why, but they did. And let's not forget about the leaks and constant maintenance they required!
Somewhere between then and now, living with rumpity solid lifter cams, 12:1 compression ratios, and constantly chasing header leaks became a lot less fun. We've noticed that during the last several years people are making their cars much more user friendly. They still want performance, but they also want to be able to get in, start the car, and go. As a result, we've seen a lot of engines with the standard aftermarket add-ons--intakes, carbs, ignitions, aluminum water pumps, and valve covers--but a lot of them are running stock, cast-iron exhaust manifolds. What we really find interesting is that these cars don't seem to be running stock manifolds for cost considerations. Stock, high-performance exhaust manifolds command pretty good prices at swap meets, and we've seen more than a few sets commercially coated to improve their appearance, which also isn't cheap. The fact is, today it's usually cheaper to run headers than the stock manifolds! But nobody wants to hack their Mopar's fenderwells, or worry about bottoming out and mangling the headers, or constantly fix leaks. Plus, headers are notoriously difficult to install, especially on Mopars.
Ah, the times they are a-changin'! We've heard a lot of really good things about Tube Technologies, Inc.'s (tti) headers and exhaust systems from enthusiasts we knew who've installed them. Specifically, we've heard they don't hang low enough to get crushed on speed bumps, there's no hacking or bending of anything on your car to install them, and perhaps most importantly, they fit. Well, we heard from enough people that tti's exhaust system was the way to go, so we started searching for a car to do the story on. Mike Volpe, president of the Westcoast Mopar Club in St. Petersburg, Florida, had just the car we were looking for--clean, with a built 340, automatic trans, power steering, and the stock Hi-Po cast iron exhaust manifolds. He'd never put headers on the car, even though it sees regular street duty and more than an occasional trip down the quarter mile. He agreed to let us use his car, and we ordered up a complete kit from tti, consisting of headers, 2-1/2-inch mandrel-bent exhaust pipes, DynoMax mufflers, and stainless steel tips.
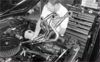
So how'd it go? Headers are never fun to install (unless it's on a truck), so there was an understandable amount of disassembly to the car to get them in. The starter and oil filter need to be removed, and the steering linkage needs to come down. But we knew that up front, because the kit's detailed instructions warned us about it ahead of time. As for getting the headers in, it's definitely a two-man job, at least on the driver's side, but they do go in with a minimum of hassle, and they fit as delivered--no clearancing, no hammering, no swearing. You have to find the magic combination of angles of attack to get them in place, but once there, they clear everything.
The 2-1/2-inch mandrel-bent pipes going out the back also installed with a fairly minimal amount of grief, though we did have a pro muffler shop hang them for us. John and the guys at The Muffler and Exhaust Center do a fantastic job, and even with kits we know are going to fit, we always have them do it because their results are far superior to ours. We also always have the pipes welded, rather than clamped, though that's just personal preference. The clamps tti supplied were polished stainless steel, and they would have worked perfectly. One other addition to the tti kit we made was replacing the supplied fasteners and gaskets with Stage 8 locking fasteners and ROL gaskets. Again, the fasteners supplied with the kit are top quality grade 8 fasteners, but quite frankly, we won't install headers without the Stage 8s or ROL gaskets. The ROLs compress well and don't ever burn through, and once you put Stage 8 fasteners on, you never have to tighten them again. They may be a little more difficult to install than regular bolts, but once they're on, that's it. We'd much rather spend a little more time up front doing something right than have to tend to it the rest of our lives. And the little extra cash spent on them is an excellent investment.
TTI offers both small- and big-block headers and exhaust kits, with a choice of tubing sizes for a variety of body styles. The finished product looks fantastic, the exhaust pipes are up out of harm's way, and the performance of headers is going to let your engine breathe better than the stock manifolds ever could have. It took 30 years, but we've finally got the best of all worlds!