We've all done it before: crawled upside-down and backwards to work under a dash only to discover that the part we need to service screws into the electrical system with a bunch of ring terminals on individual wires, all of which look pretty much the same after all these years. Or remove some plug only to have it fall apart in your hands. Or excitedly go to install something new only to have to wire it permanently, dreading that one day we'll have to remove it. Or worst of all, forego or dread some EFI installation because its connectors appear to defy our knowledge. Wouldn't it be nice if our trucks' wiring systems were as serviceable as the ones in modern trucks?
Good news: There is a way to make your truck's electrical system just as serviceable as one in a new model. And we have even better news: It's so affordable and easy that you'd need to have your head examined not to use them.
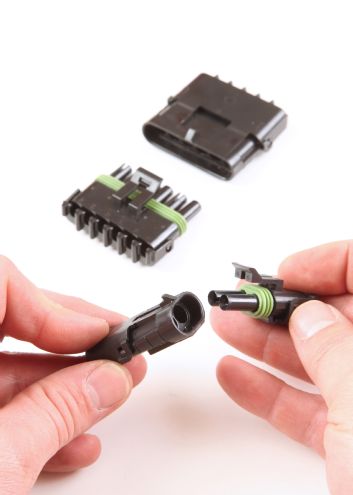
These modular plug systems date to at least 1955, the year that GM's Packard division converted from a purely spaghetti-style system of individual connections to a modular system of plugs. Now before you Ford and Mopar fans grouse at the prospect of using GM components on your obviously superior machines, take note that those companies did just that by licensing the Packard 56 design for some components in their own brands. So part of what follows may well apply to your truck even if it isn't a GM.
While various makers licensed other style of plug systems in the 1970s and '80s, GM's Packard division created a revolutionary system called Weather Pack. As the name implies, Weather Pack resists the elements, in this case by a seal design that isolates the terminals from oxygen and therefore oxidation, the prime culprit in poor electrical connections. Then in the 1990s it tweaked the design into Metri Pack, a multi-series system of connectors sized according to their capacity. Low-current components get connectors far smaller than Weather Pack and the larger connectors, while the same size or even smaller than Weather Pack, conduct far more current than Weather Pack could ask for. Our apologies to Ford and Mopar devotees; the sealed components those companies licensed aren't as popular and therefore don't exist in quantities as vast as the ones GM used.
The exponent of this good news is that the parts to work on all of these systems came way down in price over the past decade or so. Most of the following components cost only a few cents and the most expensive pieces costs only a buck or two if sourced from the right places. You may have to buy in bulk, but sometimes it's cheaper to buy 100 pieces from a specialty shop than five pieces at the local parts store.
Even more recently tooling came way down in price. Once upon a time only OEM tools were available. They often cost hundreds of dollars and each system had its own dedicated tool. The aftermarket responded with affordable, lighter-weight versions, but the tools were still specific to each design.
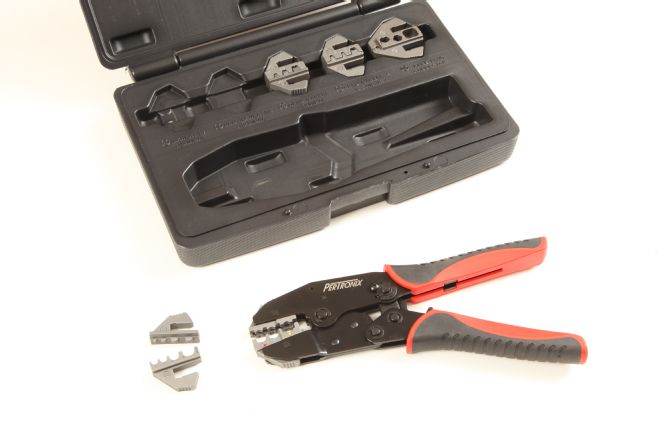
But recently PerTronix, the company that made its name in the ignition market, developed a crimping tool. It handles the latest two of GM's three connection systems. But this tool isn't anything like the clumsy stamped crimp pliers that crimped everything, but didn't crimp anything well.
These crimp pliers resemble the last generation of design-specific tools in all ways but one: they're modular. The kit consists of pliers and four sets of dies. As noted earlier, the dies work on two of GM's three designs (and likely more makers' terminals). Their compound leverage exerts the necessary pressure to affect an OEM-grade crimp with comparatively little hand force. Best of all, this tool won't release until it achieves the set pressure, assuring an effective crimp each time.
What follows is what you need to know about the three most popular connector styles: Packard 56, Weather Pack, and Metri Pack. There are others, but since they lack the utility of these three we'll save them for another entry.
For now, though, learn what it takes to make a wiring installation as serviceable as the one in your new truck. So handy, affordable, and easy to use are these connectors that you'll wonder how on earth you did without them so long.
Packard 56
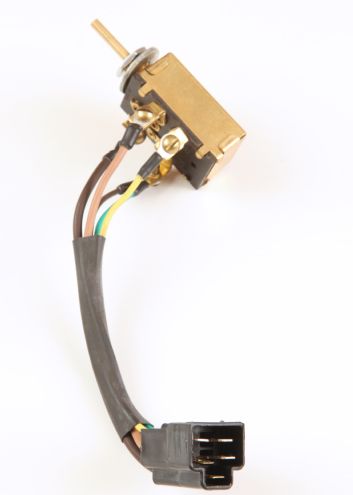
These housings come in a variety of configurations from plain in-line connectors to specialty connectors that correspond to various devices like sending units, flasher modules, ignition switches, alternator plugs, dimmer switches, and certainly most familiar, three-pin headlight plugs.
The terminals resemble those for Bosch-style relays in that one set of ears fold over the conductor and another over the jacket to affect a strain relief. For those who don't trust crimped connections, lay your fears to rest; when done properly they achieve better conductivity than a soldered connection (lead and zinc aren't as efficient as brass, but a crimp is direct) without the risk of overheating and crystallizing the conductor. The OEMs haven't soldered things in decades and the FAA bans it in all but a few specialized applications.
All 56-series connectors use ¼-inch blade-type terminals that can handle as much as 48 continuous amps yet are small and unobtrusive. They come in two-wire capacities: one for 14-to-16-gauge wire and another for 18-to-20-gauge wire.
Since they date to the '50s they're entirely appropriate for restorations and historically plausible on a period hot rod or custom (though unlikely at the time since the tools were once exceedingly expensive making them unlikely). The lack of sealing means they don't work well in damp locations so keep them to the engine compartment or interior. And they can be a real bear to connect and pull apart, especially when cold or in tight confines.
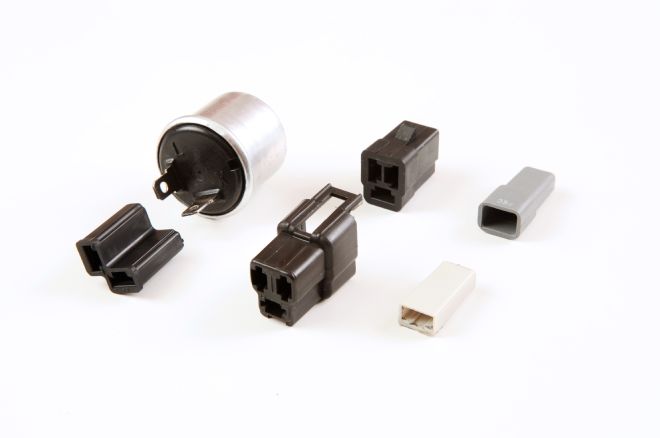
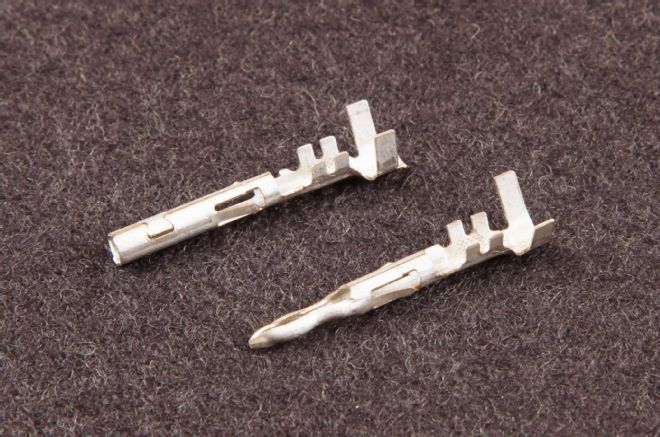
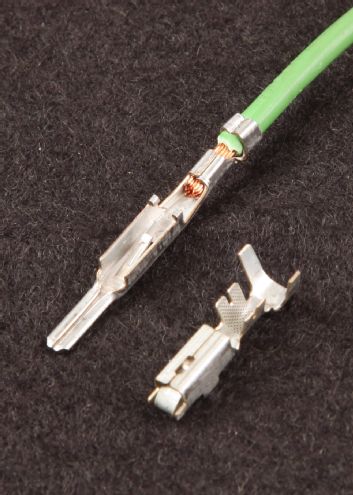
01 Packard Electrical Division made dozens, if not hundreds, of 56-series configurations. Shown here are one-cavity connectors, a stacked three-cavity connector, and a really handy flasher-module connector.
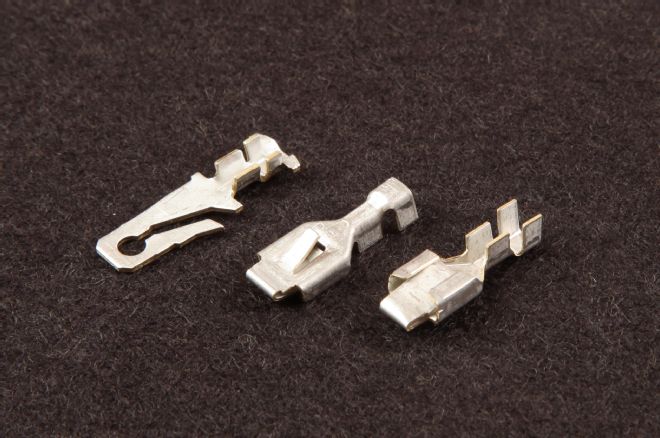
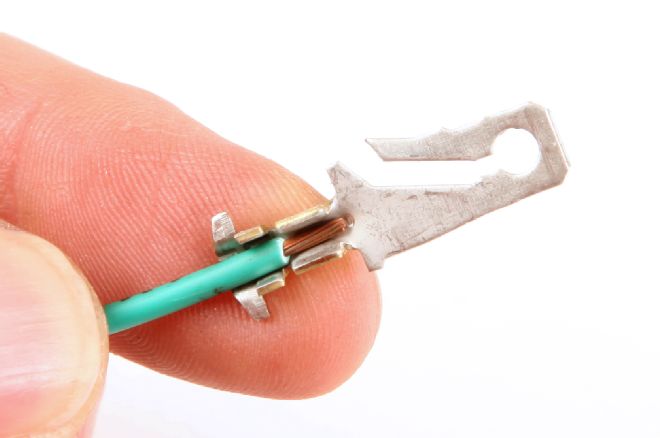
02 The female Packard 56 connector resembles a plain push-on terminal. The foreground female terminal shows the "wings" that fold over the conductor and jacket. The middle terminal shows the tang that locks the terminal into its connector. The background terminal is the male.
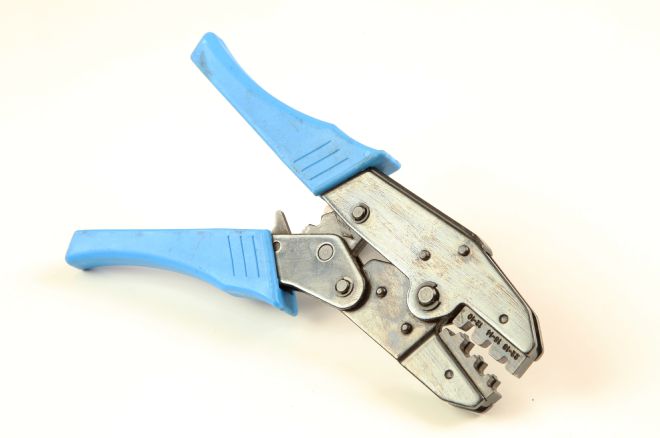
03 Ratcheting crimpers use compound leverage to affect a crimp far stronger than any stamped pliers can, necessary because the 56 terminals are thick. Their pawl won't release until they achieve a complete crimp. Del City stocks one that can be modified for 56 as part number 990168.
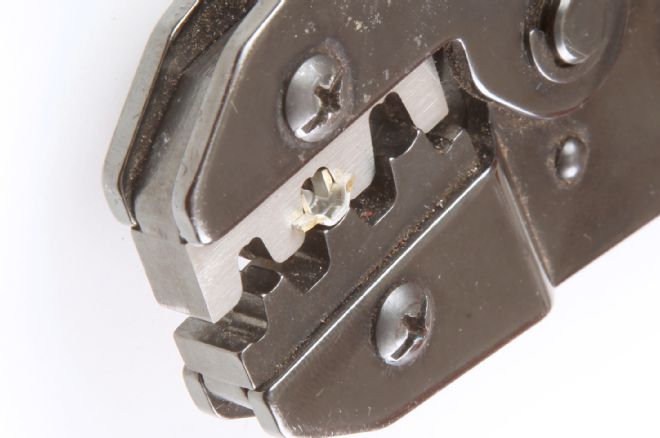
04 Purpose-made 56-series crimpers are rare and expensive when you find them. The 990168 crimp pliers officially crimp lighter terminals like those in relay sockets or pin-type connectors (like Molex) which have a shorter distance between the locating "wings." But the dies can be ground for clearance as shown here. Not difficult work.
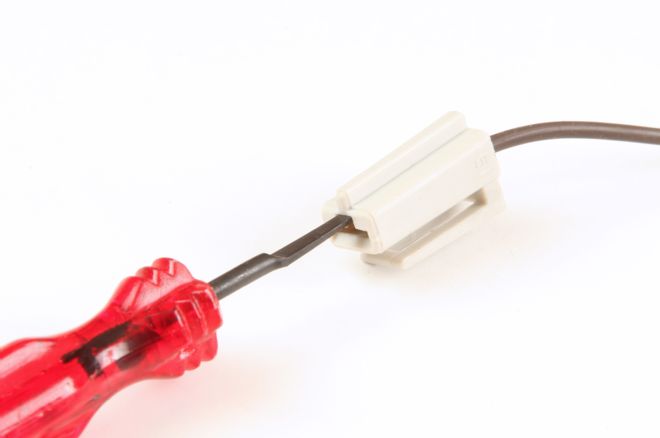
05 I find it easiest to set the terminal in the dies and then insert the wire, but it doesn't photograph well. Strip approximately 3/16-inch of jacket to expose the conductor and push it in the trough until the jacket bottoms on the primary crimp ears as shown here.
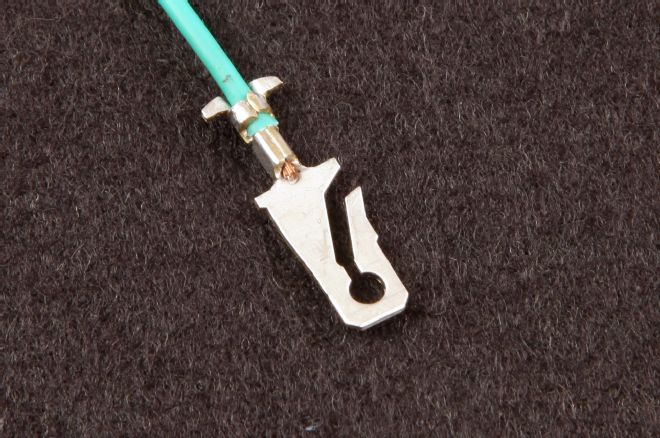
06 Once the wire fits properly in the terminal squeeze the crimp-pliers' handles until the tool fully closes and releases. Even with the compound leverage it takes a fair bit of pressure to affect a solid crimp. A proper crimp folds the tangs over the conductor and the insulation as shown here.
07 The terminals correspond with the connector gender: male with male and female with female. Tangs lock the terminals into their respective connectors. The tangs on the female terminals orient to the connector's notched side (shown here), but the male has no orientation.
08 It takes a small, flat-bladed tool to release a Packard 56 terminal from its connector. The correct one has a blue handle, but I make do with the smaller red one. It pushes in the groove for the female connector. Initially push on the wire as the tool goes in then pull when the tool seats.
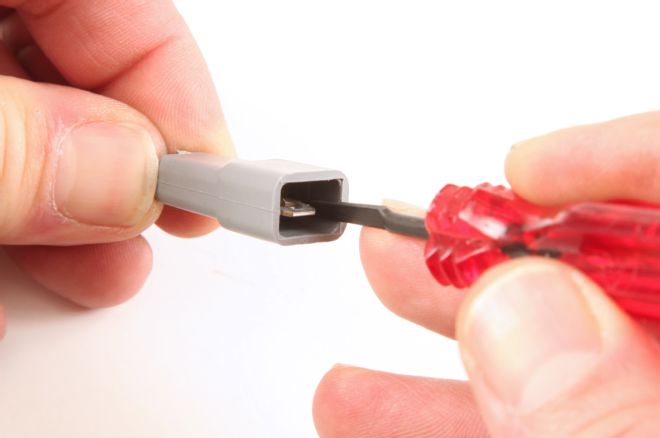
09 The same release tool or even a small screwdriver blade presses against the side of the blade tang to release the terminal.
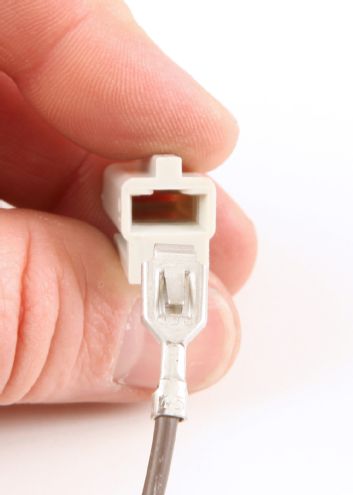
10 Connectors can make a harness come apart anywhere. It can also make a non-plug component removable as seen here. It's seriously nicer than making individual connections.
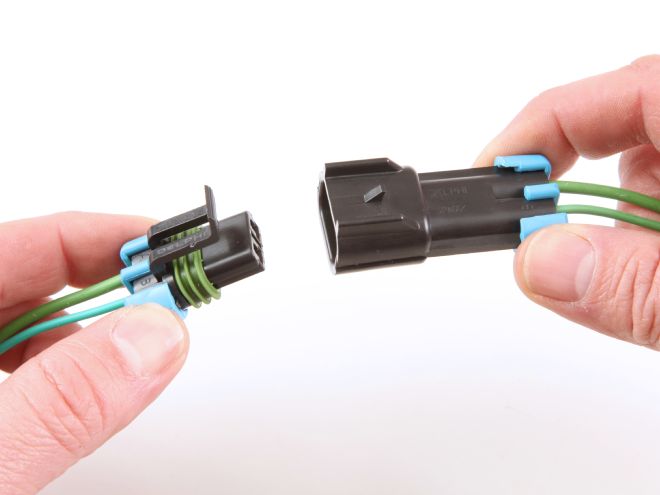
Weather Pack
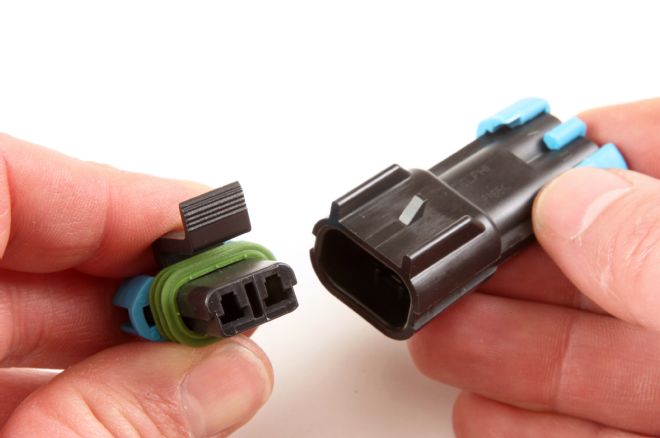
Packard 56 is handy for sure, but it has one fatal flaw: it doesn't protect the terminals from oxidation. So in the 1970s Packard Electrical Division created the Weather Pack, a connector system that, as the name implies, resists water and oxygen.
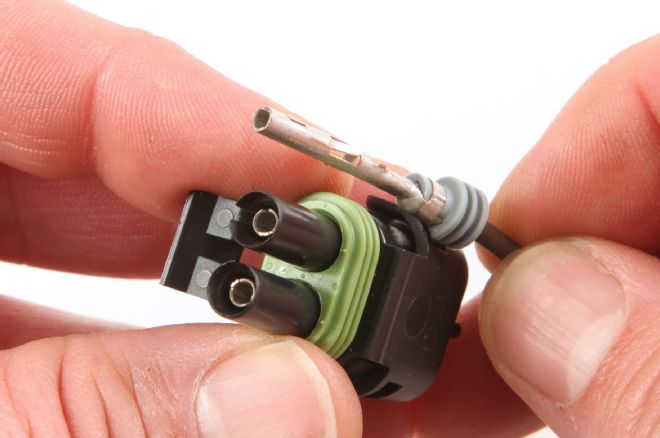
Packard/Delphi's sealed system uses two silicone seals, a large one on one connector body and small round ones where each wire enters the stations in each body. Like the 56 series, a pair of ears on the terminal fastens to the conductor. But in Weather/Metri Pack, a second pair of larger ears fastens the small round grommets, AKA seals, to the backside of the terminal.
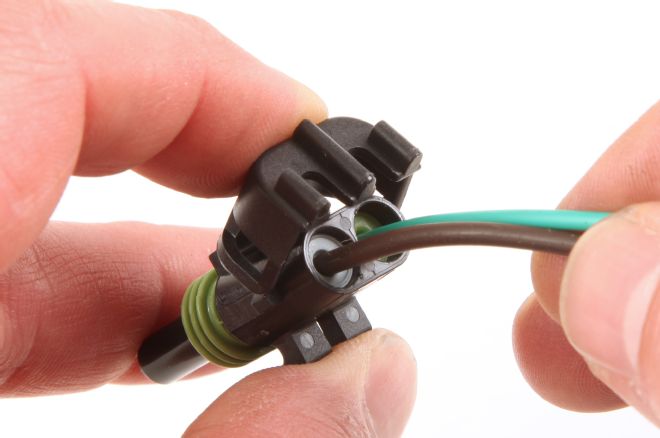
Though Weather Pack is a modular system, it achieved its weather resistance by sacrificing some of its utility. For the most part Weather Pack connectors are mostly exclusive to harnesses and connect to specific components in only a few applications, like the square, four-cavity plug on a 700-R4 transmission. The seal system also prohibits more than one wire from meeting a terminal. If you need to gang a pair of wires you'll have to do that outside the connector body.
Weather Pack's relatively small surface-contact area limits constant current capacity to 20 amps, less than half the capacity of Packard 56. But the design more than compensates for availability: every parts store across the country has Weather Pack service parts. And they're almost insultingly inexpensive if you buy them right.
11 Weather Pack connectors are available in seven configurations: from one to six cavities in a flat format and with four or five cavities in a stacked format (four for the 700-R4). Shown here are a two cavity and broad six-cavity connector. Each set consists of a tower (halves with green seals) and shrouds (no seals).
12 Here are male (foreground) and female Weather Pack terminals. The terminal selection in Weather Pack is pretty limited due to its relatively limited current capacity. Two sizes are available, one labeled 15 for 14-to-16-gauge wire and another labeled 20 for 18-to-22-gauge wire.
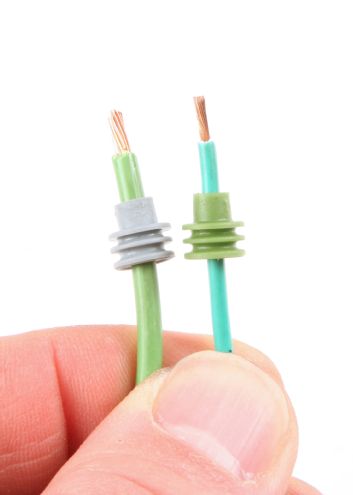
13 Weather Pack achieves its weather resistance with silicone seals on the towers and by these small silicone seals that slip over the wire insulation. They're available in several sizes, but due to the relatively limited wire-gauge range gray (14-to-16 gauge) and green (18-to-22 gauge) are the standards.
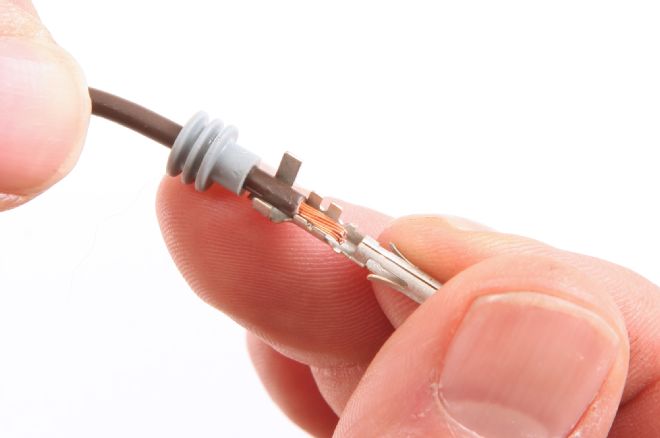
14 Slip a silicone seal over the wire with the fat side away from the terminal and push it back sufficiently to clear the terminal ears. Then strip approximately 3/16-inch of the jacket and push the wire into the terminal until the jacket edge catches the ears. Seal unused cavities with a cavity plug (not shown; Packard part no. 12059168).
15 Weather Pack uses an open-barrel design that uses special pliers. I abandoned my simpler tool for the modular system that PerTronix offers. It has removable dies, each of which crimps one of several terminal types. Like the blue-handled ones, these are compound levers that don't release until they achieve a complete crimp.
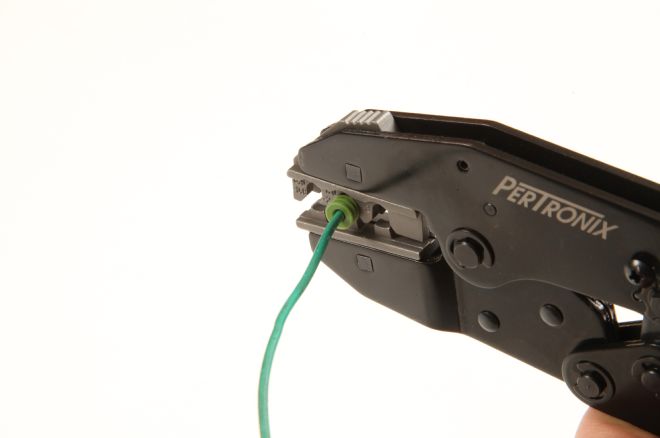
16 The primary advantage of these dies is their ability to crimp the conductor and the seal in one operation. I find it easiest to insert the terminal first then push the wire/seal into it.
17 Weather Pack terminals technically aren't gender specific; however, the tower (shown) best supports the female terminal and guides the male terminal into it. Open the hinged clip and push the terminal in until the tang clicks behind the ear.
18 Once the terminals seat in their respective tower or shroud simply fold over the retaining clip. The connectors are fully ready to use at this time.

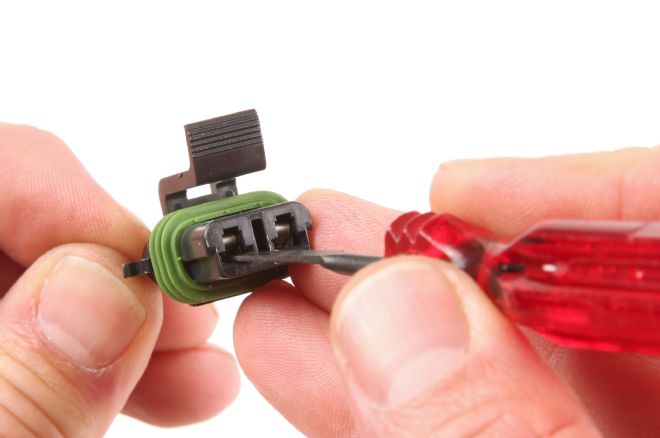
19 To disassemble Weather Pack connectors first undo the retaining clip. The Weather Pack release tool is little more than a thin-wall tube in a screwdriver handle. Simply push over the terminal while pushing on its respective wire until the tool bottoms. Then pull on the wire.
Metri Pack
Metri Pack represents Packard's second-generation modular connector. The company completely revised the terminal shape to flat blades and rectangular slots and standardized it to a metric format, hence the Metri part in the name.
Metri Pack consists of four common series: 150, 280, 480, and 630. The numbers correspond with the blade width: 1.5mm, 2.8mm, 4.8, and 6.3. Naturally the widths correspond to amperage capacity: 14 amps, 30 amps, 42 amps, and 46 amps, respectively. Most applications call for 150 and 280, but the information applies to 480 and 630.
Metri Pack also comes in a sealed and non-sealed version. The sealed versions use the same seals as Weather Pack. However, unlike Weather Pack, the terminals in the sealed system don't lock in with tabs. Nor do they have a clip that covers the wires where they emerge from each connector.
Instead, Metri Pack uses a separate plastic clip that fits in the backside of each terminal. Dubbed Terminal Position Assurance or TPA, this clip system keeps the terminals in place by pushing against the silicone seals. Each connector subseries in Metri Pack requires its own TPA and the clips vary by cavity count. Yeah it's more parts to stock, but the system really works.
The non-sealed Metri Pack series doesn't use the TPA system. Instead, each terminal has a tang that locks into the connector a lot like how Weather Pack does. Not every connector needs the sealing capacity, but it's probably more convenient and affordable to stock all sealed-type components than sealed and non-sealed. Anyway, the sealed and non-sealed connectors from a specific series plug into each other. About the only thing you'd need in non-sealed are terminals to plug into fuse panels. More on that in a minute.
Like Packard 56, Metri Pack is available in more applications than inline. In fact pretty much all GM electrical components from the '90s onward feature Metri Pack connections.
A few of the Metri Pack connectors have a little secret. The 280- and 630-series correspond with ATM (mini) and ATO/ATC fuse-blade width. What's more, Delphi developed a whole series of components to correspond with that standard. You've seen them if you've taken apart a modern GM car: the little blades on flasher modules and relays among other devices just happen to match the dimensions on an ATM fuse.
It's beyond the scope of this article, but there are standalone, modular fuse holders and panels that use the Metri Pack 280-series terminals. Maybe we'll show those one day. We'll show you what they look like at the end, though.
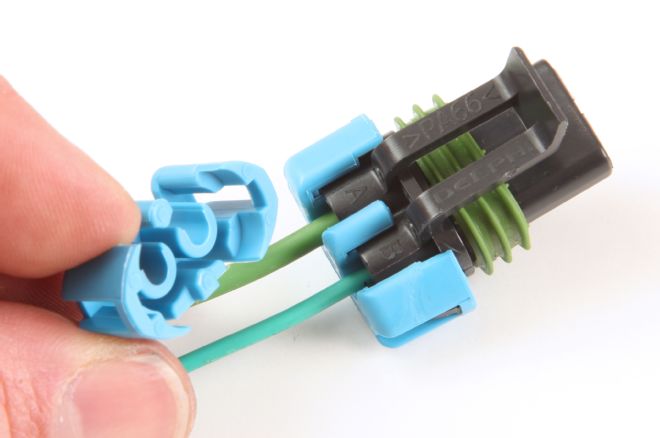
20 The Metri Pack 280 bears a passing resemblance to the Weather Pack. These are the components of a two-cavity connector.
21 The 280 comes in several gauges, the common ones being 10-to-12, 14-to-16, and 18-to-22. Non-sealed 280 terminals (background) don't use seals, but will work in sealed connector bodies. The non-sealed ones crimp like a Packard 56; the sealed ones crimp by the Weather Pack method. Again, seal the unused cavities with the Packard 12010300 cavity plug.
22 As with Weather Pack, the non-sealed 280 terminals lock into their connectors with a tang. It takes a small release tool much like Packard 56 to remove the latter. This red one is for really small Micro Pack 150s, but it works on 280.
23 The TPA clip pushes against the terminal's seal making Metri Pack really durable. The TPA clips on either way and removes with a flat-head screwdriver or even a release tool. It also reveals the cavity letters (A, B, C, and so on) regardless of its orientation.
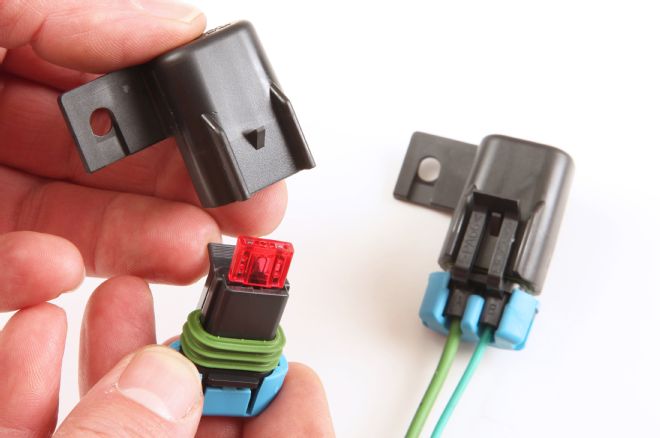
24 Here's a neat one. The two- and six-cavity 280 female bodies double as a fully sealed inline fuse holder. This shows the cap for the two-cavity female connector. It can mount with a #10 screw, but an optional clip is available. The same holds for the 630 series.