
Infusing style into an early post-war-styled hot rod is as easy as opening a dusty "lil' book" and peering deep to see what's pressed between the pages. Inspired metal fabrication can instill the feeling of speed into any hot rod.

The interior dash and door area of a Ford Model A are pretty basic, leaving plenty of opportunity to artistically alter its original configuration. To add just a dash of speed and style to the area, the team at the Rolling Bones Hot Rod Shop in Greenfield Center, New York, set out to blend the dash and door tops together with the sleek look reminiscent of those seen in '33-36 Ford roadsters. Working with a Brookville Roadster '29, the team began by adding plenty of momentum to its persona by installing a Sellers Equipped windshield and Brookville '32 Ford dash. This prior work included the removal of the stock eyebrow section of the body, which was reworked to accommodate the new windshield as well as peak to the back of the cowl being pie-cut and laid back.
Getting started, team member Matt Schmidt prepared the area to the side of the dash where he would create a mold for the first transition of rolling the dash into the door top. Using 2-inch masking tape, he covered the work area, since the tape would act as a perfect release agent for the mold once completed. After preparing a small amount of plastic body filler, he began to apply it to the area in gradual stages, allowing plenty of drying time between the layers. This step allowed Schmidt to fill the area and build it up in just the right places. Once the plastic had hardened, he followed with a combination flat and half-round file to sculpt the gradual transition from the dash to the beginning of the door top. When satisfied with the mold, it was carefully pried from its place and used as a visual guide to create the panel from steel. Schmidt proceeded with 22-gauge flat stock, cold rolled mild steel to fashion a filler piece. Using a pair of metal shears, he cut out the piece, making sure it was larger than required to allow for needed trimming in obtaining the exact shape. To add a graceful bend to the steel, Schmidt worked with a sandbag and a curved dolly while test-fitting the piece to the dash numerous times till the exact transition was found. With the basic shape attained, he trimmed the piece for a better fit using metal shears and continued with a number of body hammers to establish the correct contours to the end of the dash.
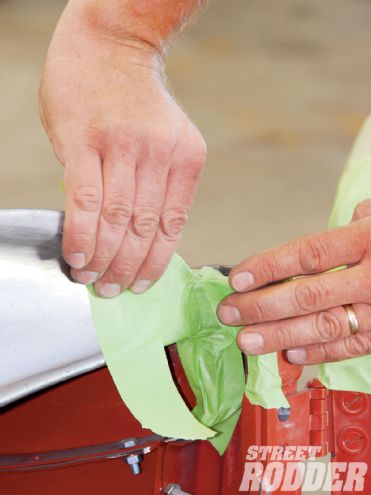 Matt Schmidt, of Rolling Bones Hot Rod Shop, uses 2-inch masking tape applied to the end of the dash and windshield post area. This acts as a release agent for the upcoming plastic mold.
Schmidt forged on to stretch the steel to create some needed compound curves using a homespun anvil anchored in a bench vise while working the filler piece with a blunt point and finishing hammer. Once satisfied with the piece, he used his Millermatic MIG welder to anchor the piece. Wearing eye protection, the welds were then ground smooth using an air-driven disc grinder topped with a 50-grit disc followed by a die grinder.
With the transition piece from the dash completed, Schmidt focused on the gradual sweeping flow needed to bridge this area to the door top. Working in the same fashion used to create the initial dash end mold, he proceeded with tape and plastic filler to design the transition atop the door. Using this as a guide, he selected a 4-foot section of 1-3/4-inch steel exhaust pipe to act as a solid base. After bending the pipe to match the factory curve of the door top, he marked it for trimming and where it needed to be split open to begin the shaping process. While anchored in a bench vise, he used an air-driven cutoff wheel to make the initial incision to split the pipe section open. Using an anchored flat dolly, Schmidt proceeded to open up the pipe by hammering both of the separated sides flat with a rubber hammer from front to back. This prevented the pipe section from becoming dented during the process. To open the pipe even further, he used a pair of duck-billed Vise-Grips parallel to each other to additionally stretch the section open. As the pipe changed its shape, Schmidt checked the section to the door top numerous times to ensure the curve to the top of the pipe did not become distorted. This is a gradual process that takes plenty of time to get right.
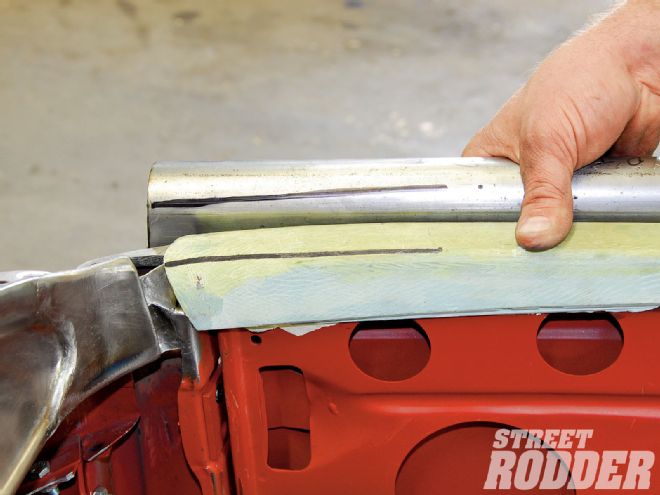 Similar to the plastic mold of the dash, one was also crafted for the door top. The steel filler panel is being compared to the molded unit for continued fabrication in the shaping stage. The guide line marks where the door top contour will meet the corner of the dash.
Once comfortable with the fit to the door top, it was time to begin forming the forward end (which will meet the dash filler piece) to add the needed graceful curves and form the transition. For this step, Schmidt used various anchored dollies to gradually stretch the steel while adding curves and depth through the use of a number of body hammers with different ends. Again, this is a process that takes time, working the steel and placing the filler piece atop the door countless times to aid in its shaping to create just the right contour.
Once satisfied with the overall shape, Schmidt first reinstalled the Sellers Equipped windshield and then marked the exterior of the new door top with masking tape to show a delicate sweep from fore to aft. He cut the excess metal off using a plasma cutter and ground the edges smooth with a small disc grinder. Wanting to achieve the correct contour for the inside curve of the door, a relief-cut was made using a disc grinder to the inner top edge and it was rolled inboard. Focusing on the inner portion of the door top, a masking tape line was run from the end of the dash filler piece rearward to follow a gradual tapered line. The door top was then removed, trimmed with a plasma cutter, and its edge ground smooth with a disc grinder. Knowing that interior panels would need an anchoring point, Schmidt marked a "fold-line" on the door top, which would need to be bent inward toward the door. Since this was a compound curve, to accomplish the bend a number of relief cuts were marked and carefully cut using an air-driven cutoff wheel with the piece in a bench vise. With the curve intact, Schmidt used a flat anvil secured in a bench vise to bend the tabs over to the correct angle. After test-fitting the door top in place, it was again removed for the tabs to be MIG welded together. It's imperative to allow ample cooling between the welds so as to not distort the steel. A disc grinder was used to smooth out all of the finished welds. Once a few remaining filler pieces were fashioned and added to the front inside top hinge area of the door, the new door top was welded into place and all welds were ground smooth with a disc grinder topped with a 50-grit disc. The completed job added newfound personality to the interior of the Model A by incorporating plenty of sleek styling with the flow of the '32 Ford dash into the door tops.
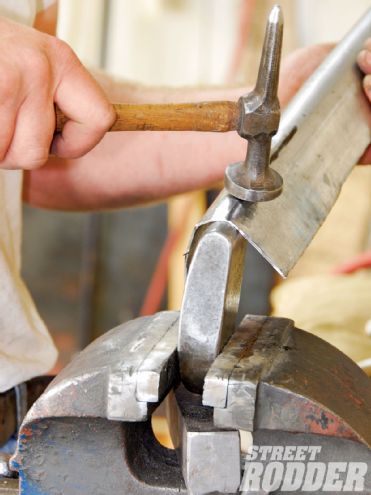 With a variety of anvils and hammers, reshape the steel pipe to form the proper contour for the top of the door as it transitions to the end of the dash. Take your time to achieve just the right lines.