At times manufacturers blessed cars and trucks with instrument panels that rival fine clocks. The trouble is that many of these panels were developed in the automobile's adolescence when things like an engine's vital signs hardly factored. The low state of tune at the time meant that oil pressure and water temperature gauges rarely read any more than high or low or hot or cold, and even rarer did they do that very accurately.
Modern engines or early ones tuned for more output usually operate in ranges that far exceed those original gauges' capacity. Nowadays companies specialize in retrofitting old gauges with modern movements and re-screen their faces with modern scales but not even that is without flaws. The inexpensive retrofits pierce the veil of suspended disbelief (they look obvious) and the faithful looking ones often cost thousands of dollars. And for good reason, quality is expensive.
We swear we're not bashing retrofits but they fall short in another very critical cultural way that no money can address. During the Golden Age of the hot rod and custom car nobody ever dreamed of retrofitting an old gauge with a new movement and scale. They resorted to the familiar and more often than not they hung mass-produced accessory panels below their dashes and filled them with aftermarket gauges. So from a historical perspective a car built to appear as if it was a hot rod for 60 years isn't authentic unless it has at least a few aftermarket gauges in a panel under the dash.
Of course that isn't without flaw either. We've grown far more discerning over the years. Even when we faithfully build a vintage-themed hot rod or custom we do it to a far finer degree than our forebears ever did. So in an ironic twist, a mass-produced accessory panel hanging from a dash of a really high-quality car pierces the veil of suspended disbelief. Suddenly something that's so faithful to the past looks oddly cheap and out of place. Sigh.
This is where a really creative person will observe that it's not necessarily the idea of a panel that fails as much as what that panel represents. Mass-produced accessory gauge panels look out of place because they look too undifferentiated. They rarely fit because they look as if someone bought a part anyone else could buy and bolted it to a very specialized vehicle.
But if you build a gauge panel with the same passion and style that built the rest of the car then it will magically take on an air of authority. Bear in mind that building a part with the same passion and style as the rest of the car doesn't necessarily translate to trying to make it appear as if it's a factory part. That would defeat the whole idea of an accessory panel and gauges. And it would be dishonest: We've seen dashes enough times to know when something is out of place. There's a fine line between a handcrafted part and an imposter.
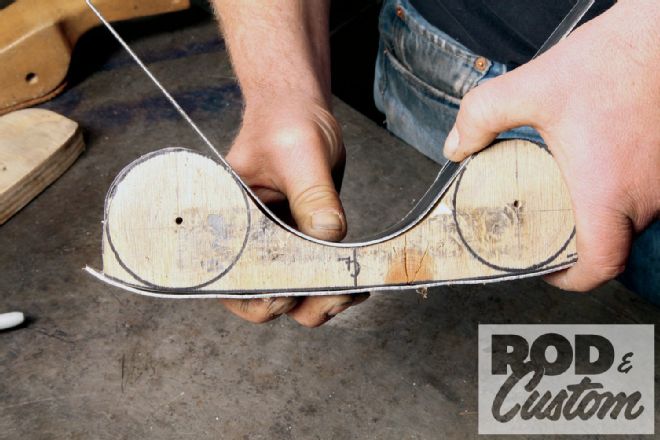
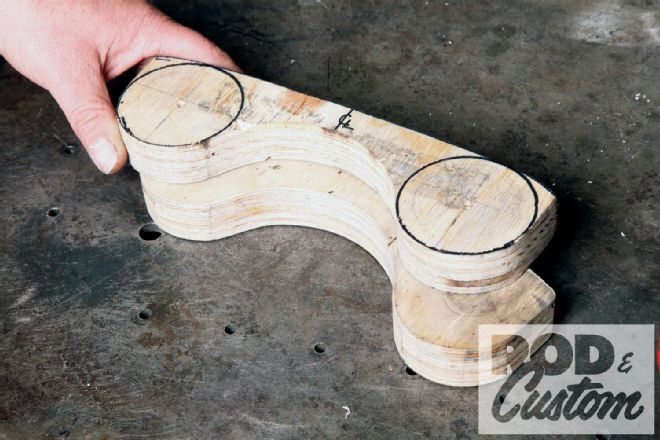 1. Marshall Woolery began by creating a chipboard template that follows the dash’s lower edge yet still lets the shifter swing up in Reverse and Second. He shaped it to take two 2 1/16-inch gauges, then cut two copies from plywood.
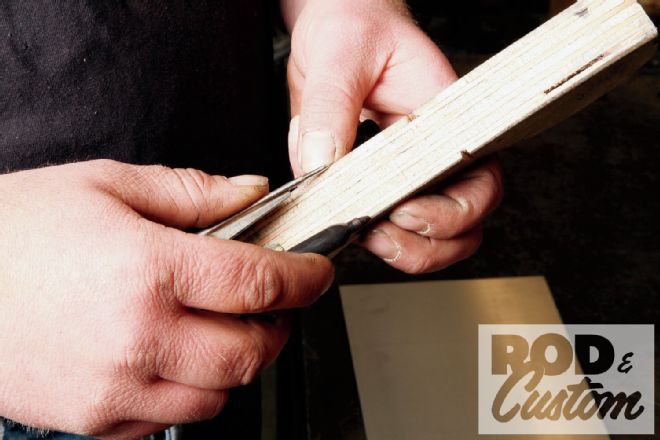 2. He needed to transfer the ply thickness to an aluminum sheet but instead of measuring he simply set his homebrew marker protractor to the dimension.
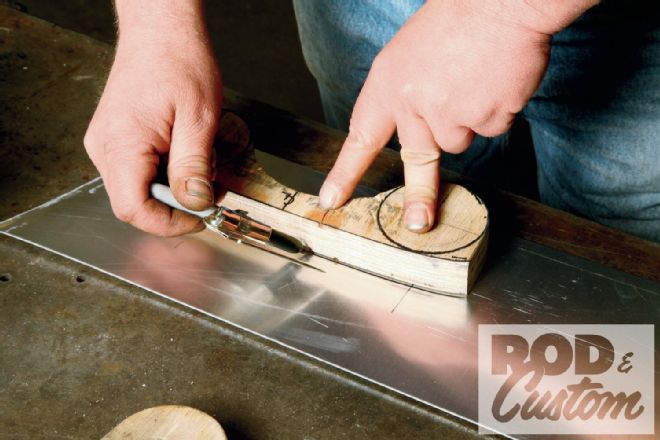 3. Woolery first transferred the form’s shape onto the aluminum sheet. For this he’s using 0.063-inch-thick 3000-series material.
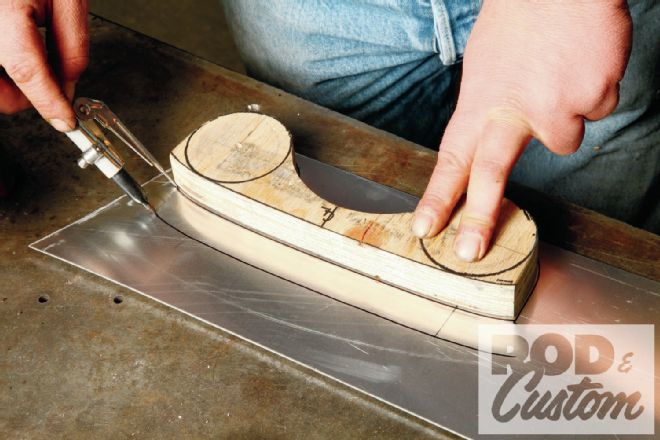 4. Then he flipped the protractor around and, using the dimension that he set his homebrew protractor at, scribed the flange dimension across the panel’s topside.
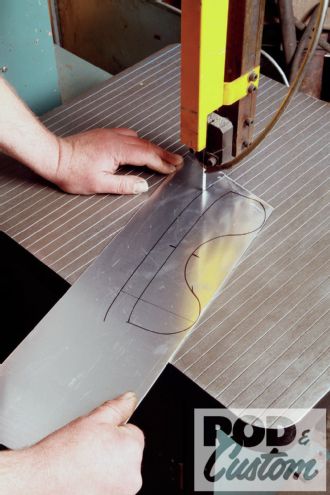 5. A bandsaw makes short order of a complex cutout but nothing says you can’t use tin snips. If you do, remember to first cut about a 1/4-inch wide of the mark. That way the chip will curl out of the way as you cut.
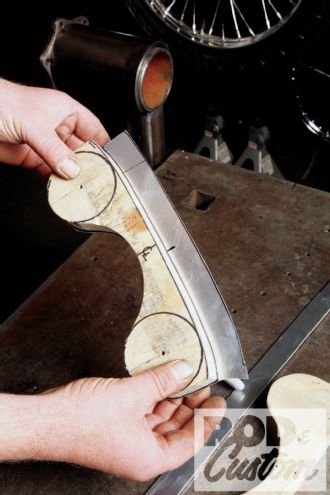 6. Here’s how the sheet fits between the forms: completely obscured except for the flange across the top.
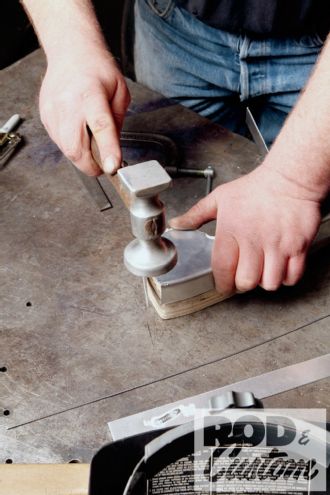
 7. Woolery folded the edge in multiple light blows, each pass bending it a few degrees. Resist the temptation to just lay it over in a few strikes; it’ll pucker and distort the edge.
 8. Exercise patience and the edge will fold over perfectly, as seen here. Note that a conventional low-crown body hammer would do the trick too.
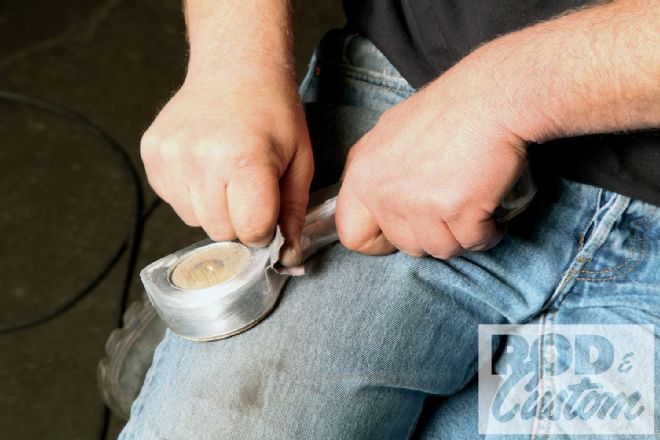
9. Woolery sheared a strip approximately the thickness of one plywood form. He then bent it by hand to conform to the coved shape. Compensate for the spring-back by bending it slightly more than necessary.
10. He clamped the strip to the form and tacked the edge from the center outward. He had to re-position the clamp as he progressed to make the edge lay flat.
8. Exercise patience and the edge will fold over perfectly, as seen here. Note that a conventional low-crown body hammer would do the trick too.
9. Woolery sheared a strip approximately the thickness of one plywood form. He then bent it by hand to conform to the coved shape. Compensate for the spring-back by bending it slightly more than necessary.
10. He clamped the strip to the form and tacked the edge from the center outward. He had to re-position the clamp as he progressed to make the edge lay flat.
 11. He continued tacking along the outside radius. Note the clamp’s new position. Maintaining a tight fit will improve the edge quality considerably.
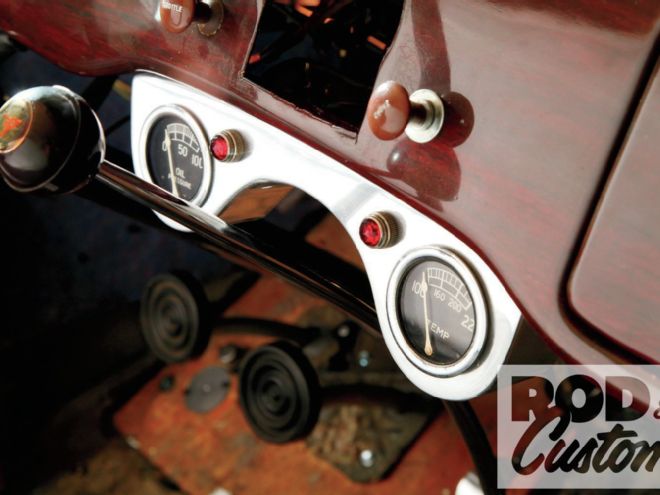
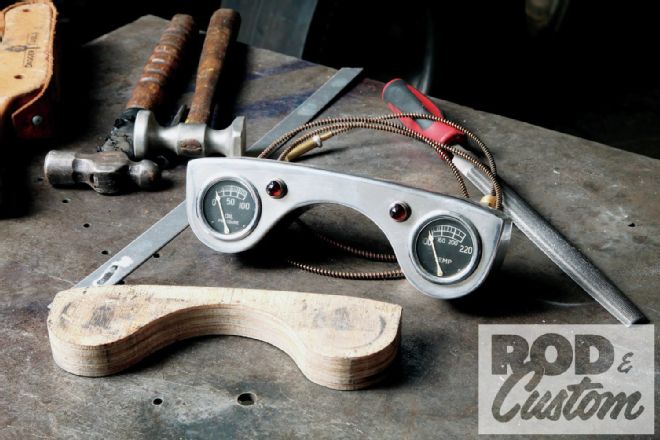
To show us how to walk that fine line is our pal Marshall Woolery. One of his customers has a 1936 Ford that bore a 1950s hot rod treatment yet lacked an appropriate gauge treatment. So he solved it by crafting an instrument cluster that at once respects the car and honors tradition.
Among other things this thoughtful panel takes advantage of otherwise unused space: the divot taken out of the dash to accommodate the shifter in Reverse and Second gear. That it fits that space and still accommodates the shifter makes it more sophisticated. That it matches the car's general shape and style without trying too hard to fit it in makes it authentic in a way. It's a custom part in a custom car and it makes no apologies for standing out just a little bit.
He used a very simple hammer-forming technique to form the panel. It's a process within the grasp of most enthusiasts. As the photos show he sandwiched a sheet between two wooden bucks and hammered over the edges—who with a saber saw, a vise, tin snips, and a collection of inexpensive body hammers couldn't do that? He used aluminum for its willingness to form with minimal effort but for those who lack a GTAW welder or the skill necessary to acetylene-weld aluminum could use steel with the same effect. For that matter one could form the panel and call on a pro or a well-practiced friend to weld up the seams. In that case exploit the easy-forming nature of the aluminum. It's much easier to shape.
Aluminum also has the advantage of an appealing natural finish (most people mistake it for a casting). It would be a shame to cover up aluminum but steel naturally requires a plating painting process. For paint we recommend a wrinkle finish: black for availability or brown for an Eisenhower-era field-radio appeal.
However you decide to finish it, a hand-made accessory gauge panel has a presence that no universal part can ever match. Plan it right and it'll take on a quality like a fine clock, a piece of functional jewelry that you can say you made.
 12. Woolery marked where the strip meets the upper mounting flange. After trimming the strip he’ll weld it to the flange. But not before the next step.
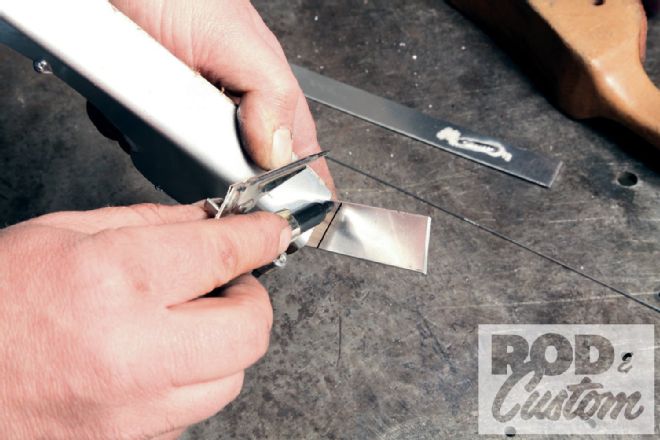
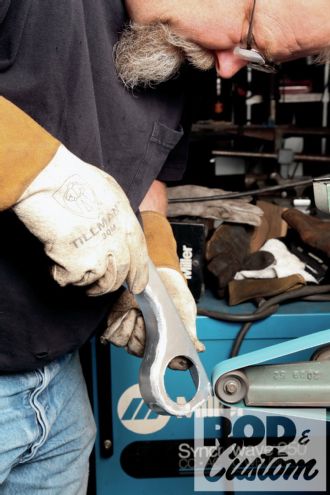
 13. This shot shows two things. For one it shows how the strip looks when trimmed. For another, it shows how the top flange puckered at the corner from trying to conform to a compound curve. He sawed through the pucker’s peak.
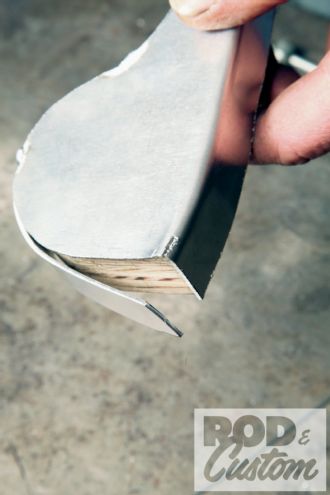
 14. The sawed pucker lays right down with a few hammer blows. Note that he used the form as the dolly.
 15. Woolery then reset the clamp and finished tacking the edge.
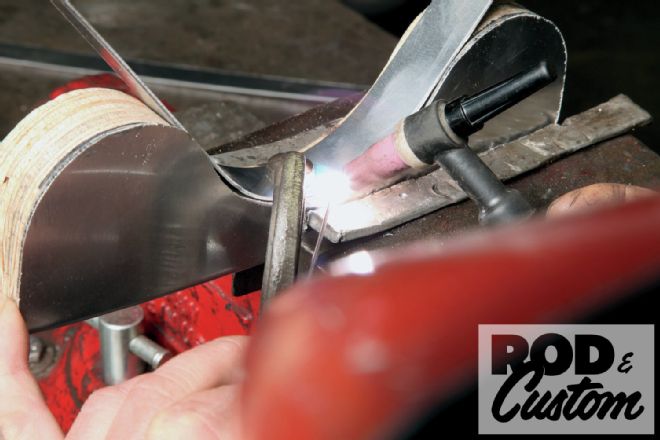
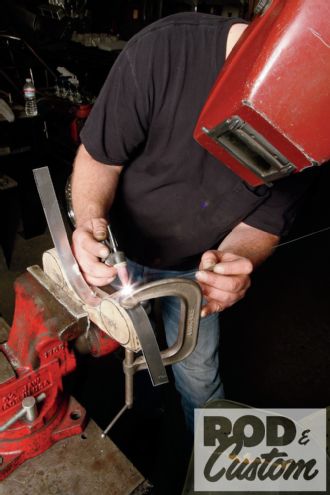
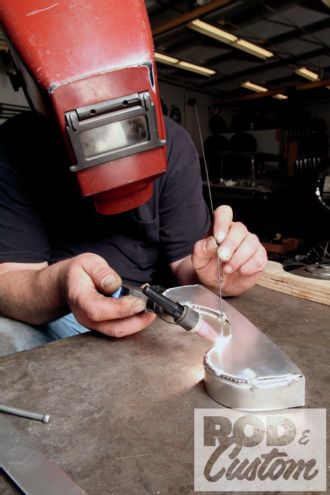 16. Once finished tacking, Woolery welded up the entire edge. He skip welded—interrupted his bead and restarted elsewhere—to prevent overheating the piece.
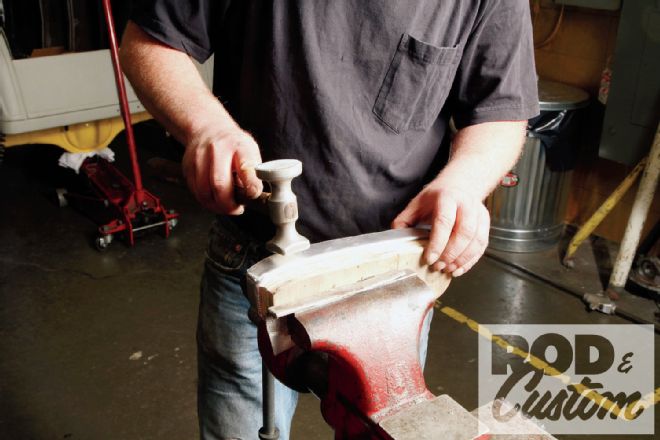 17. Though formed to the form’s profile, the top edge doesn’t always lay perfectly flat the first time around. Woolery chased the humps and waves that remained.
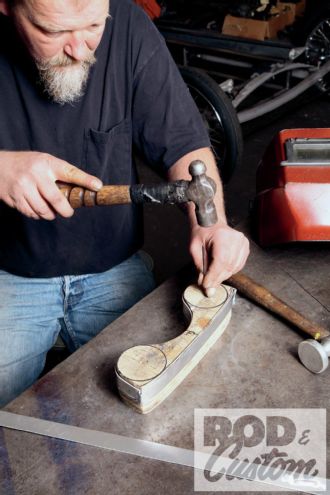 18. Woolery drilled through the points that served as the compass pivots for the gauge circles. He then used a transfer punch to mark the holes’ locations in the panel. It’s a good idea to mark the actual gauge-opening dimensions on the panel itself.
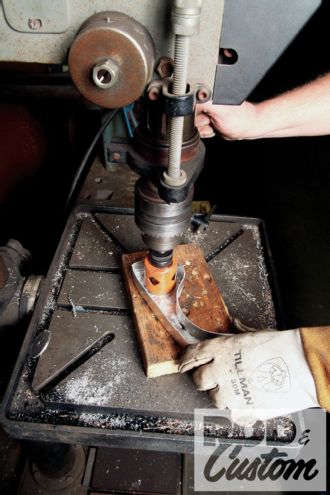 19. From there he cut the openings with a hole saw. Hole saws cut imperfect openings so use a smaller-than-necessary saw and hand file the holes to the right diameter.
 20. He then ran a belt sander over the welded seams. Remember, a softer edge will make an aluminum part appear as if it were sand cast. A sharp edge often appears made up or die cast.
 21. A belt sander removes material quickly but at the price of precision. So Woolery finished the shaping work with a file. Raking a file like a sanding board across a body panel will remove inconsistencies.
 22. He finished the job with a few strips of emery cloth. Fingertips conform to the shapes, which helps blend machine marks and make the surface appear more organic.
 23. A short spell on the polishing wheel coaxed a respectable shine from the surface. Again, resist the urge to perfect the finish. Perfect surfaces look cold and manufactured and call attention to flaws in the surfaces around them. Had you not seen the preceding, you couldn’t tell when this was made, much less how—you’d swear it’s cast.