How to make this . . . Look like this in less than a day
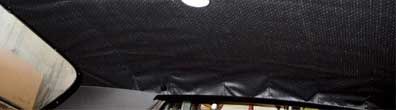
Of all the flaws common to a thirty-year-old car's interior, there is probably no more annoying problem than a sagging headliner. Sure, it looks bad, but even worse, a damaged headliner is a huge distraction to the driver; it can cause the driver to rip the headliner from the car in a fit of rage, depositing dry asbestos insulation into the driver's eyes, and sending the car careening into a kindergarten playground . . . Well, maybe we're getting carried away, but a sagging headliner does look bad and is easier to fix than you think. Even if you've never tackled a headliner job before, you should easily be able to accomplish the task with less than a day's work and common hand tools.
The headliner in our '71 Road Runner is typical of headliners found in most Mopar musclecars. It is constructed of fabric and is supported by metal rods or "bows" that keep it tucked against the roof of the car. The edges are held in place by glue and the interior trim. Over time, it's common for this style of headliner to show wear. The glue dries up and loses its adhesive properties; the fabric becomes dry rotted and brittle, tearing at even the slightest touch. The resulting rips and holes in the headliner expose the insulation underneath, which then is free to drop from the ceiling, covering driver, seats, and carpet in a layer of asbestos (ok, fiberglass) dust. While the health risk is questionable, the resulting mess is unavoidable and detracts from a car's appearance.
How do you fix it? Easy, order a new headliner, a bottle of glue, and replace it. We found everything we needed in Year One's catalog and also decided to replace our side panels, sun visors, and package tray at the same time we replaced the headliner. We suggest you carefully inspect the items adjacent to the headliner and replace or refurbish them at this time. Worn or discolored trim next to a new headliner can look just as bad as a worn headliner.
Your headliner will probably arrive as ours did-folded up in a small box. Don't worry about the creases in the fabric caused by the folds. Parking the car in the warm sun a few times after the installation will smooth the wrinkles nicely. Also, don't worry if the headliner seems too big, most headliners are manufactured larger than they need to be so you'll need to trim the edges during the installation. If it's too small or the wrong color, however, you probably have the wrong headliner so check your part number. When we ordered our headliner, we discovered an interesting fact: B-body cars in 1971 came with either a four-bow or six-bow headliner. we had to count the metal bows in our original liner (ours had six) prior to placing our order. If you have any questions when ordering your headliner, the staff at Year One is well equipped to help. These guys are the original aftermarket suppliers of restoration equipment, and there's a good chance they've worked on a similar project.
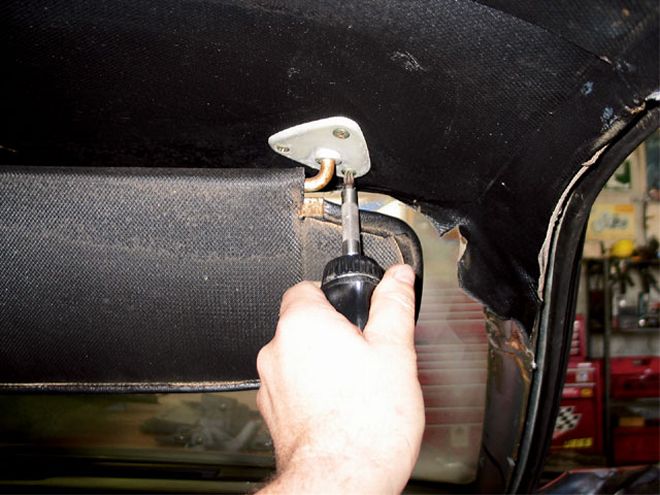 After removing the plastic A-pillar trim, we remove screws holding the sun visors and the rearview mirror in place. Again, pay attention to the location of these items. We'll have to find all the fastener holes by feel during re-installation, so getting a mental (or better yet, digital) picture of the location of these items will be an advantage.
Out With The Old
Removing the old headliner is a fairly easy task. If your headliner is old enough, chances are there's not much left to remove. Ours was tattered and dry, tearing easily as we took it out of the car. The combination of fabric dust and dry insulation underneath necessitated safety glasses and a dust respirator be worn while performing the job. The interior of our car was removed, which made the job easier, but it can be performed with most of the interior intact. If you're replacing the headliner while leaving the seats and carpet in the car, we suggest covering them with sheets to make the clean-up easier. All of the trim around the windows needs to be removed, as well as the rearview mirror, sun visors, clothing hooks, dome light, and shoulder belts if your car is so equipped. A Phillips screw driver is all you'll need to remove everything but the shoulder belts, which require a 131/416-inch socket or wrench. With the trim and accessories out of the way, the edges of the headliner can be pulled away from the metal roof of the car. The headliner is held in place at the sides with glue, and in the front and rear with a combination of glue and metal hooks stamped into the roof structure of the car. The glue has usually lost its adhesive properties, and the headliner should pull right out, but if not, a heat gun will aid in the process. Once the edges are loose, simply flex the metal bows out of their holes or retaining clips, and the headliner can be removed as one unit. If the headliner is badly damaged or nonexistent, be sure to keep track of each bows location as they are likely different lengths.
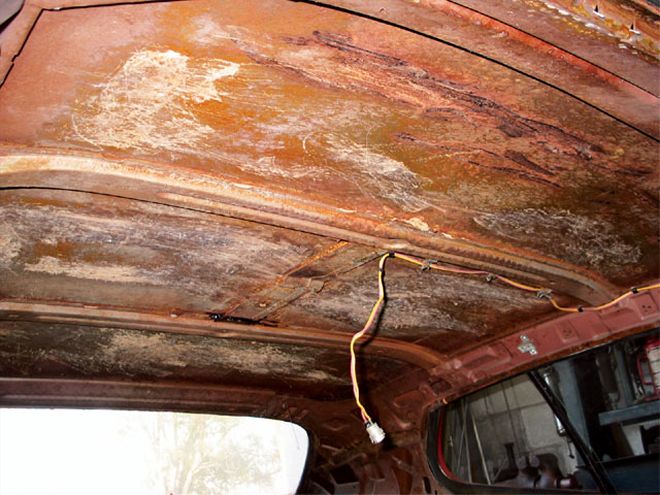 With the old liner removed and the insulation scraped away, this is what we have. It's common to see some surface rust on the bottom side of the roof, which can be treated with a rust inhibitor. Excess glue should be removed by using a scraper and a heat gun. Tough deposits can be freed by wiping with Naptha or another suitable chemical cleaner. Now we're ready to install our new headliner.
In With The New
With our old headliner removed and our car's ceiling cleaned up, it's time to begin our installation. It helps to have an area big enough to lay out the old and new headliner side-by-side while transferring the bows from one to the other. As stated, the new liner will be larger than the old and will have to be trimmed to fit. We also had to trim the ends from the bow retainers sewn into the new headliner. The old headliner can be used as a template, or just trim equal amounts from each end until enough bow is exposed for installation. With the bows installed, the headliner is hung and final fitting can be accomplished. We secure the liner front to rear first, then pull the sides tight. Once fitted, glue is applied both to the back of the headliner and to the metal surface it will bond to. We begin by stretching the liner and gluing front to rear, then pull the sides tight and glue them. The metal tabs will hold the liner in place in the front and rear, clamps will have to be used on the sides. Once the headliner is glued into place, the trim and accessories can be re-installed. If your parts are in good shape, simply bolt them back in, ours were showing wear so we cleaned and painted most of the items, then we installed new visors, rear side panels, and a new dome light lens. When finished, our interior had the look and smell of a new car. You won't be able to get all of the wrinkles or creases out of the new headliner during installation, but don't worry, the fabric is pliable and will smooth right out after a few days in the sun.